Sitecom X5 N600 Bruksanvisning
Läs nedan 📖 manual på svenska för Sitecom X5 N600 (61 sidor) i kategorin Router. Denna guide var användbar för 5 personer och betygsatt med 4.5 stjärnor i genomsnitt av 2 användare
Sida 1/61

WLM-5600
User Manual

Table of Contents
Introduction .......................................................................................................... 3
Key Features ......................................................................................................... 4
Package Contents .................................................................................................. 5
Cautions ............................................................................................................... 6
Product Layout ...................................................................................................... 7
Network + System Requirements ............................................................................ 9
Setup your Router ................................................................................................10
Setup your Computer ............................................................................................11
Login to your Router .............................................................................................14
Configure your Internet connection .........................................................................15
Status .................................................................................................................18
TOOLBOX ............................................................................................................42
Addendum A: USB Port Control Center ....................................................................49
Addendum B: Declaration of Conformity ..................................................................60
Revision 1 .1
© Sitecom Europe BV 2015
Note: All the information contained in this manual was correct at the time of publication.
However, as our engineers are always updating and improving the product, your device’s
software may have a slightly different appearance or modified functionality than
presented in this manual.

Introduction
Congratulations on your purchase of the WLM-5600 Wireless ADSL2+ Modem. This
modem is fully compliant with 802.11a, 802.11b, 802.11g and 802.11n. This modem
provides the best performance when used in combination with 802.11n client adapters.
The WLM- is not only a Modem or Wireless Access Point, but can also be used to 5600
connect wired Ethernet devices at 10/100/1000 Mbit speeds.
For data protection and privacy, the WLM- can encode all wireless transmissions 5600
with WEP, WPA or WPA2 encryption. By default, the modem is secured with a WPA2
(AES) encryption key. (The WPA2-key is printed on the label underneath the modem.)
With a built-in DHCP Server & powerful SPI firewall the WLM- protects your 5600
computers against intruders and known Internet attacks, and also provides safe VPN
pass-through.
With Sitecom Cloud Security, Sitecom goes one step further and ensures that you can
surf the Internet even more safely, not only on your PC, but on all the devices in your
home which you use to access the Internet. It does not matter whether you surf the
Internet on a laptop, a tablet, a mobile telephone or your television. Thanks to the
security that is integrated in the router, all the Internet devices in your home are
protected against the dangers of Internet criminality.
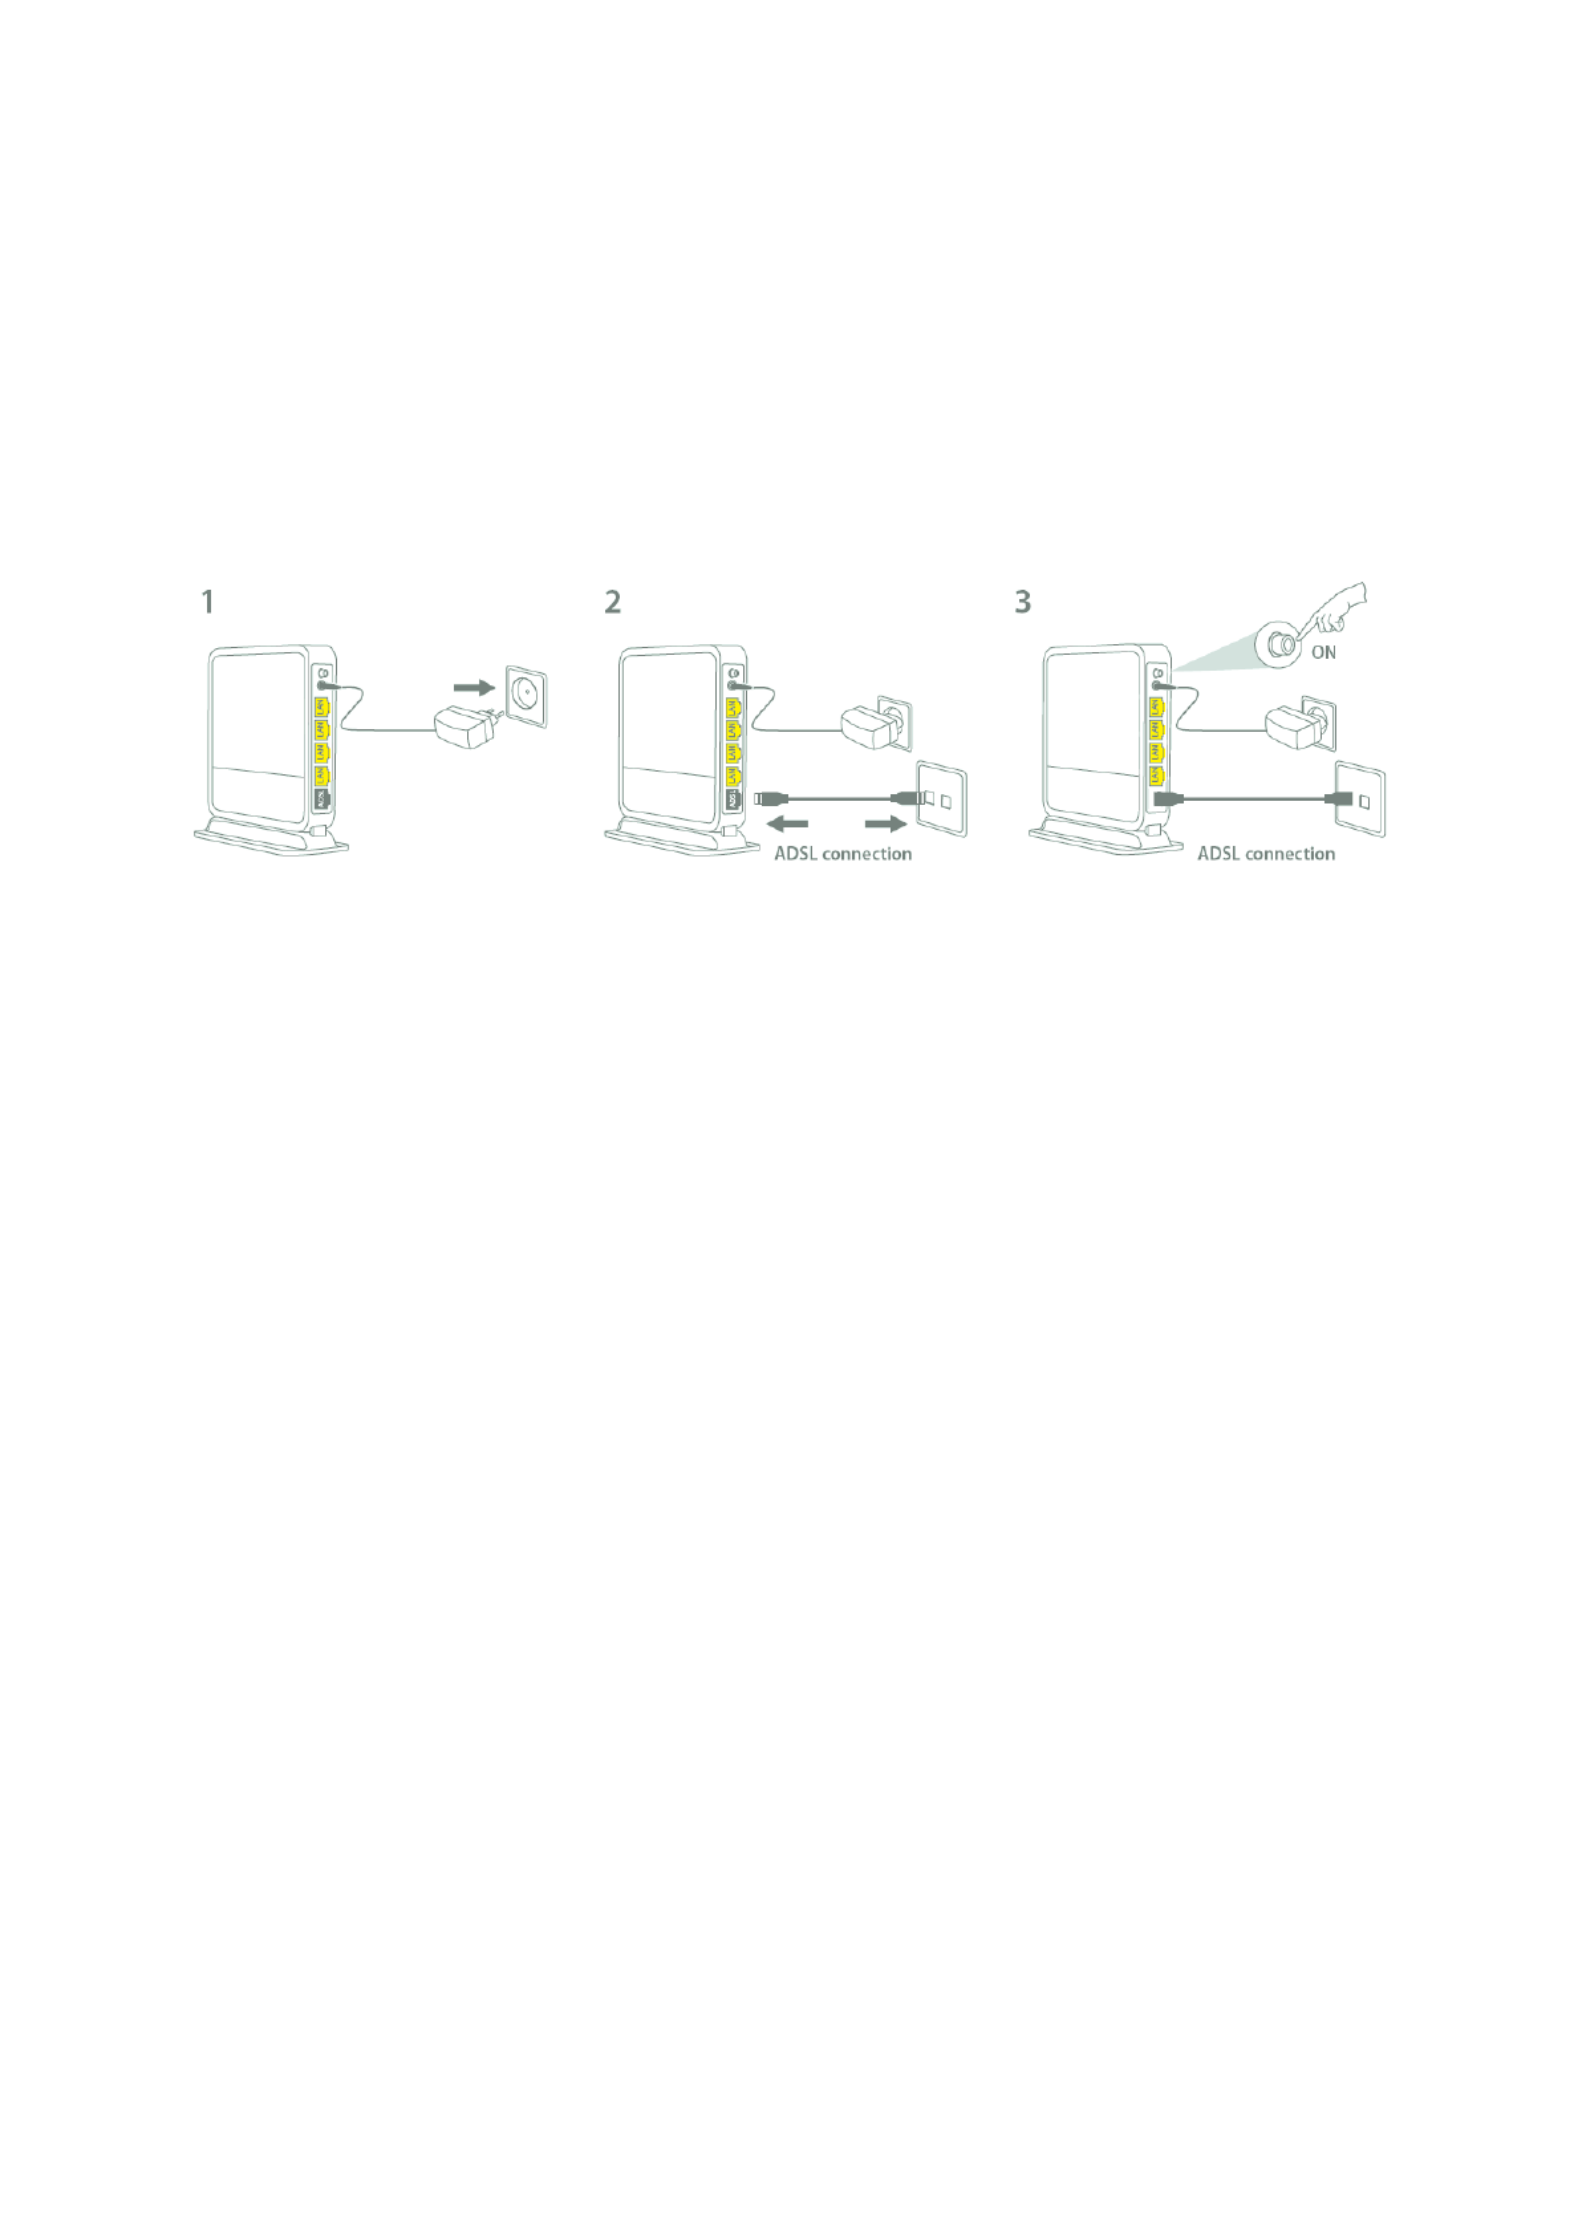
Setup your Router
You can place the router on a desk or other flat surface, or you can mount it on a wall.
For optimal performance, place your router in the center of your home (or your office) in
a location that is away from any potential source of interference, such as a metal wall or
microwave oven. This location must be close to a power connection and your ADSL
connection.
Connect the supplied power-adapter to the power inlet port and connect it to a wall
outlet. Switch the router on by flipping the switch on the back of the device. The router
automatically enters the self-test phase. During self-test phase, the Power LED will be lit
continuously to indicate that this product is in normal operation.
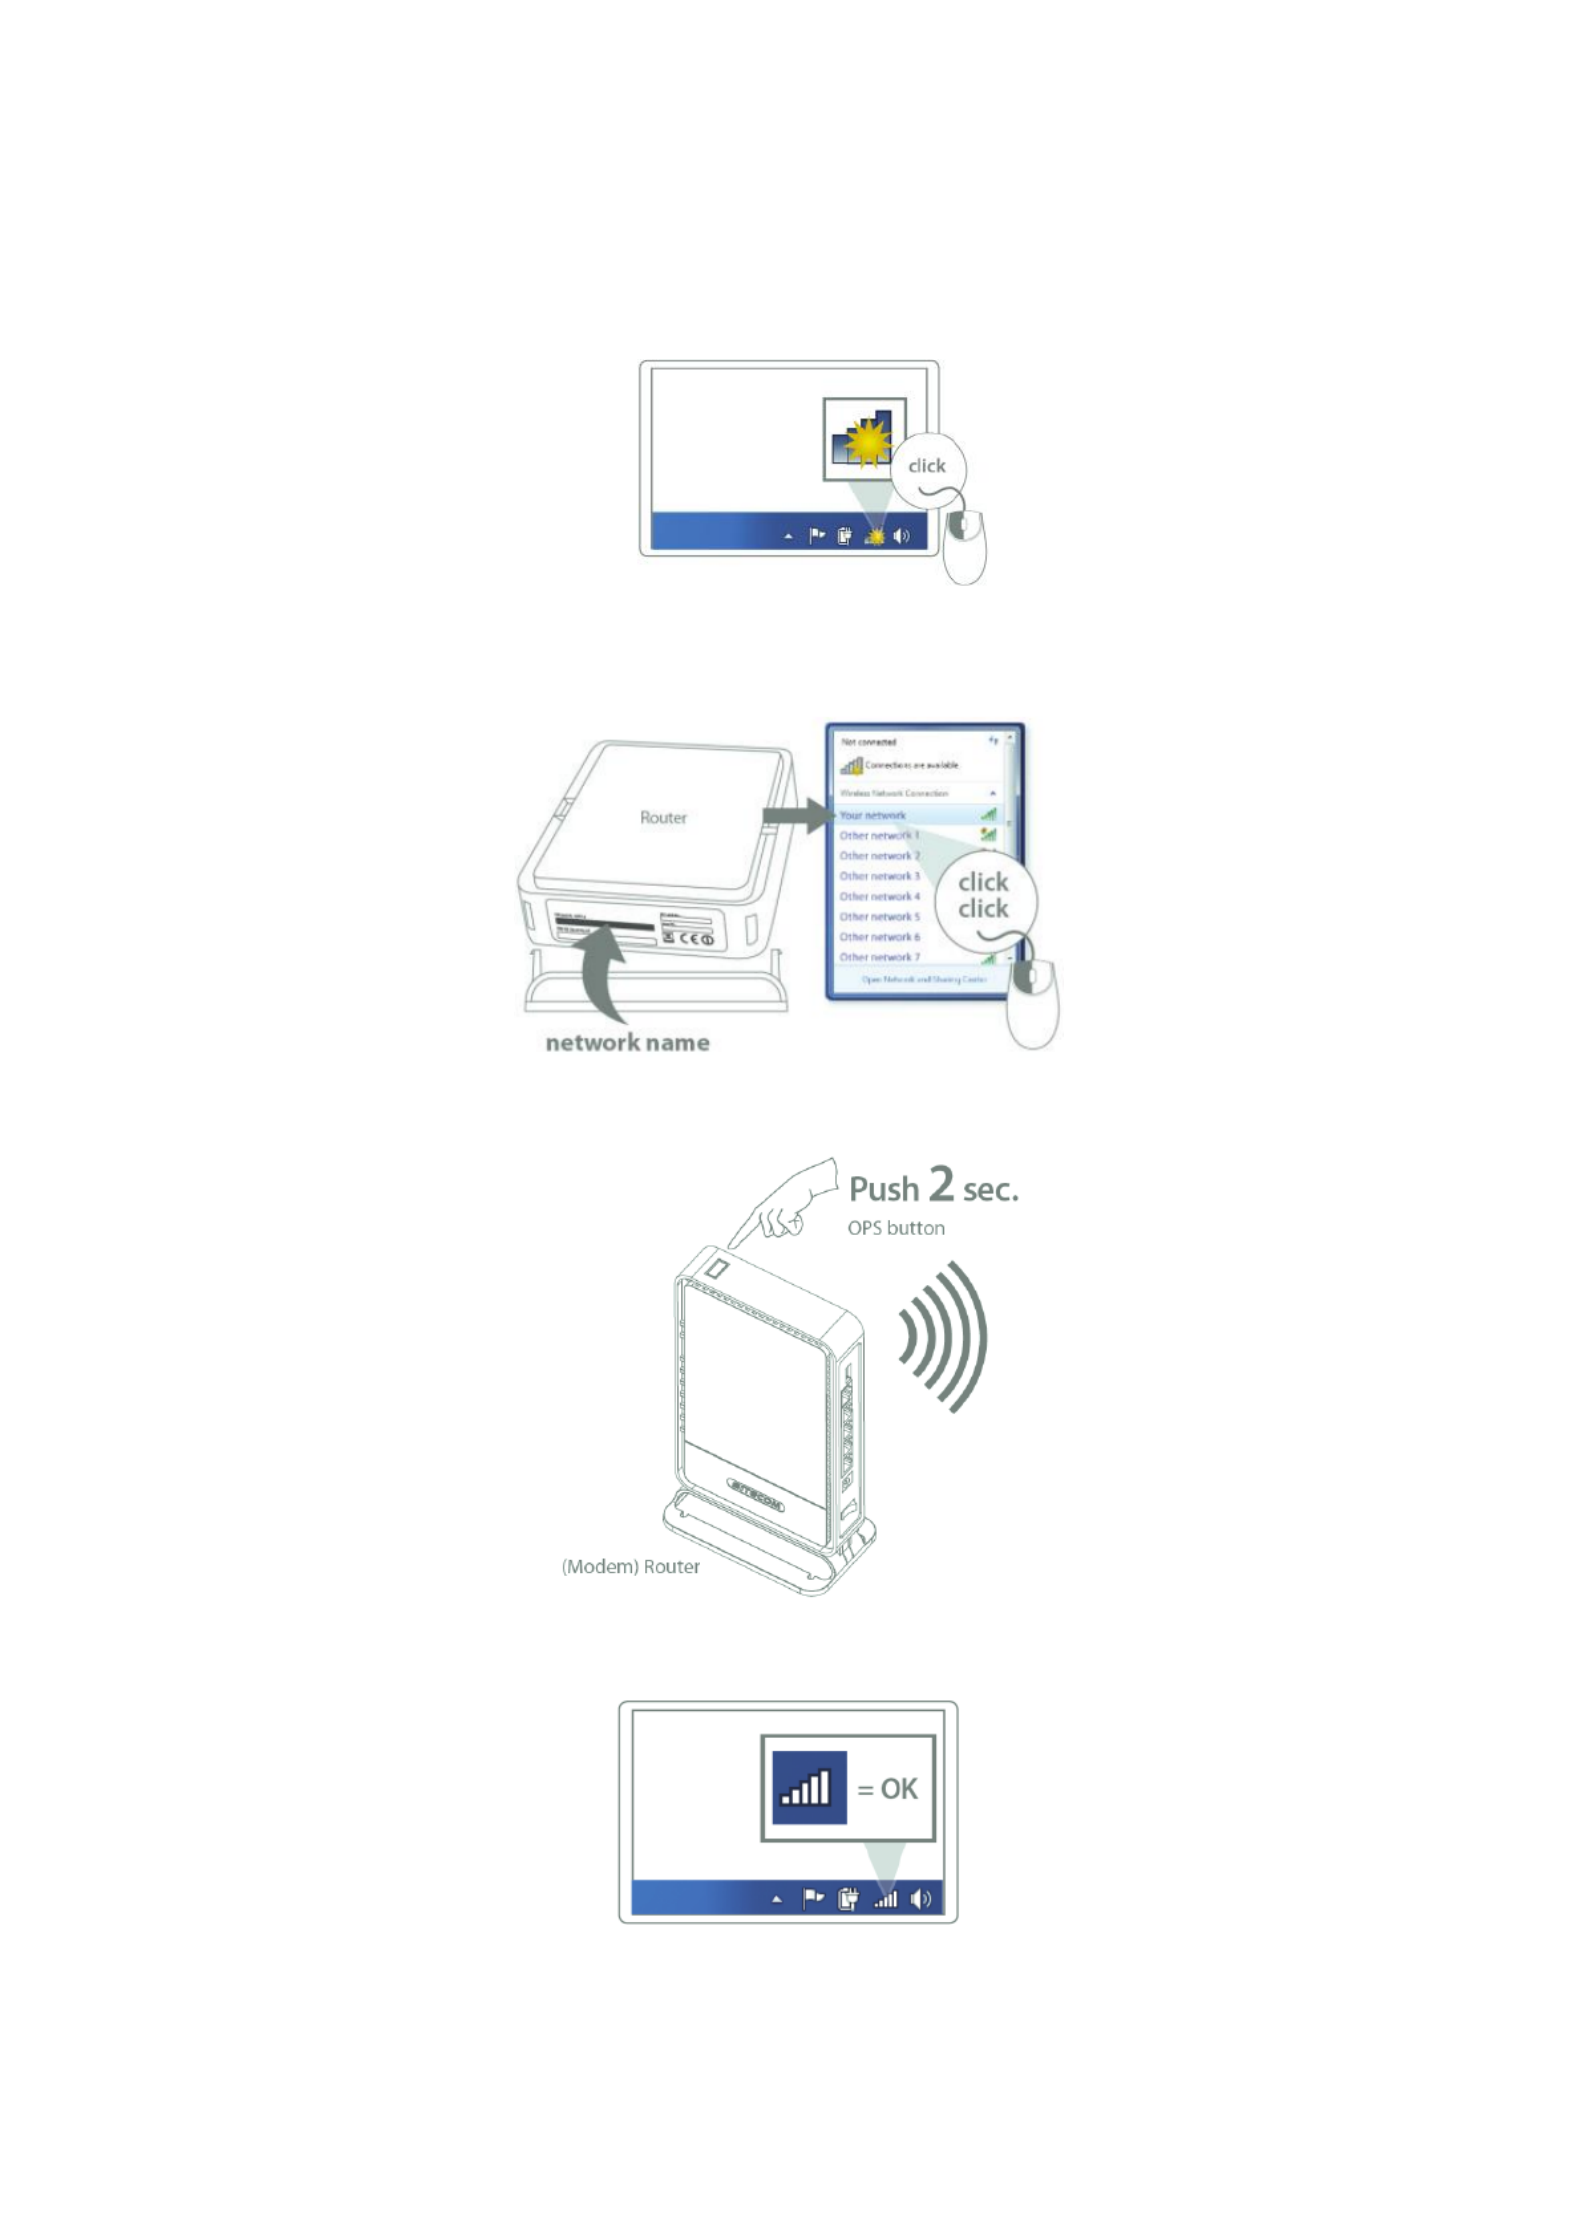
Windows, OPS Connection
Click on the icon for wireless connectivity. This is usually located in the System
Tray, next to the clock.
Select the Sitecom network. The correct network name can be found on the
sticker on bottom of the router, or in the Network Details Folder.
Push the OPS Button on the router. Keep the button pushed for 0-5 seconds.
Wait for the icon to display that it’s connected to the network.

Mac OSX
Click on the icon for wireless connectivity. This is usually located in the System
Tray, next to the clock.
Select the Sitecom network. The correct network name can be found on the
sticker on bottom of the router, or in the Network Details Folder.
Fill in the password for the wireless network. The correct password can be found
on the sticker on the bottom of the router, or in the Network Details Folder.
Wait for the icon to display that it’s connected to the network.

Configure your Internet connection
From the menu, select “Internet Settings”.
Depending on the chosen setting, you may need to enter your user name and password,
MAC address or hostname in the following window. After you have entered the correct
information, click . Apply
IPv6 Configuration
The IPv6 (Internet Protocol version 6) section is where you configure your IPv6
Connection type.
IPv6 Connection Type
There are several connection types to choose from: Static IPv6, Autoconfiguration, 6RD
and Link-local only. If you are unsure of your connection method, please contact your
IPv6 Internet Service Provider.
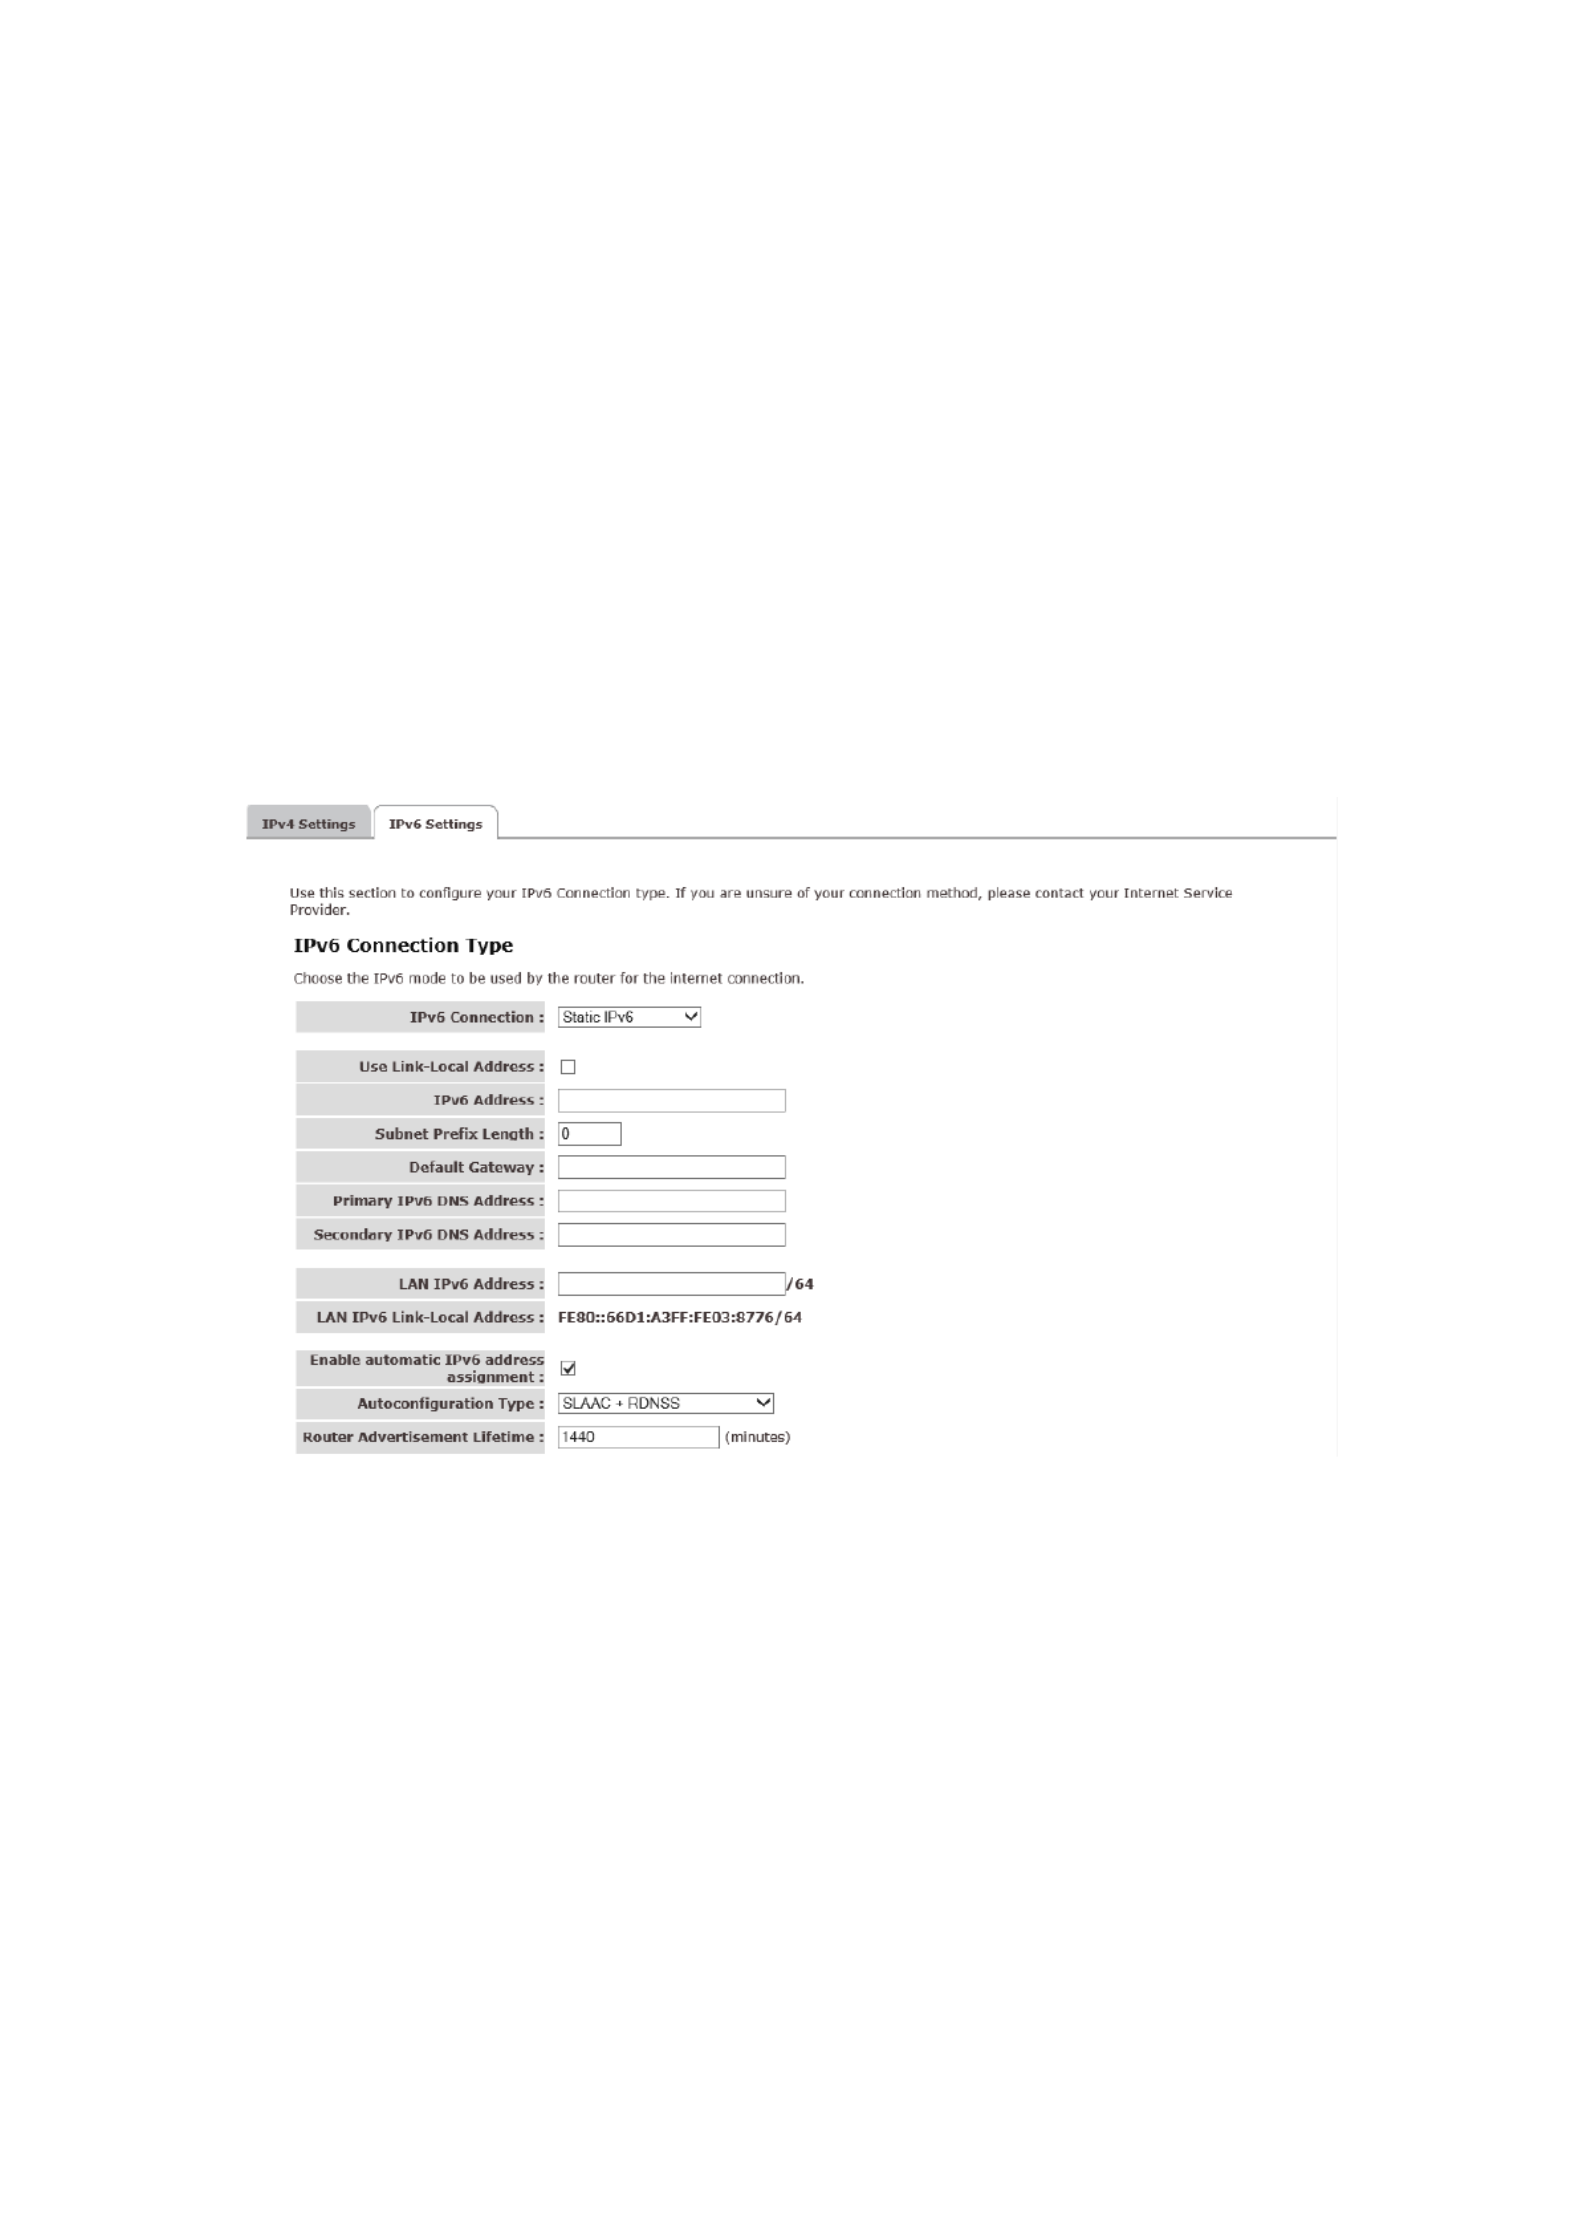
Static IPv6 Mode
This mode is used when your ISP provides you with a set IPv6 addresses that does not
change. The IPv6 information is manually entered in your IPv6 configuration settings.
You must enter the IPv6 address, Subnet Prefix Length, Default Gateway, Primary DNS
Server and Secondary DNS Server. Your ISP provides you with all this information.
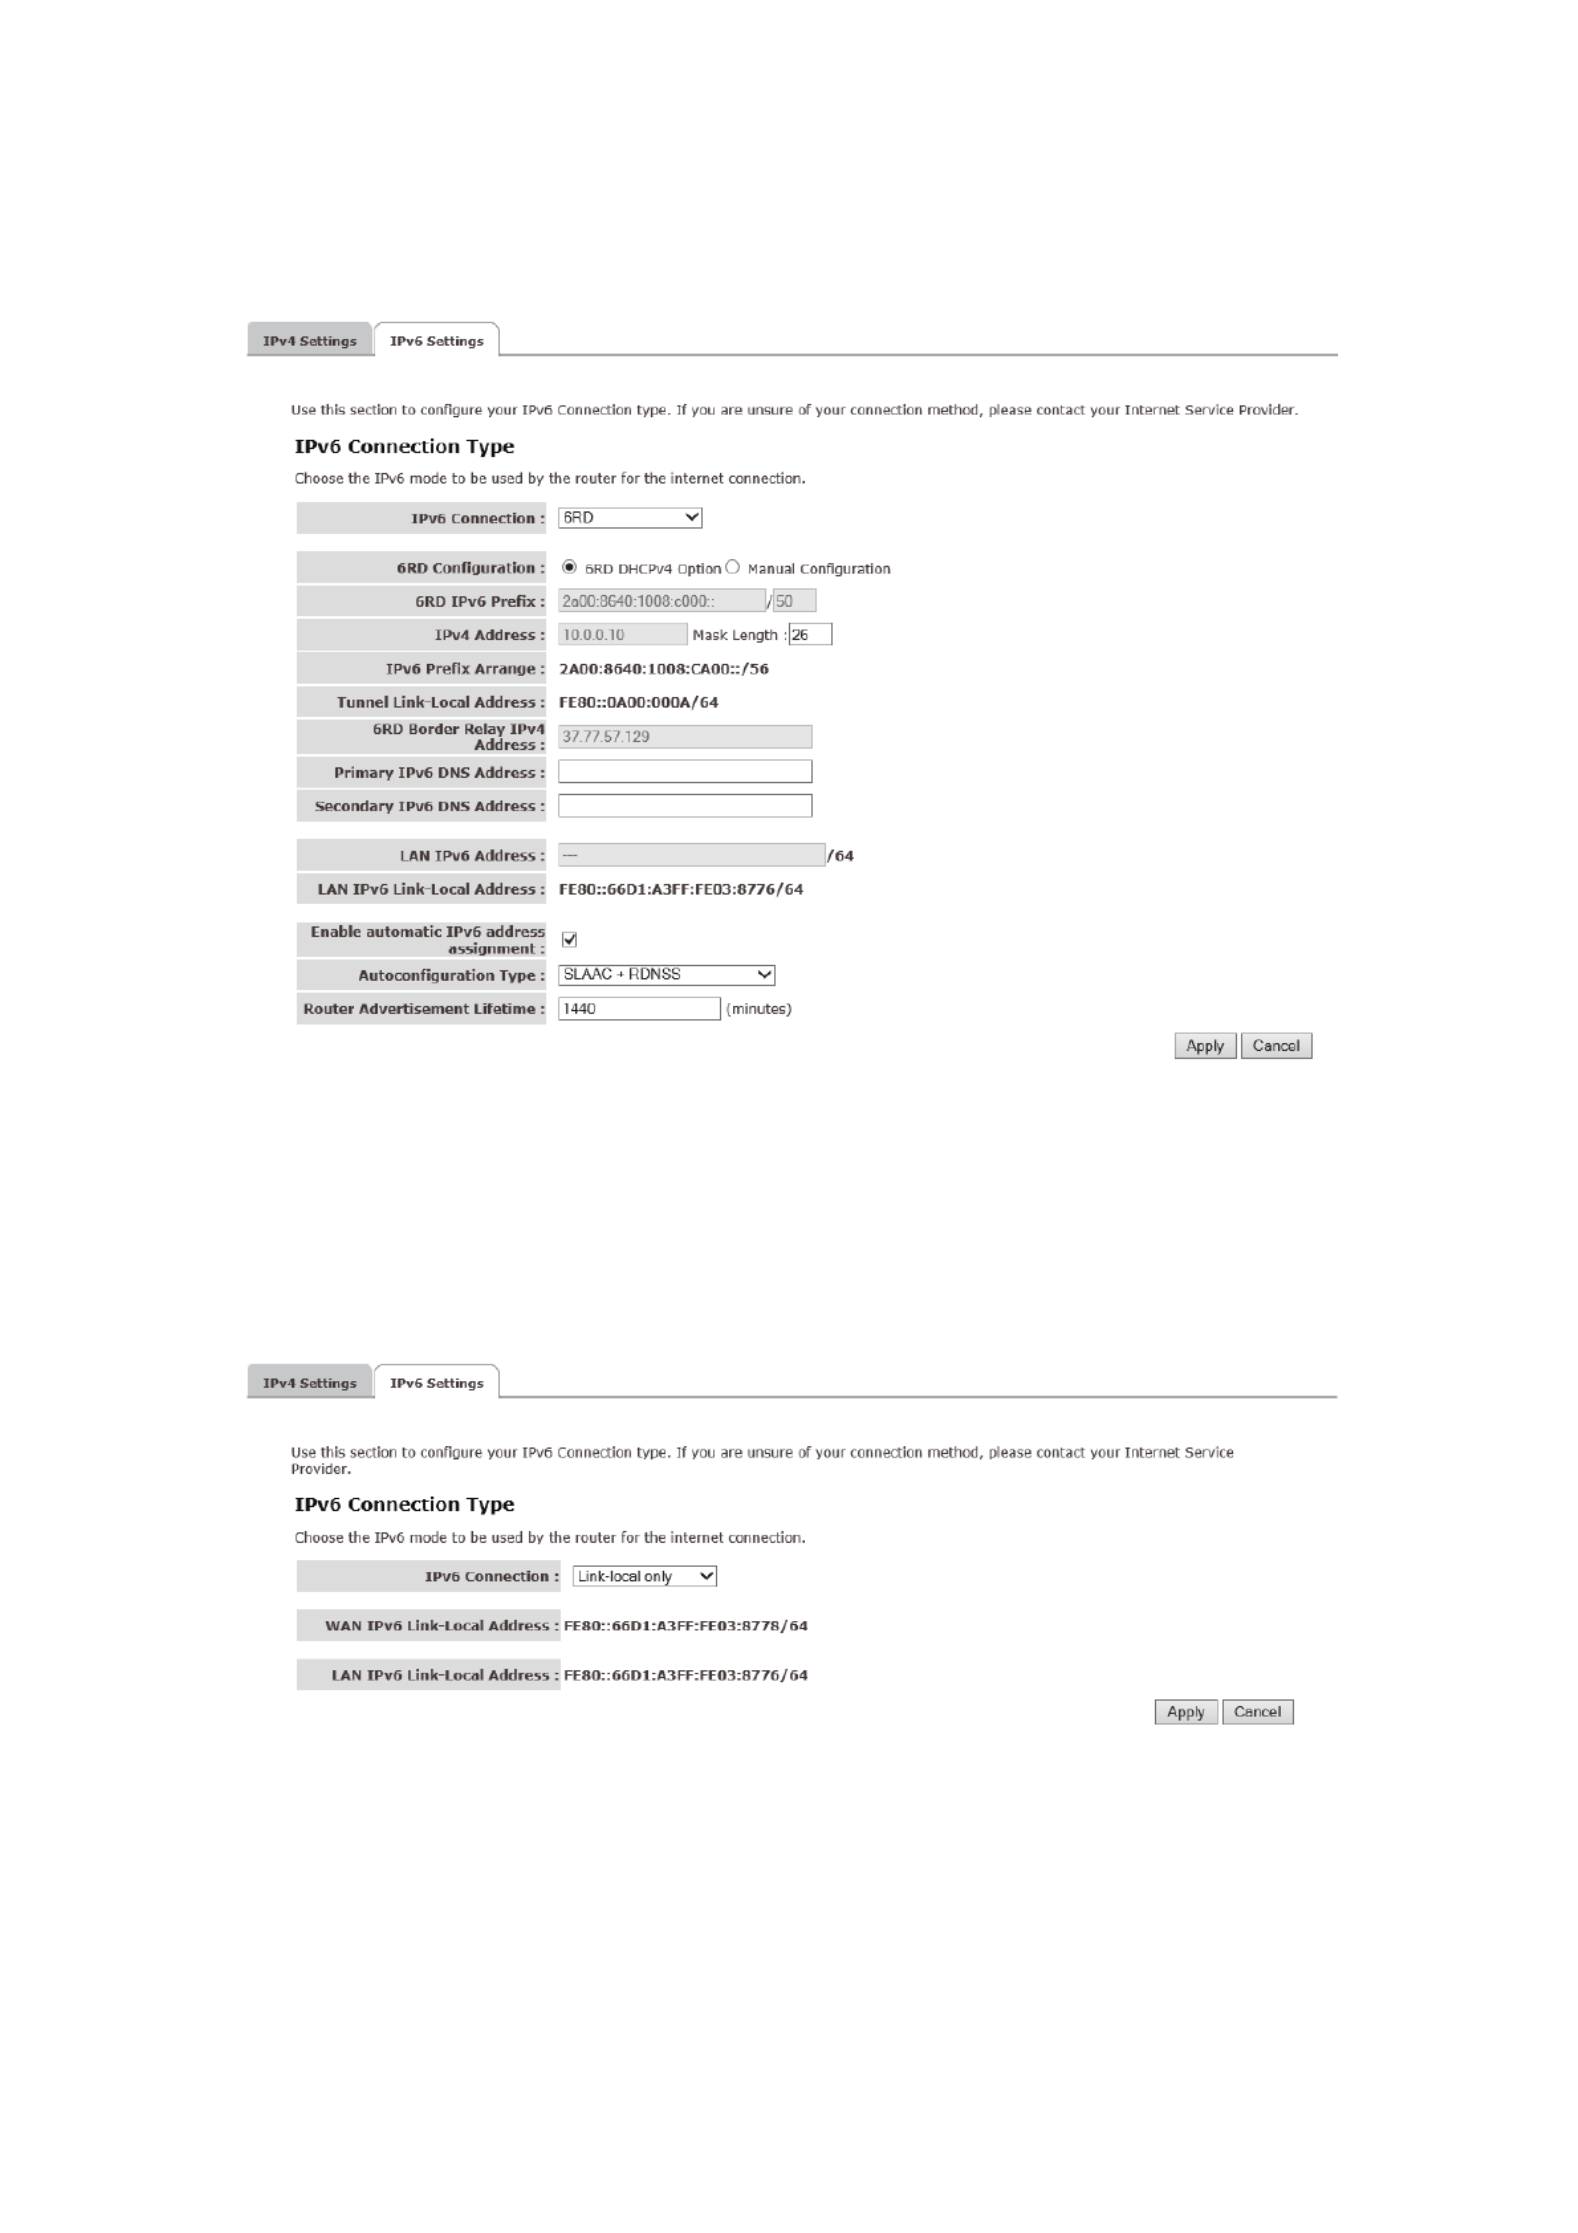
6RD Mode
In the 6RD mode, no additional configuration is necessary.
Link-local Mode
The Link-local address is used by nodes and routers when communicating with
neighboring nodes on the same link. This mode enables IPv6-capable devices to
communicate with each other on the LAN side.

Status
The pages in the status section provide you general information about the operational
status of your device.
Status
The System status section allows you to monitor the current status of your
modem/router: the UP time, hardware information, serial number as well as firmware
version information is displayed here. The page also shows extensive information
concerning the ADSL status and current settings.

Statistics
You can view statistics on the processing of IP packets on the networking interfaces. You
will not typically need to view this data, but you may find it helpful when working with
your ISP to diagnose network and Internet data transmission problems. To display
statistics for any new data, click “Refresh”.
DHCP List
This page shows all DHCP clients (LAN PCs) currently connected to your network. The
table shows the assigned IP address, MAC address and expiration time for each DHCP
leased client.

Diagnostics
The Diagnostics page allows you to test the current configuration.
Click ‘Start’ to let the modem router perform several tasks to verify if the connection is
operational.

Depending on the chosen provider, you may need to enter your user name and password
or hostname in the following window. After you have entered the correct information,
click Next.
Click Finish to complete the configuration.

Basic Settings
LAN Settings
This page is used to configure the LAN interface of your ADSL Router. You can set IP
address, subnet mask, and IGMP Snooping or modify the IPv6 address range .
DHCP Settings

You can configure your network and the router to use the Dynamic Host Configuration
Protocol (DHCP). This page allows you to select the DHCP mode that this router will
support.
There are two different DHCP Modes: DHCP Server and DHCP Relay. When the router is
acting as DHCP server, please configure the router in the “DHCP Server” page; while
acting as DHCP Relay, you can setup the relay in the “DHCP Relay” page.

WAN Settings
This page allows you to manually configure the ADSL/WAN settings. The settings on this
page require some knowledge concerning the WAN configuration. We advise less-
experienced users to configure the WAN settings using the Wizard.
VPI (Virtual Path Identifier) and VCI (Virtual Channel Identifier) define a virtual circuit.
VPI: The valid range for the VPI is 0 to 255. Enter the VPI assigned to you. This field
may already be configured.
VCI: The valid range for the VCI is 32 to 65535. Enter the VCI assigned to you. This field

may already be configured.
ATM QoS: Select CBR to specify fixed (always-on) bandwidth for voice or data traffic.
Select UBR for applications that are non-time sensitive, such as e-mail. Select VBR for
burst traffic and bandwidth sharing with other applications.
PCR: Divide the DSL line rate (bps) by 424 (the size of an ATM cell) to find the Peak Cell
Rate (PCR). This is the maximum rate at which the sender can send cells.
SCR: The Sustain Cell Rate (SCR) sets the average cell rate (long-term) that can be
transmitted.
MBS: Maximum Burst Size (MBS) refers to the maximum number of cells that can be
sent at the peak rate. Type the MBS, which is less than 65535
Encapsulation:
Select the encapsulation type your ISP uses from the Encapsulation list. Choices vary
depending on what you select in the Mode field. If you select Bridge in the Mode field,
select 1483 Bridged IP. If you select Routing in the Mode field, select PPPoA, 1483
Bridged IP, 1483 Router IP or PPPoE.
PPPoE/PPPoA
User Name: Enter the user name exactly as your ISP assigned.
Password: Enter the password associated with the user name above.
Encapsulation: select Bridge in the Mode field, select either PPPoA or RFC 1483. Select
Routing in the Mode field, select PPPoA, RFC 1483, ENET ENCAP or PPPoE.
Multiplex: Select the method of multiplexing used by your ISP. Choices are VC or LLC.
Connection: The schedule rule(s) have priority over your Connection settings.
Always on: Select Always on Connection when you want your connection up all the
time.
Connect on Demand: Select Connect on Demand when you don't want the connection
up all the time and specify an idle time-out in the Max Idle Timeout field
Get IP Address: Choose Static or Dynamic
Static IP Address: Enter the IP address of ADSL Router in dotted decimal notation, for
example, 192.168.1.254 (factory default).
IP Subnet Mask: The default is 255.0.0.0. User can change it to other such as
255.255.255.0.Type the subnet mask assigned to you by your ISP (if given).
Gateway: You must specify a gateway IP address (supplied by your ISP) when you use
1483 Bridged IP in the Encapsulation field in the previous screen.
Network Address Translation: Select None, Many to One or Many to Many from the
drop-sown list box. Refer to the NAT chapter for more details.
RIP Version: Select the RIP version from RIP-1, RIP-2B and RIP-2M.
RIP Direction: Select the RIP direction from None, Both, In Only and Out Only.
Multicast: IGMP (Internet Group Multicast Protocol) is a network-layer protocol used to
establish membership in a Multicast group - it is not used to carry user data.

2.4GHz/5GHz WiFi
This section provides the wireless network settings for your router. You can enable and
configure the wireless AP function here.
SSID: The SSID (up to 32 printable ASCII characters) is the unique name identified in a
WLAN. The ID prevents the unintentional merging of two co-located WLANs.
Channel Width: Set channel width of wireless radio. Do not modify default value if you
don’t know what it is, default setting is ‘Auto 20/40 MHz’.
Channel Number: It is the radio channel used by the wireless LAN. All devices in the
same wireless LAN should use the same channel. Please select the country you are
located and designate a channel that the router will use. If you want to let the router
automatically to find an available channel with the highest signal strength, please select
“Auto”.
When you finish, click ‘Save’ to save the settings made and restart the router so the
settings will take effect after it reboots.

Security Settings
This router provides complete wireless LAN security functions, include WEP, IEEE 802.1x,
IEEE 802.1x with WEP, WPA with pre-shared key and WPA with RADIUS. With these
security functions, you can prevent your wireless LAN from illegal access. Please make
sure your wireless stations use the same security function.
Encryption: You can choose “None” to disable the encryption or select “WEP”,
“WPA(TKIP)”, “WPA2(AES)” or “WPA2 Mixed” mode for security. When “WEP” is enabled,
please click “Set WEP Key” button to choose the default key and set the four sets of WEP
keys.
WEP: WEP is less level of security than WPA. WEP supports 64-bit and 128-bit key
lengths to encrypt the wireless data.
WPA(TKIP): WPA uses Temporal Key Integrity Protocol (TKIP) for data encryption. TKIP
utilized a stronger encryption method and incorporates Message Integrity Code (MIC) to
provide protection against hackers.
WPA2(AES): WPA2, also known as 802.11i, uses Advanced Encryption Standard (AES)
for data encryption. AES utilized a symmetric 128-bit block data encryption.
WPA Mixed: The router supports WPA (TKIP) and WPA2 (AES) for data encryption. The
actual selection of the encryption methods will depend on the clients.
Use 802.1x Authentication: IEEE 802.1x is an authentication protocol. Every user must
use a valid account to login to this wireless router before accessing the wireless LAN. The
authentication is processed by a RADIUS server. Check this box to authenticates user by
IEEE 802.1x.
WEP-64Bits: WEP is less level of security than WPA. WEP supports 64-bit and 128-bit
key lengths to encrypt the wireless data. The longer key length will provide higher
security. W -hen “WEP 64Bits” is selected, you have to enter exactly 5 ASCII characters
(“a z” and “0 9”) or 10 hexadecimal digits ("0- - -9", "a-f") for each Key (1-4).
WEP- 8Bits12 : When “WEP 128Bits” is selected, you have to enter exactly 13 ASCII -
characters (“a z” and “ 9”) or 26 hexadecimal digits ("0- 0- -9", "a-f") for each Key (1-4).

WPA Authentication Mode: There are two types of authentication mode for WPA.
Enterprise (RADIUS): It uses an external RADIUS server to perform user
authentication. To use RADIUS, enter the IP address of the RADIUS server, the RADIUS
port (default is 1812) and the shared secret from the RADIUS server. Please refer to
“Authentication RADIUS Server” setting below for RADIUS setting.
Personal (Pre-Shared Key): Pre-Shared Key authentication is based on a shared
secret that is known only by the parties involved. To use WPA Pre-Shared Key, select key
format and enter a password in the “Pre Shared Key Format” and “Pre red Key” - -Sha
setting respectively.
Pre-Shared Key Format: You may select to select Passphrase (alphanumeric format) or
Hexadecimal Digits (in the “A F”, “a f” and “0 9” range) to be t- - - he Pre-shared Key. For
example:
Passphra se: ”iamguest”
Hexadecimal Digits: “12345abcde”
Pre-Shared Key: Please enter 8-63 chara -Shared K cters as the “Pre ey”.
Authentication RADIUS Server: Enter the port (default is 1812), the IP address and
the password of external RADIUS server are specified here.
When you finish, click ‘save’ to save the settings made and restart the router so the
settings will take effect after it reboots.
Wireless ACL
This wireless router supports MAC Address Control, which prevents unauthorized clients
from accessing your wireless network.
Active: Choose to either Enable or Disable the Wireless Access Control

Allow: Only allow the wireless clients with the MAC Address you have specified can
access to the router.
Deny: The wireless clients with the MAC Address you have specified will be denied
accessing to the router.
MAC Address: Enter the MAC Address of the wireless clients for the filtering control.
When you finish, click ‘ ’ to save the settings made and restart the router so the Submit
settings will take effect after it reboots.
Advanced Wireless
This page allows advanced users who have sufficient knowledge of wireless LAN. These
setting shall not be changed unless you know exactly what will happen for the changes
you made on your router.
Transmit Power: Set the maximum output power of the router. The higher output
power, the wider the coverage range is.
Beacon Interval: The interval of time that this wireless router broadcast a beacon.
Beacon is used to synchronize the wireless network. The range for the beacon period is
between 20 and 1024 with a default value of 100 (milliseconds).
RTS/CTS Threshold This value should remain at its default setting of 2347. Should you :
encounter inconsistent data flow, only minor modifications are recommended. If a
network packet is smaller than the preset “RTS threshold” size, the RTS/CTS mechanism
will not be enabled. The wireless router sends Request to Send (RTS) frames to a
particular receiving station and negotiates the sending of a data frame. After receiving an
RTS, the wireless station responds with a Clear to Send (CTS) frame to acknowledge the
right to begin transmission.
Fragment Threshold: Fragment Threshold specifies the maximum size of packet during
the fragmentation of data to be transmitted. If you set this value too low, it will result in
bad performance. Enter a value from 256 to 2346.

When you finish, click ‘ ave’ to save the settS ings made and restart the router so the
settings will take effect after it reboots.
Wireless WPS
Wi-Fi Protected Setup (WPS) is the simplest way to establish a connection between the
wireless clients and the wireless router. You don’t have to select the encryption mode
and fill in a long encryption passphrase every time when you try to setup a wireless
connection. You only need to press a button on both wireless client and wireless router,
and WPS will do the rest for you.
SSID: This is the network broadcast name (SSID) of the router.
Use WPS: Check the box to enable WPS function and uncheck it to disable the WPS
function.
Push Button: Press the button to start the WPS process. The router will wait for the
WPS request from the wireless devices within 2 minutes.
Input PIN Number: You can fill-in the PIN code of the wireless device and press the
button to start the WPS process. The router will wait for the WPS request from the
wireless device within 2 minutes.

Advanced Settings
QoS
QoS allows you to classify Internet application traffic by source/destination IP address
and port number. You can assign priority for each type of application and reserve
bandwidth for it. The packets of applications with higher priority will always go first.
Lower priority applications will get bandwidth after higher priority applications get
enough bandwidth. This can let you have a better experience in using critical real time
services like Internet phone, video conference …etc. All the applications not specified by
you are classified as rule name “Others”. The rule with a smaller priority number has a
higher priority; the rule with a larger priority number has a lower priority. You can adjust
the priority of the rules by moving them up or down.
Enable/Disable QoS: You can check “Enable QoS” to enable QoS functionality for the
WAN port.
Add a rule: Enter all the data required for the rule you wish to set and click Add to save
this rule.
Edit a QoS rule: Select the rule you want to edit and click “Edit”, then enter the detail
form of the QoS rule. Click “Apply” after editing the form and the rule will be saved.
Discipline: Save allows to save the selected Qos discipline without changing the current
rules.
Click ‘Add’ To save and apply the new rule.

UPnP
When the UPnP function is enabled, the router can be detected by UPnP compliant
system such as Windows 7. The router will be displayed in the Neighborhood of Windows
7, so you can directly double click the router or right click the router and select “Invoke”
to configure the router through web browser.
UPnP: Enable or disable UPnP feature.
When you finish, click ‘Save’ to save the settings made and restart the router so the
settings will take effect after it reboots.
Routing
The page enables you to define specific route for your Internet and network data.
Most users do not need to define routes. On a typical small home or office LAN, the
existing routes that set up the default gateways for your LAN hosts and for the router
provide the most appropriate path for all your Internet traffic.
Produktspecifikationer
| Varumärke: | Sitecom |
| Kategori: | Router |
| Modell: | X5 N600 |
Behöver du hjälp?
Om du behöver hjälp med Sitecom X5 N600 ställ en fråga nedan och andra användare kommer att svara dig
Router Sitecom Manualer

2 Oktober 2024
23 September 2024
22 September 2024
20 September 2024
19 September 2024
15 September 2024
8 September 2024
Sitecom wireless network modem router mimo xr Bruksanvisning
7 September 2024
4 September 2024
Sitecom wl 322 wireless adsl2 modem router 300n Bruksanvisning
4 September 2024Router Manualer
- Router Xiaomi
- Router Bosch
- Router Huawei
- Router HP
- Router DeWalt
- Router Motorola
- Router Nokia
- Router Siemens
- Router Topcom
- Router VTech
- Router Alcatel
- Router Allnet
- Router Alfa
- Router Allied Telesis
- Router Airlive
- Router Anker
- Router Silverline
- Router Edimax
- Router Strong
- Router Hikvision
- Router Proximus
- Router Arris
- Router BenQ
- Router Makita
- Router Hitachi
- Router Thomson
- Router Gembird
- Router Black And Decker
- Router Asus
- Router Skil
- Router Eminent
- Router Renkforce
- Router Vivanco
- Router Festool
- Router Metabo
- Router TP Link
- Router Manhattan
- Router Ezviz
- Router Black Box
- Router Trust
- Router Milwaukee
- Router Hikoki
- Router Sagem
- Router Roland
- Router ZTE
- Router Nilox
- Router Einhell
- Router Hama
- Router Sonos
- Router AVM
- Router TCL
- Router Gigabyte
- Router Nec
- Router Techly
- Router Totolink
- Router Cisco
- Router Engenius
- Router KPN
- Router IFM
- Router Netis
- Router Envivo
- Router Digitus
- Router Kathrein
- Router Draytek
- Router Belkin
- Router Devolo
- Router Linksys
- Router Barco
- Router Buffalo
- Router Powerplus
- Router Porter-Cable
- Router Dahua Technology
- Router Cotech
- Router Netgear
- Router Nest
- Router LevelOne
- Router BT
- Router QNAP
- Router Vodafone
- Router Sigma
- Router ICIDU
- Router Dell
- Router Mercusys
- Router Milan
- Router Planet
- Router ZyXEL
- Router Western Digital
- Router Clas Ohlson
- Router Konig
- Router AT&T
- Router Sweex
- Router MSI
- Router Foscam
- Router Zebra
- Router D-Link
- Router Aruba
- Router Tenda
- Router Phicomm
- Router Kyocera
- Router Teltonika
- Router Ubiquiti Networks
- Router Zoom
- Router Marshall Electronics
- Router Thrustmaster
- Router Jung
- Router Technicolor
- Router Synology
- Router Trendnet
- Router Blackmagic Design
- Router Mikrotik
- Router ATen
- Router Digi
- Router Verizon
- Router Billion
- Router T-Mobile
- Router Conceptronic
- Router RGBlink
- Router Gefen
- Router RAVPower
- Router Hawking Technologies
- Router Kopul
- Router Nexxt
- Router Beafon
- Router Kraun
- Router Zolid
- Router Sagemcom
- Router Toolcraft
- Router Telstra
- Router SPL
- Router Logilink
- Router Moxa
- Router Smart-AVI
- Router StarTech.com
- Router Holzmann
- Router SIIG
- Router Eero
- Router Advantech
- Router Mercku
- Router IOGEAR
- Router Hercules
- Router Xantech
- Router KanexPro
- Router Intelix
- Router Blustream
- Router Intellinet
- Router Lancom
- Router Arcadyan
- Router ModeCom
- Router Digiconnect
- Router Ubee
- Router SMC
- Router Tele 2
- Router Vimar
- Router Kogan
- Router Ocean Matrix
- Router Peak
- Router CradlePoint
- Router Davolink
- Router Sixnet
- Router Kramer
- Router 7inova
- Router Media-tech
- Router AVPro Edge
- Router Cudy
- Router Lindy
- Router F-Secure
- Router Rosewill
- Router Digicom
- Router Sabrent
- Router On Networks
- Router Atlona
- Router AVMATRIX
- Router PENTAGRAM
- Router Leoxsys
- Router Readynet
- Router OneAccess
- Router Accelerated
- Router Nexaira
- Router FSR
- Router Hamlet
- Router Approx
- Router T-com
- Router Alfatron
- Router Amped Wireless
- Router Key Digital
- Router Cambium Networks
- Router 3Com
- Router I-Tec
- Router Avenview
- Router United Telecom
- Router BZBGear
- Router WyreStorm
- Router Rocstor
- Router Ruckus Wireless
- Router Dovado
- Router Mach Power
- Router MuxLab
- Router EXSYS
- Router NetComm
- Router Juniper
- Router Comtrend
- Router Premiertek
- Router Bea-fon
- Router GL.iNet
- Router A-NeuVideo
- Router Shinybow
- Router Edgewater
- Router Atlantis Land
- Router Lantronix
- Router Lumantek
- Router Keenetic
- Router Starlink
- Router Keewifi
- Router Milesight
- Router PulseAudio
- Router Wisetiger
- Router Predator
- Router Evolution
- Router Comprehensive
- Router Digitalinx
- Router Luxul
- Router DVDO
- Router StarIink
- Router Silentwind
- Router Keezel
- Router VigilLink
- Router Digital Forecast
Nyaste Router Manualer
9 April 2025
9 April 2025
8 April 2025
3 April 2025
1 April 2025
30 Mars 2025
30 Mars 2025
30 Mars 2025
30 Mars 2025
30 Mars 2025