Sony PXW-FS5M2 Bruksanvisning
Läs nedan 📖 manual på svenska för Sony PXW-FS5M2 (200 sidor) i kategorin Kamera. Denna guide var användbar för 14 personer och betygsatt med 4.5 stjärnor i genomsnitt av 2 användare
Sida 1/200

4-581-849-13 (1)
®
Solid-State Memory
Camcorder
Operating Guide
PXW-FS5/FS5M2/FS5M2K
Table of Contents
Getting Started
Recording
Playback
Editing
Using the Menu
Troubleshooting
Additional Information

2
Read this first
Before operating this unit, please read this manual thoroughly, and retain it for future
reference.
Precautions when using the
camcorder
• Do not hold the camcorder by the following
parts, and also do not hold the camcorder by the
jack covers.
b Notes
• The camcorder is not dustproof, dripproof or
waterproof. See “About handling of your
camcorder” (p. 188).
• When connecting the camcorder to another
device with communication cables, be sure to
insert the connector plug in the correct way.
Pushing the plug forcibly into the terminal will
damage the terminal and may result in a
malfunction of the camcorder.
• Use your camcorder in accordance with country/
region regulations.
On the LCD screen
• A menu item that is grayed out is not available
under the current recording or playback
conditions.
• The LCD screen is manufactured using
extremely high-precision technology, so over
99.99% of the pixels are operational for
effective use. However, there may be some tiny
black points and/or bright points (white, red,
blue, or green in color) that appear constantly on
the LCD screen. These points are normal results
of the manufacturing process and do not affect
the recording in any way.
On sunlight
• Do not record the sun or leave the camcorder
under the sun. The internal parts of the
camcorder may be damaged. If sunlight is
focused on a nearby object, it may cause a fire.
When you must place the camcorder under
direct sunlight, attach the front lens cap.
• Do not expose your camcorder’s viewfinder,
lens, or LCD screen to the sun or strong light
source for extended periods. Doing so may
cause a malfunction of the camcorder.
• Do not attempt to record the sun directly. Doing
so may cause a malfunction of the camcorder.
• Do not look at the sun or a strong light through a
removed lens. This may cause irrecoverable
damage to your eyes. Also, this may cause a
malfunction.
• Do not expose the lens to beams, such as laser
beams.
That may damage the image sensor and cause
the camera to malfunction.
Lens LCD screen
Microphone (sold separately) or
Microphone holder
Black point
White, red, blue or
green point

3
On the temperature of your camcorder
and battery pack
• Your camcorder has a protective function that
disables recording or playback if the
temperature of your camcorder or battery pack
is beyond the safely operable range. In this case,
a message appears on the LCD screen (p. 176).
On recording
• When the memory card access lamp is lit or
flashing in red, your camcorder is reading or
writing data. Do not apply any vibrations or
shocks to your camcorder. Do not turn the
power off, and do not remove the memory
cards, battery pack, or the AC Adapter. The
image data may be destroyed.
• In order to stabilize memory card operation, it is
recommended that you format the memory card
when you use it with your camcorder for the
first time. All data recorded on the memory card
will be erased by formatting, and cannot be
recovered. Save important data on the memory
card on other media, such as a computer, before
formatting the memory card.
• Before starting to record, test the recording
function to make sure the picture and sound are
recorded without any problems.
• Compensation for the loss of the content of
recordings or the loss of recording opportunities
cannot be provided, even if recording or
playback is not possible due to a malfunction of
the camcorder, storage media, etc., or even if
images or sounds are distorted due to the limits
of the capabilities of the camcorder.
• TV color systems differ depending on the
countries/regions. To view your recordings on a
TV, you need to set [60i/50i SEL] in accordance
with the country/region.
• Television programs, films, video tapes, and
other materials may be copyrighted.
Unauthorized recording of such materials may
be contrary to the copyright laws.
• Because of the way that the image device
(CMOS sensor) reads out image signals, the
following phenomena may occur.
– The subjects passing by the frame rapidly
might appear crooked depending on the
recording conditions. (This phenomenon may
be notable in displays having high motion
resolution.)
– Horizontal lines appear on the LCD screen
during recording under fluorescent lights,
sodium lamps or mercury lamps. The
phenomena can be reduced by adjusting the
shutter speed (p. 51).
– Images on the LCD screen look horizontally
divided when a subject is continuously lit
with a flash. The effect of this phenomenon
may be reduced by using a slower shutter
speed. Also, you may try using software to
repair the image.
Save all your recorded image data
• To prevent your image data from being lost,
save all your recorded images on external media
periodically.
To handle the recorded images on
your computer
• Download the “Catalyst Browse” software.
Format the memory card using
[MEDIA FORMAT] if images are not
recorded or played back properly
• If you continue recording and deleting images
on memory cards for a long time, the files on
that memory card may become fragmented. As a
result, you may not be able to record and save
images properly. If this happens, save the
images on a separate recordable media, such as
a disc or computer, then format the memory
card. See “Formatting a memory card” (p. 136).
Continued ,

4
About the operation of the camcorder
• The operation of the camcorder is controlled
using the SEL/SET dial (p. 7, 139) or the multi-
selector on the grip (p. 10).
About this manual
• Operations in this manual are described using
the “SELP18105G” lens. When the operation
differs depending on the lens used, you will find
the relevant information in “Notes” or “Tips.”
• The values you can set in [REC FORMAT] and
other menus depend on the [60i/50i SEL]
setting. In this manual, the values for both [60i]
and [50i] settings are described.
• The images of the LCD screen used in this
manual for illustration purposes are captured
using a digital still camera.
• The on-screen displays in each local language
are used for illustrating the operating
procedures. Change the screen language before
using your camcorder if necessary (p. 165).
• Design and specifications of memory cards and
other accessories are subject to change without
notice.
Read this first (continued)

5
About upgrade licenses and firmware versions
Some of the functions described in this manual require an upgrade license (option) and
firmware of a specified version or later.
Purchase option products and upgrade the camera firmware according to the devices used.
Function See
page
PXW-FS5 PXW-FS5M2/FS5M2K
Firmware
version Upgrade license Firmware
version Upgrade license
External output and face
detection support when
recording in XAVC QFHD
(4K mode)
133
Ver. 1.1
or later
– Ver. 1.0
or later
–
Auto ND Filter 54 Ver. 2.0
or later
– –
Recording in RAW format
using a RAW recorder (sold
separately)
70
Purchase of
CBKZ-FS5RIF
required.
Purchase not
required
(pre-installed)
Zebra 1 / Zebra 2 54 – –
Setting the headphone
output 84 – –
GPS function 115 – –
MPEG HD recording
73
Ver. 3.0
or later
Purchase of
CBKZ-SLMP
required.
Purchase of
CBKZ-SLMP
required.
High dynamic range (HDR) 57 Ver. 4.0
or later
– –
Expansion of ISO/GAIN
settings 147 – –
High frame rate (HFR)
68
Purchase of
CBKZ-FS5HFR
required.
Purchase not
required
(pre-installed)
6
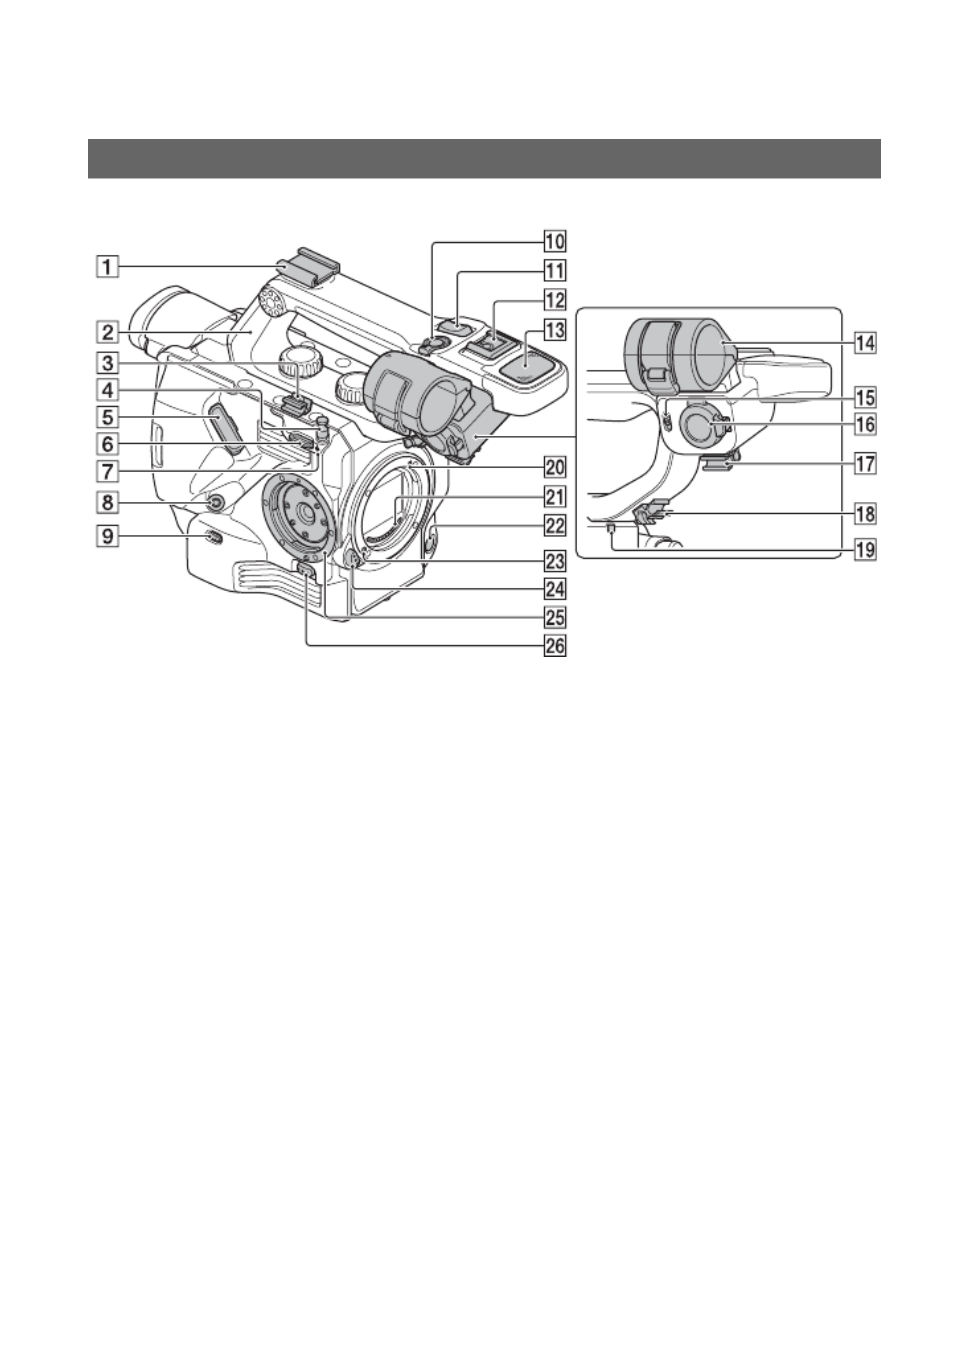
Identifying parts and controls
The numbers in ( ) are reference pages.
A Accessory shoe (with cold shoe
attached)
For details about attachment, see
page 27.
B XLR handle (attached)
For details about attachment, see
page 26.
C Cable clamper
D Tape measure hook (p. 45)
E LCD screen connection jack (p. 29)
F Shoulder strap attachment point
G Image sensor position index (p. 45)
H REMOTE jack (p. 31)
I INPUT 1 (LINE/MIC/MIC+48V)
switch (p. 83)
J Handle record button (p. 40)
The handle record button is disabled
when set to the HOLD position.
K Handle zoom lever (p. 43)
L Multi-interface shoe (p. 83)
M Internal microphone (p. 82)
N Microphone holder
O INPUT 2 (LINE/MIC/MIC+48V)
switch (p. 83)
P INPUT 2 jack (p. 82)
Q Cable clamper
R Cable clamper
S Recording lamp (front) (p. 40)
The recording lamp flashes if the
remaining capacity of the memory card
or battery is low.
T Mounting index point (p. 23)
U Lens contacts
b Note
• Do not touch directly with your hands.
V WB SET button (p. 56)
W Lens lock pin
X Lens release button (p. 23)
YGrip attachment point (p. 31)
Z Grip release button (p. 32)
Body

8
A ❙/1 (ON/STANDBY) switch (p. 33)
B Shoulder strap attachment point
C Recording lamp (rear) (p. 40)
The recording lamp flashes if the
remaining capacity of the memory card
or battery is low.
D Remote control sensor
E ASSIGN1/S&Q button (p. 63)
F ASSIGN2/P PROFILE button (p. 103)
G AUTO/MAN (CH-1) switch (p. 84)
H AUDIO LEVEL (CH-1) dial (p. 84)
I AUDIO LEVEL (CH-2) dial (p. 84)
J AUTO/MAN (CH-2) switch (p. 84)
K FOCUS (AUTO/MAN) switch —
PUSH AUTO button (p. 45)
L i (headphones) jack
M DC IN jack
N Tripod receptacles (1/4 inch, 3/8 inch)
Supports 1/4-20UNC and 3/8-16UNC
screws.
For mounting on a tripod with screw
length 5.5 mm or shorter (sold
separately).
The tripod may not be able to mount in
some orientations, depending on the
tripod specifications.
Top panel
Identifying parts and controls (continued)

10
The numbers in ( ) are reference pages.
For details about attaching the LCD screen,
see page 29.
A LCD ON/OFF switch (p. 34)
BMIRROR switch (p. 114)
C LCD screen mounting clamp
For details, refer to the instruction manual
supplied with the lens.
The numbers in ( ) are reference pages.
For details about attaching the grip, see
page 31.
A Grip zoom lever (p. 43)
B ASSIGN4/FOCUS MAG button (p. 46)
C ASSIGN dial (p. 85)
D ASSIGN6 button (p. 85)
E Grip rotate lever (p. 36)
F START/STOP button (p. 40)
G Multi-selector (p. 61)
H ASSIGN5/Fn button (p. 61)
LCD screen
Lens (PXW-FS5M2K only)
Grip
Identifying parts and controls (continued)

11
I Grip belt attachment point
The grip belt is attached at the time of
purchase.
The numbers in ( ) are reference pages.
Remove the insulation sheet before using
the Wireless Remote Commander.
A DATA CODE button (p. 122)
B TC RESET button (p. 112)
C SCAN/SLOW buttons (p. 119)
D . > (PREV/NEXT) buttons
(p. 119)
E PLAY button (p. 119)
F STOP button (p. 119)
G DISPLAY button (p. 122)
H Transmitter
I START/STOP button (p. 40)
J Zoom buttons (p. 43)
K PAUSE button (p. 119)
L MODE button (p. 119)
M / / /b B v V/ENTER buttons
b Notes
• Aim the Wireless Remote Commander towards
the remote sensor to operate your camcorder.
• Point the remote sensor away from strong light
sources, such as direct sunlight or overhead
lighting. Otherwise, the Wireless Remote
Commander may not function properly.
• When you are operating with the Wireless
Remote Commander supplied with your
camcorder, your video device may also operate.
In that case, select a commander mode other
than DVD2 for your video device, or cover the
sensor of your video device with black paper.
To change the battery of the Wireless
Remote Commander
1 While pressing on the tab, inset your
fingernail into the slit to pull out the
battery case.
2 Place a new battery with the + side
facing up.
3 Insert the battery case back into the
Wireless Remote Commander until it
clicks.
• When the lithium battery becomes weak, the
operating distance of the Wireless Remote
Commander may shorten, or the Wireless
Remote Commander may not function properly.
In this case, replace the battery with a Sony
CR2025 lithium battery. Use of another battery
may present a risk of fire or explosion.
Wireless Remote Commander
Insulation sheet
WARNING
Battery may explode if mistreated. Do not
recharge, disassemble or dispose of in
fire.
Tab

13
z Tip
• Indicators may look different or appear at
different positions.
Data code during recording
For AVCHD, the recording date, time, and
shooting conditions are recorded
automatically.
They are not displayed while recording.
However, you can check them by selecting
the data to display using (DISPLAY
SET) t [DATA CODE] (p. 161) or by
pressing an ASSIGN button assigned with
the DATA CODE function.
Auto setting (p. 50)
n A
B
White balance (p. 55)
HISTOGRAM (p. 158)
AUDIO LEVEL
DISPLAY (p. 160)
Manual volume
adjustment (p. 84)
Indicator Meaning

14
Table of Contents
Read this first ........................................................................................... 2
About upgrade licenses and firmware versions ....................................... 5
Identifying parts and controls ................................................................... 6
Body ..................................................................................................... 6
LCD screen ........................................................................................ 10
Lens (PXW-FS5M2K only) .................................................................. 10
Grip ..................................................................................................... 10
Wireless Remote Commander ............................................................ 11
Screen indicators ................................................................................... 12
Step 1: Checking supplied items ............................................................ 19
Step 2: Using a battery pack or AC Adapter ..........................................21
Step 3: Attaching the lens ...................................................................... 23
Step 4: Attaching the handle, accessory shoe, microphone, LCD screen,
and grip .........................................................................................26
Step 5: Turning on the camcorder and setting the date and time .......... 33
Step 6: Adjusting the LCD screen and viewfinder .................................. 34
Step 7: Adjusting the angle of the grip ................................................... 36
Step 8: Inserting a memory card ............................................................ 38
Recording ............................................................................................... 40
Recording ........................................................................................... 40
Continuous recording on the memory cards (Relay Rec) .................. 41
Recording movies using both memory card A and B (Simul Rec) .... 42
Changing the setting of the START/STOP button and handle record
button ................................................................................................. 42
Adjusting the zoom ............................................................................. 43
Adjusting the focus .................................................................................44
Using automatic focus/fixed focus temporarily (push auto focus/
focus hold) .......................................................................................... 45
Using the focus magnifier .................................................................. 46
Focusing on a detected face (Face detection) ..................................47
Changing the recording setting/image size ............................................ 48
Selecting the file format and recording format ................................... 48
Proxy recording .................................................................................. 49
Adjusting the brightness ......................................................................... 50
Adjusting the iris ................................................................................. 50
Adjusting the ISO sensitivity/gain ....................................................... 51
Adjusting the shutter speed ............................................................... 51
Getting Started
Recording

15
Table of Contents
To adjust the amount of light (ND filter) ............................................. 53
Zebra 1 / Zebra 2 ............................................................................... 54
Adjusting the color tone ..........................................................................55
Adjusting the white balance ............................................................... 55
Adjusting the black balance .............................................................. 56
High Dynamic Range (HDR) ..................................................................57
Shooting using HDR-compatible picture profile ................................ 57
Picture profile HDR-related items ....................................................... 57
Using the gamma display assist function .......................................... 58
Playing video recorded in HDR on the camcorder ............................ 59
Limitations on HDR files recorded in non-XAVC formats ................... 60
Using Direct Menu ..................................................................................61
Slow & Quick Motion/Super Slow Motion recording ...............................63
Slow & Quick Motion recording ......................................................... 63
Recording in Super Slow Motion ........................................................ 65
Slow-Motion recording at High Frame Rate (HFR) ................................68
Preparing for High Frame Rate recording .......................................... 68
Slow-motion recording at High Frame Rate ....................................... 68
Limitations of High Frame Rate recording ......................................... 69
Recording in RAW format using a RAW recorder (sold separately) .......70
Preparing to record in RAW mode ..................................................... 70
Selecting RAW output and unit recording format .............................. 71
RAW 4K Super Slow Motion ............................................................... 72
RAW 2K Super Slow Motion ............................................................... 72
Setting the S&Q button for RAW ........................................................ 72
MPEG HD recording ...............................................................................73
Preparing to record in MPEG HD ....................................................... 73
Recording in MPEG HD ..................................................................... 73
Slow & Quick Motion Recording ........................................................ 74
Super Slow Motion Recording ........................................................... 75
Playback in MPEG HD ....................................................................... 76
MPEG HD output formats ................................................................... 77
Recommended memory cards .......................................................... 78
Estimated recording time of movies ................................................... 78
Proxy recording supported formats ................................................... 79
Streaming supported formats ............................................................ 80
About the MPEG format ..................................................................... 81
Specifications ..................................................................................... 81
Audio setup ............................................................................................82
Recording sound from the internal microphone ................................ 82
Recording sound from an external audio device ............................... 83
Recording with a Multi-Interface Shoe-compatible microphone (sold
separately) ......................................................................................... 83
Adjusting the audio recording level ................................................... 84
Setting the Headphone Output .......................................................... 84
Assigning functions to the ASSIGN buttons/dial ....................................85
Continued ,

16
Using the Wi-Fi function ......................................................................... 87
What you can do with the Wi-Fi function of the camcorder ................ 87
Downloading “Content Browser Mobile” ............................................ 87
Connecting the camcorder to an Android smartphone equipped with
the NFC function using One-touch connection .................................. 88
Using a smartphone as a camcorder remote control ........................88
Connecting without using the NFC function (Android) ....................... 89
Connecting without using the NFC function (iPhone/iPad) ................90
Using network functions ......................................................................... 92
Configuring a wireless LAN ................................................................ 92
Using airplane mode ..........................................................................96
Configuring a wired LAN .................................................................... 96
Using the streaming function (STREAMING) ..................................... 97
Using the FTP transfer function .......................................................... 99
Importing a root certificate ............................................................... 101
Resetting network settings ...............................................................102
Useful functions ................................................................................... 102
Selecting suitable settings automatically (full auto mode setting) ... 102
Customizing the picture quality (Picture profile) .............................. 103
Using the gamma display assist function ........................................ 111
Setting time data .............................................................................. 112
Preventing accidental operation (HOLD switch) ..............................113
Reviewing the most recently recorded scene (Last Scene
Review) ............................................................................................. 113
Inverting the LCD screen display ..................................................... 114
GPS function ........................................................................................ 115
GPS function compatible devices .................................................... 115
Acquiring position information .......................................................... 115
GPS INFORMATION ......................................................................... 116
AUTO CLOCK ADJ ........................................................................... 116
AUTO AREA ADJ .............................................................................. 117
About GPS ........................................................................................ 117
Playback .............................................................................................. 119
Playback ........................................................................................... 119
Changing/checking the settings in your camcorder ............................. 122
Changing the screen display ........................................................... 122
Displaying recording data (Data code) ............................................ 122
Checking the camcorder settings (Status check) ............................ 123
Connecting to a monitor or a TV ..........................................................124
Selecting jacks for external output ................................................... 125
Output signal formats ....................................................................... 125
Playback
Table of Contents (continued)

18
Streaming supported formats ...............................................................183
Using your camcorder abroad .............................................................. 184
File/folder structure on the memory card ............................................. 185
Maintenance and precautions .............................................................. 186
About the XAVC format .................................................................... 186
About the AVCHD format ................................................................. 186
About memory cards ........................................................................ 186
About the battery pack ..................................................................... 187
About handling of your camcorder .................................................. 188
Specifications ....................................................................................... 191
Index ....................................................................................................194
Table of Contents (continued)

19
Getting Started
Getting Started
Step 1: Checking supplied items
Make sure that you have following items
supplied with your camcorder. If, for any
reason, there is something missing, contact
your Sony dealer.
The number in brackets indicates the
number of items supplied.
Rechargeable battery pack (BP-U30)
AC Adapter/Charger (BC-U1A) (p. 22)
Power cord (mains lead) (p. 22)
Wireless Remote Commander (RMT-845)
(p. 11)
A button-type lithium battery is already installed.
Large eyecup (p. 36)
Accessory shoe kit (Accessory shoe,
Accessory shoe plate, screws [4]) (p. 27)
XLR handle (p. 26)
LCD screen (p. 29)
LCD screen protective sheet (p. 29)
USB cable
Grip (p. 31)
Body cap (attached to the camcorder)
(p. 23)
Continued ,

21
Getting Started
Step 2: Using a battery pack or AC Adapter
The camcorder can be powered by a battery
pack or via an AC Adapter.
For safety, do not use power sources other
than genuine Sony battery packs.
Lithium-ion battery packs
BP-U30
BP-U60
BP-U60T
BP-U90
AC Adapter/Charger
BC-U1A (supplied)
BC-U2A
b Notes
• Do not place the battery pack in hot locations,
such as in direct sunlight or near naked flames.
• Use the supplied AC Adapter to power the
camcorder from a power outlet.
1 Push the battery in and slide it
down into position.
To remove the battery pack
Set the ON/STANDBY switch to
STANDBY (
1
).
Press and hold the BATT RELEASE
button, and slide the battery up and out.
On the battery pack
• Always set the ON/STANDBY switch to
STANDBY (1) before changing the battery
pack.
• The Battery Info may not be correctly displayed
under the following conditions.
– The battery pack is not attached correctly.
– The battery pack is damaged.
– The battery pack is worn out.
Using a battery pack
BATT RELEASE
button
Continued ,

22
You can use the AC Adapter to power the
camcorder from a power outlet. While you
are using the AC Adapter, the battery pack
will not lose its charge even when it is
attached to your camcorder.
Connection example: when
connecting BC-U1A
1 Connect the power cord to the AC
Adapter.
2 Connect the AC Adapter to the DC
IN jack of your camcorder.
3 Connect the power cord to the
power outlet (wall socket).
4 Set the mode select switch on the
BC-U1A to the DC OUT position.
b Notes
• Do not short-circuit the DC plug of the AC
Adapter or battery terminal with any metallic
objects. This may cause a malfunction.
• The attached battery pack cannot be charged
while the AC Adapter is connected.
The battery pack can be charged using the
BC-U1A battery charger.
For details about charging, refer to the
manual for the battery charger.
b Note
• Even if the CHG lamp is not lit, the battery
charger is not disconnected from the AC power
source (mains) as long as it is connected to the
wall outlet (wall socket).
Using a power outlet
Power cord
(mains lead)
DC plug
To the
wall outlet
DC IN jack
BC-U1A
Charging the battery pack
Step 2: Using a battery pack or AC Adapter (continued)

24
2 Replace the rear lens cap on the
lens and attach the body cap to
the camcorder body.
Align the mark on the body cap to the
mounting index, and turn the cap
clockwise.
Before you attach caps, remove dust
from them.
b Notes
• When changing the lens, if dust or debris
adheres to the glass surface of the mount, it may
appear on the image, depending on the shooting
conditions. The glass surface of the mount has
an anti-dust coating to prevent dust from
adhering to the image sensor. However, attach
or remove the lens quickly somewhere away
from dusty locations.
• Do not leave the camcorder body with the lens
or body cap removed.
If dust or debris adheres on the glass
surface of the mount
Turn off the camcorder and detach the lens.
Clean the glass surface of the mount and the
surrounding area using a blower (sold
separately), and then reattach the lens.
b Notes
• Do not use a spray blower because it may scatter
water droplets inside the camcorder body.
• Hold the camcorder’s face downward to prevent
the dust from resettling in the camcorder.
• If you cannot clean the glass surface of the
mount by the above procedure, consult your
Sony dealer or local authorized Sony service
facility.
Lens release button
Align the marks.
Step 3: Attaching the lens (continued)

25
Getting Started
Using a mount adapter (sold separately),
you can attach an A-mount lens (sold
separately) to your camcorder. For details,
refer to the operating instructions supplied
with the mount adapter.
The available functions differ depending on
the mount adapter type.
LA-EA1/LA-EA3
• The autofocus function is not supported.
• The iris can be adjusted using the
ND/IRIS dial of the camcorder.
LA-EA2/LA-EA4
Operations when using LA-EA2/
LA-EA4
• Aperture is set to F3.5 when you record
movies with autofocusing. When you are
using a lens with an F3.5 or smaller F-
stop, aperture is set to the maximum F-
stop of the lens. When you want to set
your own value for aperture, select
manual focusing. Adjusting the aperture
during recording may cause noise or turn
the LCD screen brighter.
• The iris will not adjust automatically in
movie mode.
b Notes
• Some lenses may not be usable or may have
limited functionality. Check the dedicated
support web site or consult your local
authorized Sony service facility on compatible
lenses.
• The sound of the lens and the camcorder in
operation may be recorded during movie
recording. You can avoid this by recording
without the microphone, or by setting the
AUTO/MAN (CH-1) switch or AUTO/MAN
(CH-2) switch to “MAN” and the AUDIO
LEVEL (CH-1, CH-2) dial to 0 (p. 82).
• It may take a long time or may be difficult for
the camcorder to focus, depending on the lens
used or the subject.
Mount adapters
Function
Autofocus Continuous
AF system Phase-detection AF
AF/MF select SAM: Switchable on the lens
SSM: Switchable on the lens
and with the FOCUS switch
of the camcorder
Other lenses: Switchable with
the FOCUS switch of the
camcorder
Continued ,

26
AF area display
When using an A-mount lens with a mount
adapter, the camcorder displays in-focus
frames.
Autofocusing: The frame of the area that is
in focus turns green.
Manual focusing: The frame of the area that
is in focus turns green. This can assist
focusing.
When using LA-EA2/LA-EA4
Autofocusing
Manual focusing
b Note
• AF areas are not displayed during Super Slow
Motion recording.
Step 4: Attaching the
handle, accessory
shoe, microphone,
LCD screen, and grip
1 Remove the protective cap from
the handle connector terminal.
2 Place the handle in position,
aligning the screws and
connector with the camcorder.
3 While pressing each screw down,
turn clockwise to fasten the
handle.
Attaching the handle
Step 3: Attaching the lens
(continued)

27
Getting Started
b Note
• Make sure to securely tighten both handle
mounting screws before use. The handle may
uncouple, causing the camcorder to fall, if the
unit is used without securely tightening the
screws.
Removing the handle
Remove the handle using the reverse
procedure for attaching.
b Note
• When using the camcorder with the handle
removed, attach the protective cap to the
connector terminal to protect the connector.
1 Lift the edge of the accessory
shoe plate and pull it in the
direction opposite to that of the
arrow on the accessory shoe
plate and remove it from the
accessory shoe.
2 Place the accessory shoe with its
protrusions matching the
recesses on the accessory shoe
mount, then fix it to the mount
with the four screws.
Attaching the accessory shoe
Shoe plate
Accessory shoe
Continued ,

28
3 Insert the accessory shoe plate in
the direction of the arrow on the
plate surface until the end of the
plate engages the end of the
shoe.
To remove the accessory shoe
Remove the shoe plate in the same way as
described in step 1 of “Attaching the
accessory shoe”.
Attach the microphone holder to the handle.
1 Place the microphone A into the
microphone holder B.
2 Connect the plug of the
microphone to the INPUT 1 or
INPUT 2 jack C.
3 Place the microphone cable into
the cable holder D.
z Tips
• If the microphone cannot be attached securely,
use the spacer supplied with the microphone.
• The tip of the microphone may appear in the
picture, depending on the type of lens that is
attached. Adjust the position of the microphone.
Accessory shoe
Shoe plate
Attaching the microphone (sold
separately)
Step 4: Attaching the handle, accessory shoe, microphone, LCD screen,
and grip (continued)

30
5 Turn the lock knob clockwise to
secure the LCD screen.
b Note
• Securely tighten the LCD screen knob before
use. The LCD screen may fall off if the unit is
used without securely tightening the knob.
6 Align the “LCDv” mark on the
camcorder with the “V” mark on
the LCD screen connection jack,
and plug in the cable.
Check the cable orientation to make
sure the V faces outwards, and then
insert the cable.
To remove the cable
Press both sides (B b and ) of the LCD
screen connection jack, and then remove
the connector.
To change the angle of the LCD screen
See “Step 6: Adjusting the LCD screen and
viewfinder” (p. 34).
Step 4: Attaching the handle, accessory shoe, microphone, LCD screen,
and grip (continued)

31
Getting Started
To attach the LCD screen to different
positions on the handle
There are also LCD screen attachment
points on the back of the handle (2
locations). The attachment procedure is the
same as described in “Attaching the LCD
screen”.
Removing the LCD screen
Remove the LCD screen using the reverse
procedure of attaching.
1 Remove the grip attachment
cover.
2 Connect the cable to the REMOTE
jack.
3 Align the grip mounting index
with the attachment point index
on the camcorder, and turn the
grip counterclockwise gently.
The grip is attached when it clicks into
the locked position.
b Note
• If the grip does not attach correctly, try to
attach the grip again without using
excessive force.
Attaching the grip
Indexes
Continued ,
32
4 Insert the cable connected in
step 2 into the slot on the side of
the grip as shown in the diagram.
b Note
• If the cable is not inserted in the slot, undue
force may be applied to the cable when
changing the mounting angle of the grip or
the cable may become snagged in the
rotation mechanism.
1 Disconnect the cable from the
REMOTE connector.
2 Press and hold the grip release
button on the camcorder, and
turn the grip clockwise until it
detaches.
b Note
• Always place the camcorder on a desk or other
horizontal surface when removing the grip.
z Tip
• You can attach rosettes to the grip attachment
point on the camcorder and to the mounting
point on the grip.
Rosette mount components are available from
Sony dealers or service representatives.
– Camcorder side: 4-546-932 (sold separately)
– Grips side: 4-547-089 (sold separately)
– Mounting screws: 7-627-556 (sold
separately)*
* 4 screws/rosette are required.
(screw holes indicated by a in the
following diagram)
Removing the grip
Grip release button
Camcorder side
Grip side
Step 4: Attaching the handle, accessory shoe, microphone, LCD screen,
and grip (continued)

33
Getting Started
Step 5: Turning on the camcorder and setting
the date and time
Set the ON/STANDBY switch on (❙).
When you use your camcorder for the first
time, the [CLOCK SET] screen appears.
To turn off the power
Set the ON/STANDBY switch to
STANDBY (
1
).
b Note
• If messages appear on the LCD screen, follow
the instructions.
Set the date and time when you use your
camcorder for the first time.
z Tip
• If you do not use your camcorder for about
2 months, the built-in rechargeable battery
gets discharged and the date and time settings
may be cleared from the memory. In that case,
charge the rechargeable battery and then set the
date and time again (p. 189).
To set the date and time again, press the
MENU button, and select (SYSTEM)
t [CLOCK SET].
1 Select your area by turning the
SEL/SET dial, then press the dial.
2 Set [SUMMERTIME], [Y] (year),
[M] (month), [D] (day), hour and
minute, by turning the SEL/SET
dial, then press the dial.
The clock starts.
• Set [SUMMERTIME] to [ON] to move the
time forward 1 hour.
Turning on the camcorder
Setting the date and time
MENU button
SEL/SET dial
Continued ,
34
• You can set any year up to the year 2037.
• Midnight is indicated as 12:00 AM, and
noon as 12:00 PM.
z Tip
• The date and time are automatically recorded on
the selected memory card, and can be displayed
during playback (p. 161).
You can change the on-screen displays to
show messages in a specified language.
Press the MENU button and select
(SYSTEM) with the SEL/SET dial. Select
the screen language in [LANGUAGE]
(p. 165).
Select [60i/50i SEL] beforehand, according
to the area in which you will use the
camcorder.
To change the setting, press the MENU
button and select (SYSTEM) t [60i/
50i SEL] with the SEL/SET dial (p. 166).
Changing the language setting
Setting [60i/50i SEL]
Step 6: Adjusting the
LCD screen and
viewfinder
You can select whether to use the LCD
screen or the viewfinder using the
following settings.
To use the LCD screen only
* See page 161.
To switch between LCD screen and
viewfinder automatically
This setting enables switching to
viewfinder display automatically whenever
your eye is near the eye sensor (p. 9) on the
side of the viewfinder.
When you move your eye away from the
viewfinder, the display switches back to the
LCD screen.
b Notes
• The default setting of [VF/LCD PANEL] is
[LCD PANEL].
• The LCD screen and the viewfinder cannot be
used at the same time.
z Tip
• The eye sensor will respond if the eye sensor is
blocked, even if you are not looking into the
viewfinder.
Switching between the LCD
screen and the viewfinder
LCD screen LCD screen
“LCD ON/OFF”
switch
[VF/LCD
PANEL] menu
setting
Connected ON LCD
PANEL
LCD screen LCD screen
“LCD ON/OFF”
switch
[VF/LCD
PANEL] menu
setting
Connected ON AUTO
Step 5: Turning on the camcorder and
setting the date and time (continued)

35
Getting Started
To use the viewfinder only
The LCD screen can be turned up, down,
forwards, or backward to any angle for easy
viewing.
The LCD screen display orientation can be
controlled using the MIRROR switch
(p. 114).
z Tip
• The LCD screen should be closed when the
camcorder is not in use or when it is being
moved to protect the LCD screen.
To adjust the viewfinder angle
You can adjust the angle of the viewfinder
to suit your shooting style.
To adjust the focus of the viewfinder
display
LCD screen LCD screen
“LCD ON/OFF”
switch
[VF/LCD
PANEL] menu
setting
Connected OFF –
Not
connected
– –
Adjusting the LCD screen
Adjusting the viewfinder
Diopter adjustment dial
Move it until the image
becomes clear.
Continued ,

36
When the picture in the viewfinder is
hard to see
If you cannot see the picture in the
viewfinder clearly under bright
circumstances, use the supplied large
eyecup. To attach the large eyecup, stretch
it slightly and fit it over the groove of the
eyecup attached to the camcorder. You can
attach the large eyecup facing either the
right or left side.
b Note
• Do not remove the eyecup pre-attached to the
camcorder.
Large eyecup
(supplied)
Step 7: Adjusting the
angle of the grip
You can adjust the angle of the grip to suit
your shooting style.
Normal position
Rotated toward the lens
(maximum rotation)
Rotated toward the rear
(maximum rotation)
Step 6: Adjusting the LCD screen
and viewfinder (continued)

37
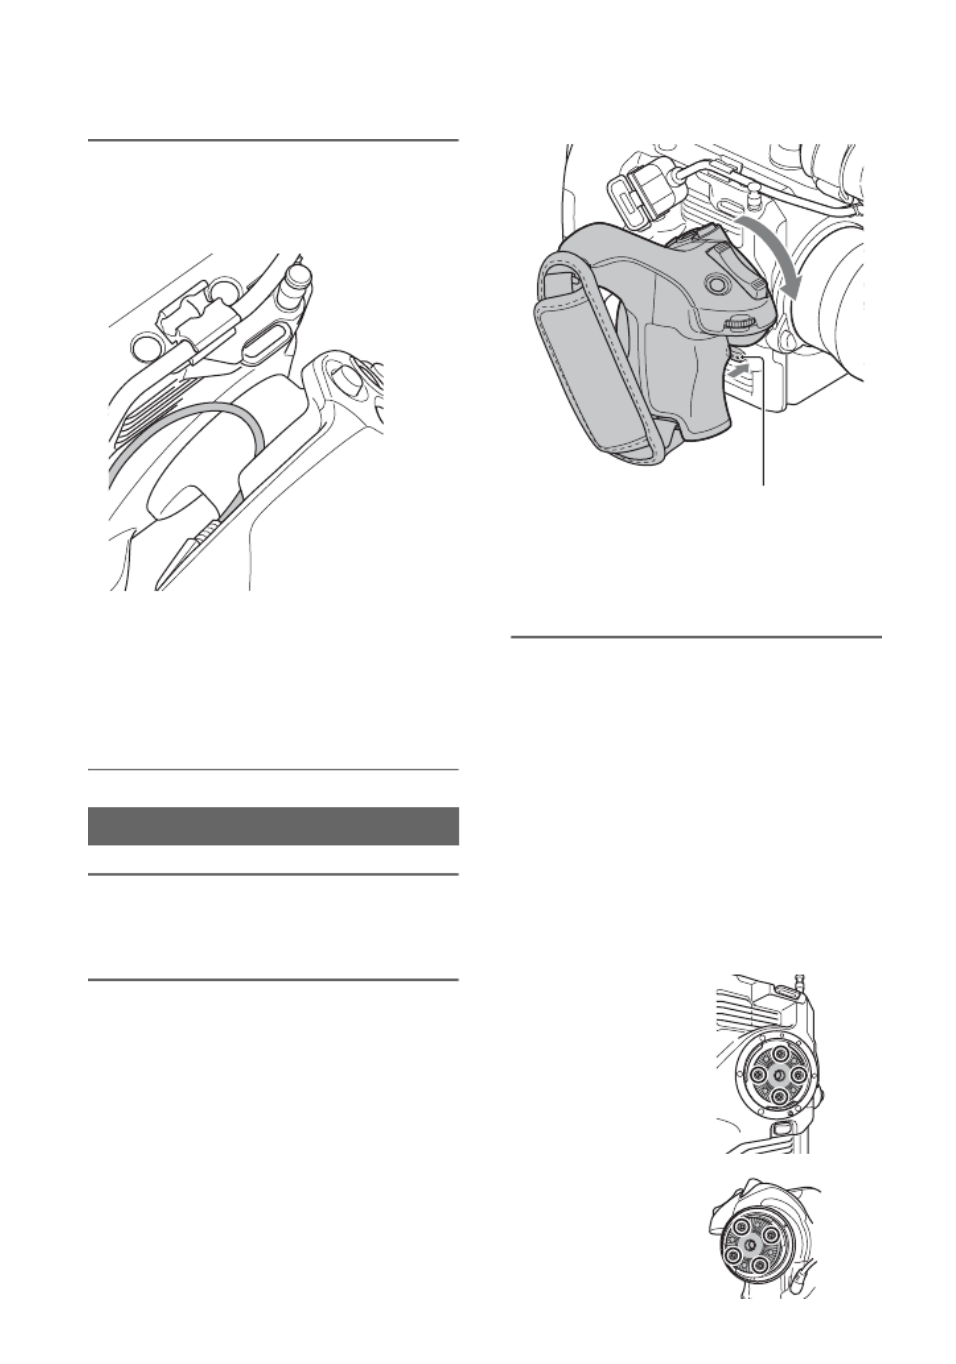
Getting Started
1 Move the grip rotate lever to the
position shown below, and turn
the grip while pressing the lever.
2 Release the grip rotate lever when
the grip is near the desired
position.
3 Move the grip slightly until it
clicks into the locked position.
When the grip is locked, move the grip
rotate lever back to its original position.
b Notes
• When finished, always check that the grip is
locked in position.
• The angle cannot be adjusted beyond the
adjustment range. Do not use force to try and
rotate the grip.
The recommended way of holding and
operating the grip is shown below.
Using the ASSIGN5/Fn button and
multi-selector
AOperate the ASSIGN dial using your index
finger.
BOperate the multi-selector and ASSIGN5
button using your thumb.
CHold the grip firmly using your middle
finger, ring finger, and little finger.
Zooming in/out
AOperate the zoom lever using your index
finger and middle finger.
BHold the grip firmly using your thumb.
Holding the grip (recommended
method)
Continued ,

38
CHold the grip firmly using your ring finger
and little finger.
Step 8: Inserting a
memory card
Supported memory cards
*1 SDXC UHS Speed Class (U3) is required to
record at 100 Mbps.
*2 SDXC memory card (U3) is required for
simultaneous XAVC HD (50 Mbps) and proxy
(9 Mbps) recording.
b Notes
• Operation with all memory cards is not assured.
• Only “Memory Stick PRO Duo” media and
“Memory Stick PRO-HG Duo” media, which
are half the size of standard “Memory Stick”
media, or standard size SD cards can be used
with this camcorder.
File format Supported memory cards
AVCHD SD, SDHC, SDXC
memory card (Class 4 or
U1 or faster)
Memory Stick PRO Duo
(Mark2), Memory Stick
PRO-HG Duo
AVCHD
(Slow & Quick
Motion, Super
Slow Motion)
SDHC, SDXC memory
card (Class 10 or U1 or
faster)
Memory Stick PRO-HG
Duo
XAVC HD SDXC memory card (Class
10 or U1 or faster)
XAVC HD
(Slow & Quick
Motion, Super
Slow Motion)
SDXC memory card (U3)
XAVC QFHD SDXC memory card (Class
10 or U1 or faster)*1
XAVC QFHD
(Slow & Quick
Motion)
SDXC memory card (U3)
XAVC HD/
Proxy
simultaneous
recording
SDXC memory card (Class
10 or U1 or faster)*2
XAVC QFHD/
Proxy
simultaneous
recording
SDXC memory card (U3)
Step 7: Adjusting the angle of the
grip (continued)

40
Recording
Recording
Your camcorder records movies on memory cards. Do the following steps to record.
1 Set the ON/STANDBY switch D to ON (❙).
2 Press a record button AC F to begin recording.
(In the following descriptions, the “record button” refers collectively to the handle record
button, START/STOP button on the camcorder, and START/STOP button on the grip.)
The recording lamps BE light up during recording.
To stop recording, press the record button again.
b Notes
• See page 178 about the recording time.
• If a movie file size exceeds 2 GB while recording in AVCHD format, the camcorder automatically divides
the file and creates a new one.
• The menu settings, the picture profile settings, and the settings made by the FULL AUTO button are
stored in your camcorder when you slide the ON/STANDBY switch to STANDBY (1). The memory
card access lamp lights up while the settings are being stored. If you remove the battery pack or the AC
Adapter before turning off the power, the settings return to the previous settings.
Recording
1080/60i
[STBY] t [REC]
41
Recording
z Tips
• For details about changing the screen display during recording, see page 122.
• Indicators displayed on the LCD screen during recording are shown on page 12.
• The recording lamp can be set to stay off ([REC LAMP[F]], [REC LAMP[R]], page 166).
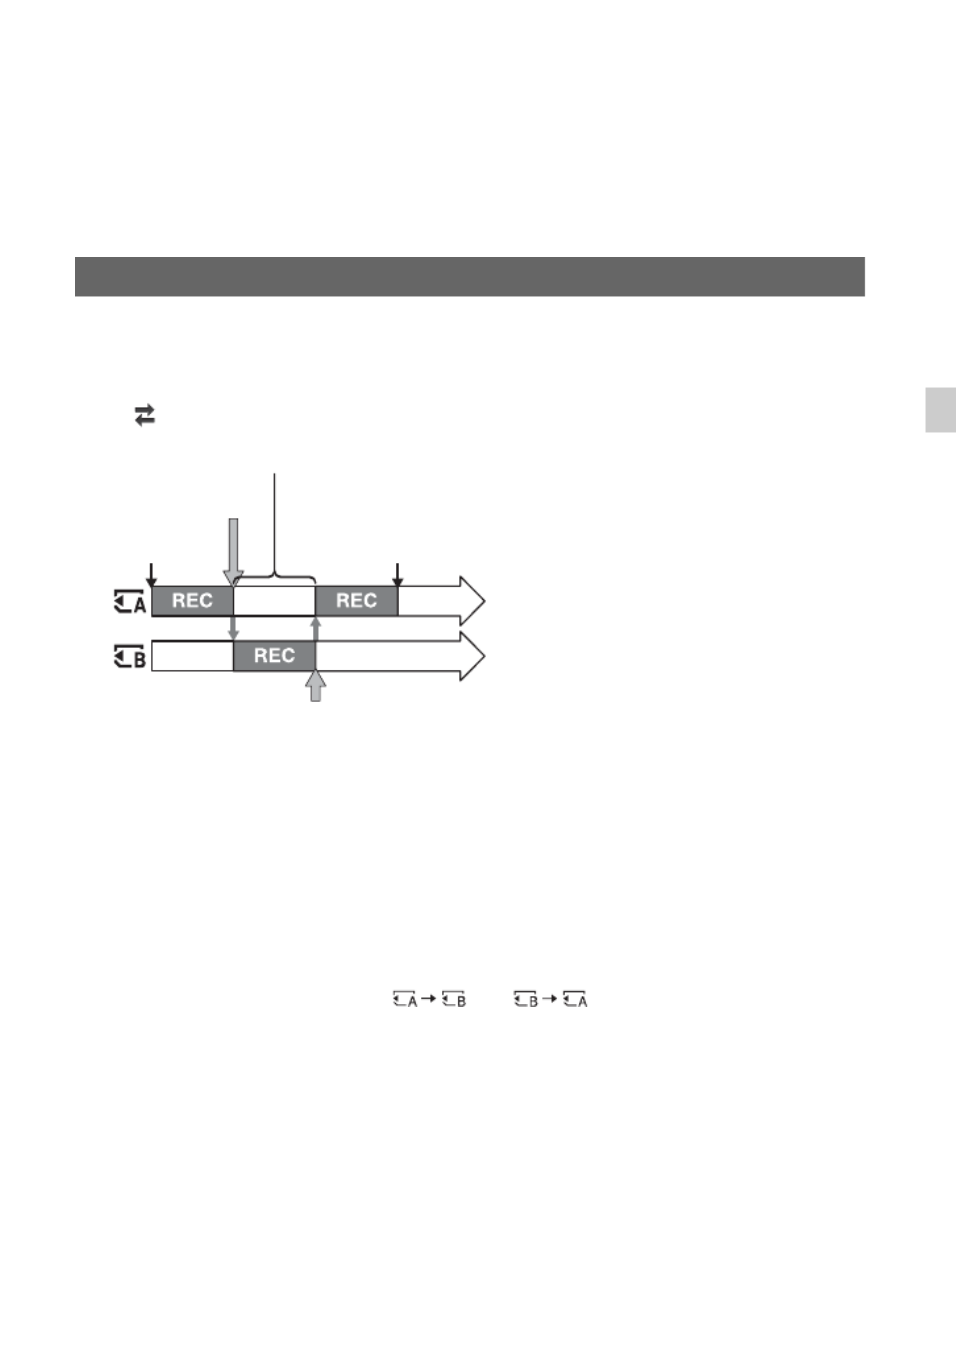
Insert memory cards each in both slots A and B so the camcorder switches memory card A (or
B) just before the remaining space on the other one runs out, and continues recording on the
next memory card automatically.
Do the following setting before recording.
Select (REC/OUT SET) t [REC SET] t [SIMUL/RELAY REC] t [RELAY REC].
b Notes
• Relay recording (Relay Rec) is not supported when using the following functions.
– Slow & Quick Motion
– Super Slow Motion
– Streaming
• Do not eject the memory card that is currently being used for recording. When replacing a memory card
while recording, replace only the one in the slot whose memory card access lamp is off.
• Even if you press the SLOT SEL button, while recording movies, you cannot switch the slot currently
being used.
• When the remaining recording time of the memory card being used is less than 1 minute and the other slot
has a recordable memory card inserted, [ ] or [ ] appears on the camcorder screen.
The indicator turns off when the memory card is switched.
• If you start recording on a memory card with the remaining recording time of less than 1 minute, the
camcorder may not be able to relay-record. To relay-record without failing, make sure that the memory
card has more than 1 minute when you start recording.
• Seamless playback of relay-recorded movies with this camcorder is not supported.
• You can re-combine relay-recorded movies using the “Catalyst Browse” application software.
• The maximum recording time using relay recording in both XAVC and AVCHD is 13 hours. Recording
stops automatically when the maximum recording time elapses.
Continuous recording on the memory cards (Relay Rec)
REC start
Small space
Exchange the recordable memory card
Small space
REC end
REC: Recording
Continued ,

42
You can record movies on both memory card A and memory card B simultaneously.
Do the following setting before recording.
Select (REC/OUT SET) t [REC SET] t [SIMUL/RELAY REC] t
[SIMULTANEOUS REC].
b Note
• Simultaneous recording (Simul Rec) is not supported when using the following functions.
– Slow & Quick Motion
– Super Slow Motion
– Streaming
When using SIMULTANEOUS REC, you can start and stop recording on different memory
cards by using the START/STOP buttons (camcorder and grip) and the handle record button.
In the default setting, movies are recorded on both the memory card A and B at the same time
when either record button is pressed.
• REC BUTTON (START/STOP buttons on camcorder and grip): ,
• HANDLE REC BUTTON: ,
To change the setting
Select (REC/OUT SET) t [REC SET] t [REC BUTTON SETTING].
Recording movies using both memory card A and B (Simul Rec)
Changing the setting of the START/STOP button and handle record
button
REC BUTTON SETTING setting Button and memory card
REC BUTTON: ,
HANDLE REC BUTTON: ,
Recording on both the memory card A and the
memory card B starts and stops at the same time when
either record button is pressed.
REC BUTTON:
HANDLE REC BUTTON:
Recording on the memory card A starts and stops
when the START/STOP button is pressed, and on the
memory card B when the handle record button is
pressed.
REC BUTTON:
HANDLE REC BUTTON:
Recording on the memory card B starts and stops
when the START/STOP button is pressed, and on the
memory card A when the handle record button is
pressed.
Recording (continued)

43
Recording
1 Press the MENU button D.
2 Select (CAMERA/PAINT)
t
[ZOOM SET] t t [ZOOM TYPE]
zoom type with the SEL/SET dial
E.
The zoom type varies as shown below,
depending on the type of the attached
lens.
z Tip
• CLEAR IMAGE ZOOM is a zoom function that
features little or no degradation in image
quality.
Press the handle zoom lever A or grip
zoom lever C slightly to zoom slowly, and
press it further to zoom more quickly.
z Tips
• Keep your finger on the power zoom lever. If
you remove your finger, the operation sound of
the power zoom lever may also be recorded.
Adjusting the zoom
Selecting the zoom type
Attached
lens
[ZOOM TYPE] setting
OPTICAL
ZOOM ONLY
ON[CLEAR
IMAGE ZOOM]
Fixed
focal
length lens
/ zoom
lens
Zoom using
zoom lever
not
supported.
Clear image
zoom
supported.
Power
zoom lens
Optical zoom
only
Optical zoom
and clear image
zoom
supported.
Adjusting the zoom with the zoom
lever
Attached
lens
[ZOOM TYPE] setting
OPTICAL
ZOOM ONLY
ON[CLEAR
IMAGE ZOOM]
Wide angle view:
Wide
Close view:
Telephoto
Continued ,
44
• You can change the handle zoom lever function
([HANDLE ZOOM], p. 150).
• You can switch the zoom display between a bar
indicator and number indicator ([ZOOM
DISPLAY], p. 160)
You can zoom at the desired speed by
turning the zoom ring B. Fine adjustment
is also possible.
b Note
• Turn the zoom ring B at a moderate speed. If
you turn it too fast, the zoom may lag behind the
zoom ring rotation, or the operation sound of the
zoom may also be recorded.
Turn the zoom ring right or left to decide on
the size of the subject in your image.
Zooming must be done before focusing.
When using a power zoom lens, you can
also zoom with the zoom lever of the lens.
b Notes
• The available operations and operating methods
depend on the lens attached. Refer to the
operating manual that comes with your lens.
• Do not grab or apply a strong force to the lens
cylinder as it rolls out when zooming. The lens
may be damaged.
• Keep your finger on the zoom lever. If you
move your finger off the zoom lever, the
operation sound of the zoom lever may also be
recorded.
Adjusting the zoom with the zoom
ring
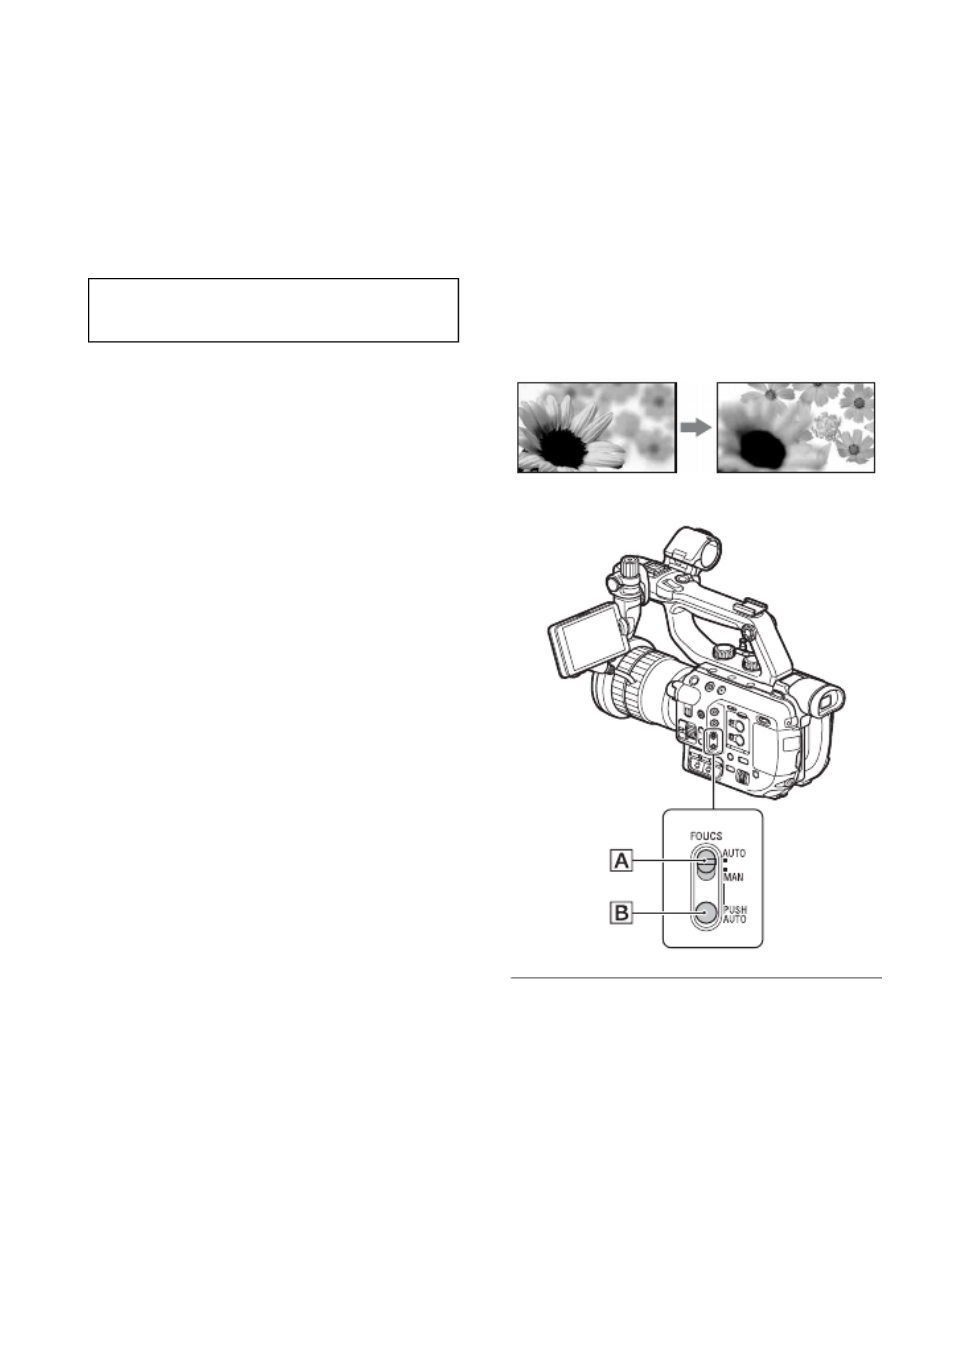
Adjusting the focus
You can adjust the focus manually for
different recording conditions.
Use this function in the following cases.
– To record a subject behind a window covered
with raindrops.
– To record horizontal stripes.
– To record a subject with little contrast
between the subject and its background.
– When you want to focus on a subject in the
background.
– To record a stationary subject using a tripod.
1 During recording or standby, set
the FOCUS (AUTO/MAN) switch
A to “MAN.”
9 appears.
Recording (continued)

45
Recording
2 Rotate the focus ring and adjust
the focus.
9 changes to when the focus
cannot be adjusted any farther, and
changes to when the focus cannot be
adjusted any closer.
To adjust automatically
Set the FOCUS (AUTO/MAN) switch A
to “AUTO.”
9 disappears and the automatic focus
adjustment is restored.
z Tips
• Can be operated using Direct Menu (p. 61).
• You can assign this function to the ASSIGN dial
(p. 85).
• The focal length information (for when it is dark
and hard to adjust the focus) appears for about
3 seconds in the following cases.
– When you set the FOCUS (AUTO/MAN)
switch A to “MAN” and 9 appears on the
LCD screen.
– When you rotate the focus ring while 9 is
displayed on the LCD screen.
• You can switch the focal length information
between meters and feet ([FOCUS DISPLAY],
p. 160).
To measure the precise recording
distance
The image sensor position mark and tape
measure hook are on the same plane as the
image sensor. To measure the precise
distance between the camcorder and the
subject, use this mark or tape measure hook
as a reference.
You can attach the end of a tape measure to
the hook, and measure the distance from the
subject.
b Note
• You cannot focus on a subject closer to the lens
than the minimum focus distance of the lens
used. Make sure you are not too close to the
subject.
To use push auto focus
Set the FOCUS (AUTO/MAN) switch A
to “MAN,” then press and hold the PUSH
AUTO button B.
The image is shot with automatic focus.
Keep the button pressed to shoot. If you
Using automatic focus/fixed
focus temporarily (push auto
focus/focus hold)
Tape measure
hook
Image sensor position mark
Continued ,

46
release the button, the setting returns to
manual focusing.
To use focus hold
Set the FOCUS (AUTO/MAN) switch A
to “AUTO,” then press and hold the PUSH
AUTO button B.
The image is shot with the focus fixed at the
point you start to press the button. Keep the
button pressed to shoot. If you release the
button, the setting returns to auto focusing.
b Note
• If the lens has the same function button as your
camcorder, the function on the lens works the
same as your camcorder. For example, when
focus hold is active on your camcorder, the
button on the lens functions as focus hold.
The selected area on the LCD screen is
magnified and displayed. This is useful
when adjusting the focus.
Press the FOCUS MAG button A on
the grip.
The setting changes with each press of the
button.
You can change the position of the enlarged
display using the multi-selector B on the
grip or the SEL/SET dial on the camcorder.
Press the multi-selector B or SEL/SET
dial to set the enlarged display position
back to the center.
b Note
• Even though the image appears enlarged on the
LCD screen, the recorded image is not enlarged.
z Tips
• You can assign this function to an ASSIGN
button (p. 85).
• You can change the magnification ratio with
[FOCUS MAG RATIO] (p. 159).
Using the focus magnifier
Enlarged display position
Adjusting the focus (continued)

47
Recording
The camcorder detects faces and focuses on
one of them (default setting is [OFF]). You
can use this function when the FOCUS
(AUTO/MAN) switch A is set to
“AUTO.”
1 Press the MENU button C.
2 Select (CAMERA/PAINT)
t
[FACE DETECTION] t [ON] with
the SEL/SET dial B.
Faces are detected.
When the faces are detected, frames
appear on the LCD screen.
3 Move the selection cursor
(orange colored frame), and
select the priority face with the
SEL/SET dial B, then press the
dial.
The frame on the priority face changes
to a double frame.
To cancel face detection
Move the selection cursor (orange colored
frame) onto the frame (double frame) on the
priority face, using the SEL/SET dial B,
then press the dial.
b Notes
• Faces may not be detected depending on the
recording environment, the condition of the
subject or the settings.
• You may not be able to get the proper effect in
some recording environments. If this happens,
set [FACE DETECTION] to [OFF].
• When [FACE DETECTION] is set to [ON], you
cannot adjust shutter speed, etc. To adjust
shutter speed, etc., set [FACE DETECTION] to
[OFF] temporarily by setting the FOCUS
(AUTO/MAN) switch C to “MAN.”
• The face detection function is not available
while using clear image zoom.
• For details about other limitations, see
“Function limitations when recording” (p. 180).
z Tips
• You can assign this function to an ASSIGN
button (p. 85).
• To make it easy to detect faces, record under the
following conditions:
– Record in a moderately bright place
– Do not obscure the face with a hat, mask,
sunglasses, etc.
– Face the front of the camera
Focusing on a detected face
(Face detection)
Selection cursor (orange colored frame)
Priority face frame (double frame)

48
Changing the recording setting/image size
You can select the file format in [FILE
FORMAT] and the recording format (bit-
rate, image size, frame rate, and scanning
system) in [REC FORMAT].
You can select either XAVC QFHD,
XAVC HD, or AVCHD for the file format
on the camcorder. (For details about RAW
format recording, see page 70.)
Change the image quality according to the
recording situation or the playback device.
1 Press the MENU button.
2 Select (REC/OUT SET) t
[REC SET] t [FILE FORMAT] t
a desired format with the SEL/
SET dial.
3 Select (REC/OUT SET) t
[REC SET] t [REC FORMAT] t
a desired format with the SEL/
SET dial.
XAVC QFHD (4K mode)
• Image size: 2160 (3840×2160)
• Frame rate: 30/25/24
• Scanning system: p (progressive)
• Bit rate: 100 Mbps/60 Mbps
XAVC HD
• Image size: 1080 (1920×1080) /
720 (1280×720)
• Frame rate: 60/50/30/25/24
• Scanning system: p (progressive) / i (interlaced)
• Bit rate: 50 Mbps/35 Mbps/25 Mbps
AVCHD
• Image size: 1080 (1920×720) / 720 (1280×720)
• Frame rate: 60/50/30/25/24
• Scanning system: i (interlaced) / p (progressive)
• Bit rate
PS: max. 28 Mbps
FX: max. 24 Mbps
FH: approx. 17 Mbps (average)
HQ: approx. 9 Mbps (average)
Selecting the file format and
recording format
60i 50i
2160/30p 100Mbps 2160/25p 100Mbps
2160/30p 60Mbps 2160/25p 60Mbps
2160/24p 100Mbps
–
2160/24p 60Mbps
–
60i 50i
1080/60p 50Mbps 1080/50p 50Mbps
1080/60p 35Mbps 1080/50p 35Mbps
1080/60i 50Mbps 1080/50i 50Mbps
1080/60i 35Mbps 1080/50i 35Mbps
1080/60i 25Mbps 1080/50i 25Mbps
1080/30p 50Mbps 1080/25p 50Mbps
1080/30p 35Mbps 1080/25p 35Mbps
1080/24p 50Mbps –
1080/24p 35Mbps –
720/60p 50Mbps 720/50p 50Mbps
60i 50i
1080/60p PS 1080/50p PS
1080/60i FX 1080/50i FX
1080/60i FH 1080/50i FH
1080/30p FX 1080/25p FX
1080/30p FH 1080/25p FH
1080/24p FX –
1080/24p FH –
720/60p FX 720/50p FX
720/60p FH 720/50p FH
720/60p HQ 720/50p HQ

49
Recording
Frame rate when [60i] is selected
The frame rate displayed on the camcorder
corresponds to the values in the following table.
b Note
• For details about other limitations in each
recording format, see “Function limitations
when recording” (p. 180).
This function allows you to simultaneously
record a low bitrate proxy file at the same
time as recording the high bitrate original
file movie.
Function limitations when proxy
recording
Some functions on the camcorder are
unavailable when proxy recording. For
details, see “Function limitations when
recording” (p. 180).
Proxy recording supported formats
Proxy recording is supported only when
[FILE FORMAT] is set to XAVC QFHD or
XAVC HD. Proxy recording is not
available when set to AVCHD.
There are limitations on the size of the
original file movie and the proxy file
movie.
For details, see “Proxy recording supported
formats” (p. 182).
Proxy recording
For details about media that support proxy
recording, see “Supported memory cards”
(p. 38).
1 Press the MENU button.
2 Select (REC/OUT SET) t
[REC SET] t [PROXY REC
MODE] t [ON/OFF] t [ON] with
the SEL/SET dial.
appears on the screen.
3 Select (REC/OUT SET) t
[REC SET] t [PROXY REC
MODE] t [SIZE] t desired
image size with the SEL/SET dial.
4 Press the record button to begin
recording.
b Note
• The camcorder can no longer record when the
maximum number of XAVC files is reached
(600).
About proxy recording files
• For details about the storage location of
proxy recording files, see “File/folder
structure on the memory card” (p. 185).
• Proxy files cannot be played on the
camcorder. appears on the thumbnail
of the original file.
• A proxy file is also deleted/protected
when the corresponding original file is
deleted/protected.
Frame rate on the LCD
screen Actual frame rate
24 23.98
30 29.97
60 59.94
Proxy recording

50
Adjusting the brightness
You can adjust the brightness by
controlling the amount of light, etc., using
iris, ISO sensitivity/gain, shutter speed, or
ND filter.
b Note
• When you set the FULL AUTO button on (lit),
the iris, ISO sensitivity/gain, shutter speed, and
white balance are adjusted automatically. You
cannot adjust them manually.
1 Press the FULL AUTO button A
to set full auto mode off.
2 Press the IRIS button E.
next to the iris value disappears.
3 Set the ND/IRIS switch B to the
“IRIS” position.
4 Turn the ND/IRIS dial C to adjust
the value.
The volume of the light increases the
more that you open the aperture
(decreasing F value). The volume of the
light decreases the more that you close
the aperture (increasing F value).
To temporarily adjust the iris
automatically
Press and hold the IRIS PUSH AUTO
button .D
The iris is adjusted automatically for as
long as you hold the button down.
To adjust automatically
Press the IRIS button E.
appears next to the iris value.
z Tips
• Can be operated using Direct Menu (p. 61).
• You can assign this function to the ASSIGN dial
(p. 85).
• The range of focus, an important effect of the
aperture, is called the depth of field. The depth
of field gets shallower as the aperture is opened,
Adjusting the iris
Iris value

51
Recording
and deeper as the aperture is closed. Use the
aperture creatively to obtain the desired effect in
your photography.
• You can assign [IRIS PUSH AUTO] to an
ASSIGN button (p. 85).
You can adjust the ISO sensitivity and gain
manually.
1 Press the FULL AUTO button A
to set full auto mode off.
2 Press the ISO/GAIN button G.
next to the ISO value or gain value
disappears.
3 Set the ISO/GAIN L/M/H switch G
to the desired position.
The set ISO value or gain value appears.
You can set the value for each L/M/H
switch position using [ISO SET] or
[GAIN SET] in the (CAMERA/
PAINT) menu (p. 148).
To adjust automatically
Press the ISO/GAIN button G.
The ISO value or gain value disappears, or
appears next to the ISO value or gain
value.
z Tips
• Can be operated using Direct Menu (p. 61).
• You can assign this function to the ASSIGN dial
(p. 85).
• You can switch the displayed value between
ISO sensitivity and gain using [ISO/GAIN SEL]
in the menu. Note that ISO sensitivity and gain
are separately saved with different values
(p. 147).
You can adjust and fix the shutter speed
manually. You can make a moving subject
look still or emphasize the fluid motion of a
moving subject by adjusting the shutter
speed.
1 Press the FULL AUTO button A
to set full auto mode off.
2 Press the SHUTTER SPEED
button H to highlight the shutter
speed value.
next to the shutter speed value disappears.
Adjusting the ISO sensitivity/
gain
ISO value/gain value
Adjusting the shutter speed
Shutter speed value
Continued ,

52
3 Turn the SEL/SET dial F to
adjust the shutter speed.
The following shutter speed adjustment
ranges are available:
When [60i] is selected:
1/8 to 1/10000
(1/6 to 1/10000 when shooting with
24p)
When [50i] is selected: 1/6 to 1/10000
The denominator of the set shutter speed
appears on the LCD screen. For
example, [100] appears on the LCD
screen when you set the shutter speed to
1/100 second. The larger the value on
the LCD screen is, the faster the shutter
speed is.
4 Press the SEL/SET dial F to
apply the shutter speed.
To readjust the shutter speed, repeat the
procedure from step 2.
z Tips
• Can be operated using Direct Menu (p. 61).
• It is difficult to focus automatically at a lower
shutter speed. Manual focusing with your
camcorder attached to a tripod is recommended.
• When recording under fluorescent lamps,
sodium lamps, or mercury lamps, the picture
may flicker or change colors, or may have
horizontal bands of noise.
You may be able to improve the situation by
adjusting the shutter speed to 1/50 if the power
frequency of your area is 50 Hz, or 1/60 in a 60
Hz area.
• You can switch the shutter speed display
between seconds and degrees ([SHUTTER
DISPLAY], page 160).
To adjust automatically
Press the SHUTTER button H twice.
The shutter speed value disappears, or
appears next to the shutter speed value.
Setting value after switching [60i/50i
SEL]
The shutter speed of the same level before
changing the [60i/50i SEL] setting is
applied. See the following table for the
shutter speeds on each level.
Level 60i/60p/30p 24p 50i/50p/25p
0–6–
1 8 12 6
2 15 24 12
3 30 25 25
4 50 40 30
5 60 48 50
6 90 50 60
7 100 60 100
8 125 96 120
9 180 100 150
10 250 120 215
11 350 144 300
12 500 192 425
13 725 200 600
14 1000 288 1000
15 1500 400 1250
16 2000 576 1750
17 3000 1200 2500
18 4000 2400 3500
19 6000 4800 6000
20 10000 10000 10000
Adjusting the brightness (continued)
55
Recording
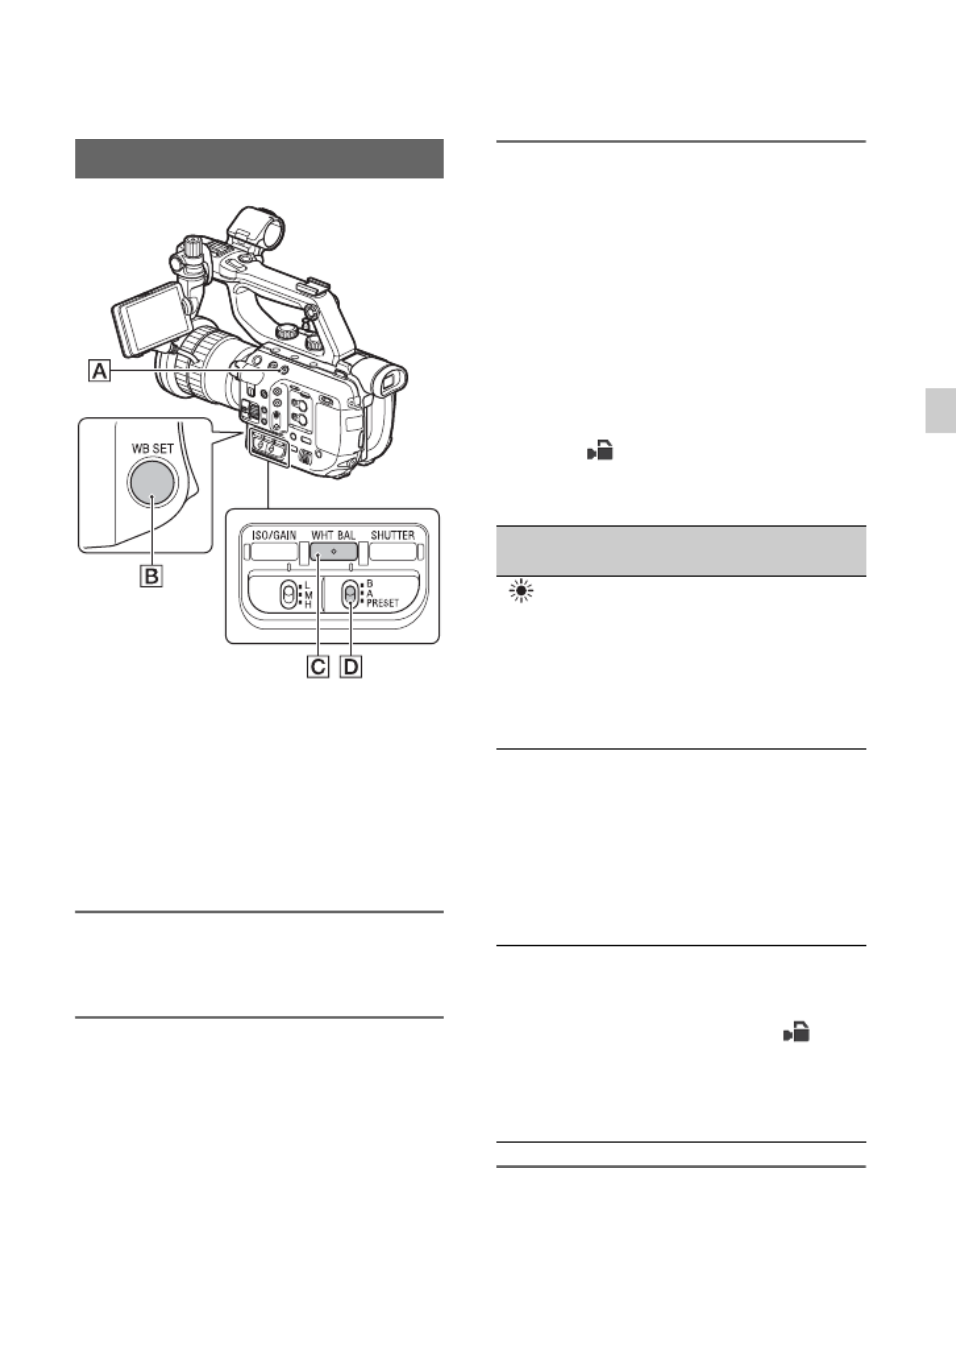
Adjusting the color tone
You can adjust and set the white balance
according to the lighting conditions of the
recording environment.
z Tips
• You can assign [WB PRESET] to an ASSIGN
button (p. 85).
• Can be operated using Direct Menu (p. 61).
1 Press the FULL AUTO button A
to set full auto mode off.
2 Press the WHT BAL button C to
display the WHT BAL indicator.
3 Set the B/A/PRESET switch D to
the desired position.
x Setting the A/B value
Select A or B for recording with the
white balance setting (p. 56) stored in
memory A or B.
• When using a commercially available ND
filter, this adjustment is recommended.
x To use the PRESET value of white
balance
Select (CAMERA/PAINT) t
[WB PRESET] and select a desired
setting.
Adjusting the white balance
Setting value Example of recording
conditions
Outdoor
([OUTDOOR])
• When recording a night
scene, neon lighting,
fireworks, etc.
• When recording a
sunrise, sunset, etc.
• Under daylight
fluorescent lamp
n Indoor
([INDOOR])
• Where lighting
conditions change,
such as at a party place,
etc.
• Under video light, such
as in a studio, etc.
• Under a sodium or
mercury lamp
Color
temperature
setting ([MANU
WB TEMP])
• You can set a desired
color temperature
between 2300K and
15000K with
(CAMERA/PAINT)
t [WB TEMP SET]
(default setting is
6500K).
Continued ,

57
Recording
High Dynamic Range (HDR)
Reproduction of brightness over a wider
range than previously available is now
supported by applying an HDR-compatible
picture profile. The camcorder supports
Hybrid Log-Gamma (HLG), with four
selectable settings.
The [HLG] setting is equivalent to ITU-R
BT.2100. The [HLG1], [HLG2], and
[HLG3] settings enable images to be
reproduced with a wider dynamic range
without images that appear unnatural, as
can arise in existing camera image
reproduction.
1 Select (CAMERA/PAINT)
menu t t [PICTURE PROFILE]
[PP10].
2 Adjust the picture profile items,
as required.
3 Press the record button.
Movies shot in HDR are recorded on the
memory card.
b Notes
• For XAVC recording
When recording HDR video in XAVC format
on the camcorder, the color space, gamma, and
other metadata required for HDR playback and
display are stored in the video file.
On devices used for playback and display that
support the metadata, the video is displayed
automatically with the appropriate settings. On
devices that do not support the metadata,
manual configuration is required.
• For AVCHD recording / MPEG HD
recording
AVCHD format recordings and MPEG HD
format recordings do not support HDR
metadata. For appropriate playback and display
of HDR, manual configuration is required.
The following items have been added.
[GAMMA] items
(Default setting in bold)
[HLG1], [HLG2], and [HLG3] all use the
same gamma curve characteristic. Only the
dynamic range and noise suppression
characteristics differ.
* On the PXW-FS5, this function is supported
using Ver. 4.0 or later (see page 5).
Shooting using HDR-compatible
picture profile
Picture profile
number Example setting
PP10 Setting for
shooting in HDR
Picture profile HDR-related
items
Item Description
[HLG] Setting equivalent to ITU-R
BT.2100.
[HLG1] Setting that provides greater
noise suppression than
[HLG2]. However, the
dynamic range that can be shot
is narrower.
[HLG2] Setting with balance between
dynamic range and noise
suppression.
[HLG3] Setting that provides wider
dynamic range than [HLG2].
However, the noise level rises.
Continued ,

58
b Notes
• The maximum value of the video output varies
depending on whether [HLG1], [HLG2], or
[HLG3] is selected ([HLG1]: 87%, [HLG2]:
95%, [HLG3]: 100%). Test shooting beforehand
is recommended to prevent use of an
inappropriate setting during actual shooting.
• The following limitations apply when [HLG],
[HLG1], [HLG2], or [HLG3] is selected.
– If [MODE] is set to AUTO for [KNEE], the
[KNEE] setting becomes disabled.
– [COLOR MODE] can only be set to
[BT.2020] or [709].
– The [BLACK GAMMA] setting is disabled.
– [AUTO BACK LIGHT] cannot be used.
[COLOR MODE] items
(Default setting in bold)
b Note
Color bars are not output correctly when
[BT.2020] is selected.
The viewfinder and LCD screen of the
camcorder do not support HDR, and so are
not appropriate for displaying HDR.
However, they can display an image to aid
shooting using the gamma display assist
function.
The gamma display assist function affects
only the monitoring video or playback
video displayed in the viewfinder or on the
LCD screen. The recorded video and output
video are not affected.
1Select (DISPLAY SET) menu
t t
[GAMMA DISP ASSIST]
[ON/OFF] t [ON].
2 Select [GAMMA DISP ASSIST] t
[TYPE].
Item Description
[BT.2020] Standard color tone when
[HLG], [HLG1], [HLG2], or
[HLG3] is selected for
[GAMMA].
[709] Color tone for recording
HDTV format (BT.709) color
when [HLG], [HLG1],
[HLG2], or [HLG3] is selected
for [GAMMA].
HLG3
HLG2
HLG1
100%
100
80
60
40
20
0
0 0.2 0.4 0.6 0.8 1
95%
87%
HLG1 to HLG3
Gamma input
Video output (%)
Using the gamma display assist
function
High Dynamic Range (HDR) (continued)

59
Recording
3 Select one of the following.
(Default setting in bold)
* Requires the MPEG HD option.
z Tip
When the camcorder is powered using the battery
pack, changing the brightness of the LCD will
make the HDR image easier to monitor. In the
DISPLAY SET menu, select [LCD BRIGHT] t
[BRIGHT].
Icon display
When the gamma display assist function is
ON, the following icons are displayed on
the shooting screen and playback screen.
You can play back video recorded in HDR
on the camcorder.
When playing files recorded in XAVC
QFHD or XAVC HD format, an “HLG”
icon is displayed on the thumbnail screen
and playback screen (see following
diagrams).
b Notes
• An “HLG” icon is not displayed when playing
AVCHD or MPEG HD format files recorded in
HDR.
• The HDMI output and SDI output do not
support HDR metadata. For appropriate display
of HDR, manual configuration is required.
Thumbnail screen
* Only files recorded in XAVC format.
Item Description
[AUTO] Shooting screen:
Automatically corrects
the picture according to
the picture profile setting.
Playback screen: For
AVCHD, MPEG HD,
and XAVC non-HLG
files, automatically
corrects the picture
according to the current
picture profile setting.
For XAVC HLG files,
automatically corrects the
picture according to the
gamma and color mode
of the playback image.
Thumbnail screen:
Maintains the recent
setting (shooting/
playback).
[HLG
(BT.2020)]
Applies suitable correction
for when [GAMMA] is
HLG and [COLOR MODE]
is set to [BT.2020].
[HLG(709)] Applies suitable correction
for when [GAMMA] is
HLG and [COLOR MODE]
is set to [709].
Icon Meaning
[HLG(BT.2020)] in use
[HLG(709)] in use
Playing video recorded in HDR
on the camcorder
“HLG” icon*
Continued ,

61
Recording
Using Direct Menu
Direct Menu allows you to change menu
settings using single-hand operation from
the grip.
The following settings can be changed
using Direct Menu.
• Focus (p. 44)
• AE shift level value (p. 149)
• ND filter value (p. 53)
• Iris value (p. 50)
• ISO sensitivity/gain (p. 51)
• Shutter speed value (p. 51)
• White balance value (p. 55)
1 Press the ASSIGN5 button A on
the grip.
By default, the Direct Menu function is
assigned to the ASSIGN5 button A,
but it can also be assigned to other
buttons.
After entering Direct Menu mode, a
cursor (underline) is displayed for items
along the bottom of the LCD screen.
• Orange cursor indicates the selected
item.
• White cursor indicates selectable
items.
For example, the iris value 4 is
selected in the following diagram.
A Focus value
B AE shift level value
C ND filter value
D Iris value
E ISO sensitivity/gain
F Shutter speed value
G White balance value
2 Move the multi-selector B left/
right to move the orange cursor
to select the target item to set.
3When (auto) appears for the
item to set, moving the multi-
selector up/down clears the
mark.
Orange cursor
Continued ,
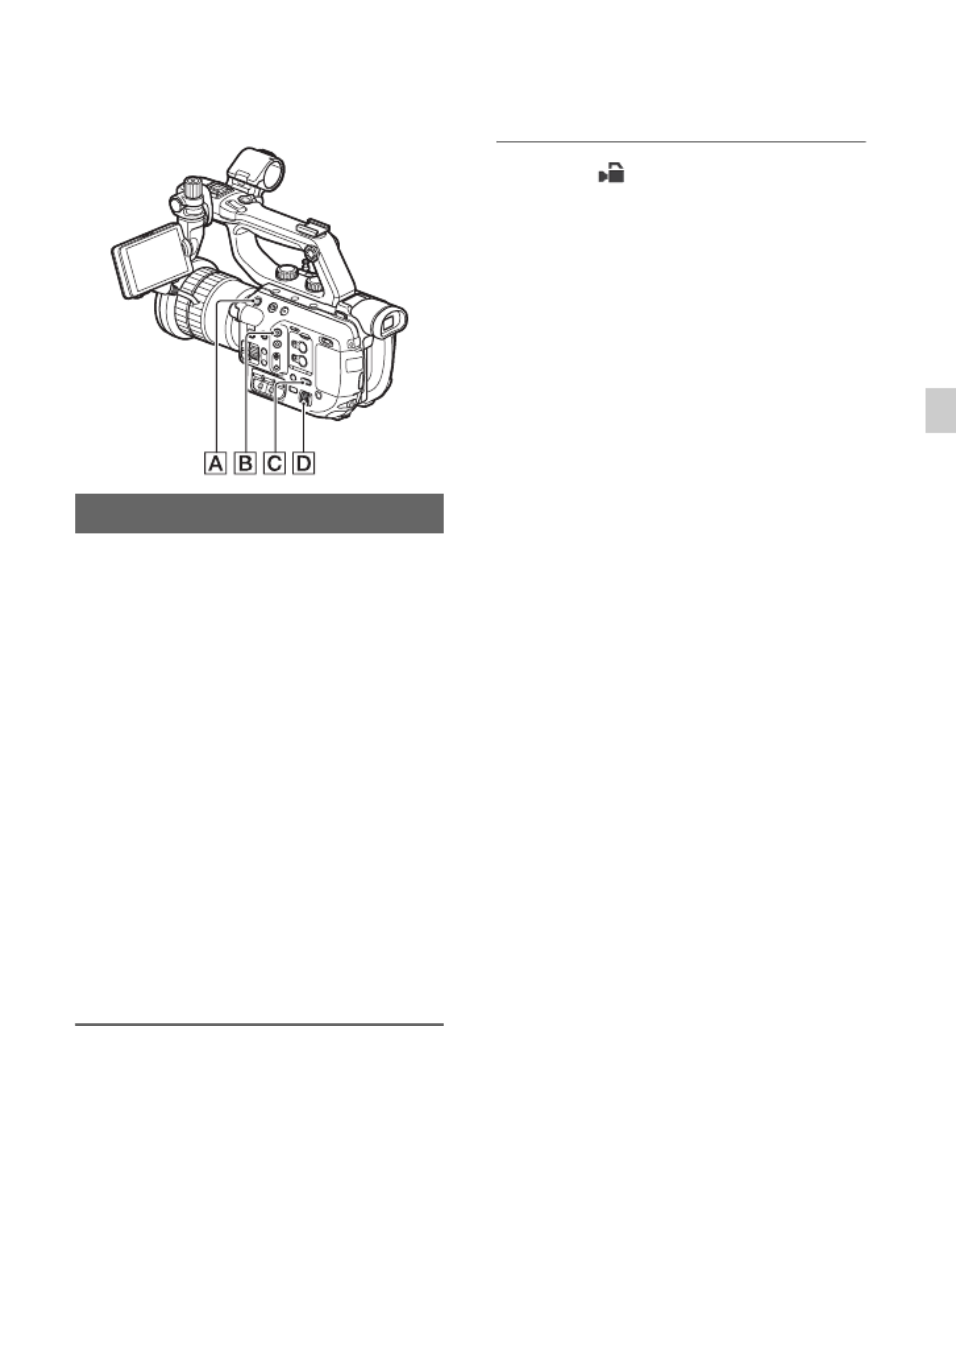
63
Recording
Slow & Quick Motion/Super Slow Motion
recording
By recording with a frame rate that is
different from the playback frame rate, you
can record smooth slow motion or quick
motion images.
b Notes
• The supported memory cards vary depending on
the file format (p. 38).
• When recording with the Quick Motion
recording function, your camcorder may
continue recording for some time
(approximately 30 seconds at most) after you
press the record button to stop recording. Do not
operate your camcorder while the [REC]
indicator is flashing on the LCD screen; wait till
it turns to [STBY].
• After you press the button to stop recording,
your camcorder continues recording till it
completes writing of the minimum unit of data
(0.5 seconds of replay time).
1 Press the MENU button C.
2 Select (CAMERA/PAINT)
t
[SLOW & QUICK] t [S&Q
MOTION] t [REC FORMAT]/
[FRAME RATE] with the SEL/SET
dial D.
[REC FORMAT]: You can select the
recording format from the following.
When [60i] is selected:
XAVC QFHD
2160/30p 100Mbps
2160/30p 60Mbps
XAVC HD
1080/60p 50Mbps
1080/60p 35Mbps
1080/30p 50Mbps
1080/30p 35Mbps
1080/24p 50Mbps
1080/24p 35Mbps
AVCHD
1080/60p PS, 1080/30p FX,
1080/30p FH, 1080/24p FX,
1080/24p FH
When [50i] is selected:
XAVC QFHD
2160/25p 100Mbps
2160/25p 60Mbps
XAVC HD
1080/50p 50Mbps
1080/50p 35Mbps
1080/25p 50Mbps
1080/25p 35Mbps
Slow & Quick Motion recording
Continued ,

64
AVCHD
1080/50p PS, 1080/25p FX,
1080/25p FH
[FRAME RATE]: You can select the
recording frame rate from the following.
When [60i] is selected:
1fps, 2fps, 4fps, 8fps, 15fps, 30fps,
60fps*
When [50i] is selected:
1fps, 2fps, 3fps, 6fps, 12fps, 25fps,
50fps*
* 60fps and 50fps cannot be selected for
QFHD.
• See page 64 for the relationship
between [FRAME RATE] and [REC
FORMAT].
3 Select [EXECUTE].
The Slow & Quick Motion recording
screen appears.
4 Press the START/STOP button A
to start recording.
To stop recording
Press the START/STOP button.
To change the frame rate setting
During standby, press and hold the S&Q
button B, then change the value with the
SEL/SET dial D.
To cancel the setting, press and hold the
S&Q button again.
To cancel the setting
Press the S&Q button B or the MENU
button C during standby.
Playback speed based on the setting
between [FRAME RATE] and [REC
FORMAT] during Slow & Quick Motion
The playback speeds based on the recording
format and frame rate setting are as follows.
XAVC HD/AVCHD
When [60i] is selected
When [50i] is selected
FRAME
RATE
REC FORMAT
1080/24p 1080/30p 1080/60p
60 40% slow 50% slow 100%
(standard)
30 80% slow 100%
(standard)
200%
quick
15 160%
quick
200%
quick
400%
quick
8 300%
quick
375%
quick
750%
quick
4 600%
quick
750%
quick
1500%
quick
2 1200%
quick
1500%
quick
3000%
quick
1 2400%
quick
3000%
quick
6000%
quick
FRAME
RATE
REC FORMAT
1080/25p 1080/50p
50 50% slow 100%
(standard)
25 100%
(standard)
200% quick
12 208% quick 417% quick
6 417% quick 833% quick
3 833% quick 1667% quick
2 1250% quick 2500% quick
1 2500% quick 5000% quick
Slow & Quick Motion/Super Slow Motion recording (continued)

65
Recording
XAVC QFHD
When [60i] is selected
When [50i] is selected
b Notes
• The maximum continuous recording time is
approximately 6 hours for XAVC and
approximately 13 hours for AVCHD.
• The [FRAME RATE] setting cannot be changed
while recording. To change the setting, first stop
recording.
• The time code is recorded in [REC RUN] mode
(p. 162).
• The Slow & Quick Motion is canceled
automatically when the ON/STANDBY switch
is set to STANDBY (1), but the [FRAME
RATE] setting is retained.
• You cannot record sound.
• For details about other limitations, see
“Function limitations when recording” (p. 180).
z Tip
• You can assign this function to an ASSIGN
button (p. 85).
By recording with a frame rate much higher
than the playback frame rate, you can
record images to be played back as super
slow motion images. Images recorded with
the Super Slow Motion function will appear
smoother than slow playback of images
recorded at normal speed.
b Notes
• The supported memory cards vary depending on
the file format (p. 38).
• When recording with the Super Slow Motion
recording function, your camcorder may
continue recording for some time
(approximately 6 minutes at most) after you
press the record button to stop recording. Do not
operate your camcorder while the [REC]
indicator is flashing on the LCD screen, and
wait till it turns to [STBY].
• After you press the button to stop recording,
your camcorder continues recording till it
completes writing of the minimum unit of data
(0.5 seconds of replay time).
• Super Slow Motion recording is not supported
in XAVC QFHD.
• The shutter value may not be displayed
correctly when recording in Super Slow Motion
if [SHUTTER DISPLAY] is set to [DEGREE]
(p. 160).
1 Press the MENU button C.
2 Select (CAMERA/PAINT)
t
[SLOW & QUICK] t [SUPER
SLOW MOTION] t [FRAME
RATE]/[REC FORMAT]/[REC
TIMING] with the SEL/SET dial D
[FRAME RATE]: You can select the
recording frame rate from the following.
When [60i] is selected:
120 fps, 240 fps, 480 fps, 960 fps
When [50i] is selected:
100 fps, 200 fps, 400 fps, 800 fps
FRAME
RATE
REC FORMAT
2160/24p 2160/30p
30 80% slow 100%
(standard)
15 160% quick 200% quick
8 300% quick 375% quick
4 600% quick 750% quick
2 1200% quick 1500% quick
1 2400% quick 3000% quick
FRAME
RATE
REC FORMAT
2160/25p
25 100% (standard)
12 208% quick
6 417% quick
3 833% quick
2 1250% quick
1 2500% quick
Recording in Super Slow Motion
Continued ,

66
[REC FORMAT]: You can select the
recording format from the following.
When [60i] is selected:
XAVC HD
1080/60p 50Mbps
1080/60p 35Mbps
1080/30p 50Mbps
1080/30p 35Mbps
1080/24p 50Mbps
1080/24p 35Mbps
AVCHD
1080/60p PS, 1080/30p FX,
1080/30p FH, 1080/24p FX,
1080/24p FH
When [50i] is selected:
XAVC HD
1080/50p 50Mbps
1080/50p 35Mbps
1080/25p 50Mbps
1080/25p 35Mbps
AVCHD
1080/50p PS, 1080/25p FX,
1080/25p FH
[REC TIMING]: You can select the
timing to start recording when pressing
the record button.
• See page 67 for the relationship
between [FRAME RATE] and [REC
FORMAT].
• See page 67 for variations in recording
times based on [REC TIMING].
3 Select [EXECUTE].
The Super Slow Motion recording
screen appears.
4 Press the START/STOP button A
to start recording.
To decide the recording time
manually
If [REC TIMING] is set to [START
TRIGGER], you can stop recording at any
time by pressing the START/STOP button.
To change the frame rate setting
During standby, press and hold the S&Q
button B, then change the value of the
frame rate with the SEL/SET dial D.
To cancel the setting, press and hold the
S&Q button again.
If you missed a scene you wished to
record
To stop recording, select [Cancel] on the
recording screen.
Recording stops, but the content recorded
up to that point is saved. The file is
displayed on the thumbnail screen.
To cancel the setting
Press the S&Q button B or the MENU
button C during standby.
Record button
START TRIGGER
END TRIGGER
END TRIGGER
HALF
Time axis
Slow & Quick Motion/Super Slow Motion recording (continued)

67
Recording
Playback speed based on the setting
between [FRAME RATE] and [REC
FORMAT] during Super Slow Motion
The playback speed based on the recording
format and frame rate settings is as follows.
When [60i] is selected
When [50i] is selected
Recording time based on the setting
between [REC TIMING] and [FRAME
RATE]
The approximate recording time based on
the recording timing and frame rate settings
is as follows.
When [60i] is selected
When [50i] is selected
b Notes
• Available only when full auto mode is off. Note
that iris, gain and shutter speed are fixed to
manual.
• When [960] ([800]) is selected in [FRAME
RATE], the image to be displayed and recorded
is approximately half the field angle.
• When [480], [960] ([400], [800]) is selected in
[FRAME RATE], the image quality is
deteriorated compared with the image with
normal recording.
• If you adjust the gain or shutter speed, or change
the white balance, the image on the LCD screen
changes. However, the camera setting at the
time the recording ends is reflected in the
recorded image.
• To change the frame rate setting, first stop
recording.
• The time code is recorded in [REC RUN] mode
(p. 162).
• The Super Slow Motion is canceled
automatically when the ON/STANDBY switch
is set to STANDBY (1), but the [FRAME
RATE] setting is retained.
• Flicker adjustment is not available.
• You cannot record sound.
• You cannot select a shutter speed value slower
than the frame rate.
• You cannot use the WB SET button.
• Data code (time and camera data) is not
recorded during AVCHD Super Slow Motion
recording.
• For details about other limitations, see
“Function limitations when recording” (p. 180).
z Tip
• You can assign this function to an ASSIGN
button (p. 85).
FRAME
RATE
REC FORMAT
1080/24p 1080/30p 1080/60p
960 2.5%
slow
3.125%
slow
6.25%
slow
480 5% slow 6.25%
slow
12.5%
slow
240 10% slow 12.5%
slow
25% slow
120 20% slow 25% slow 50% slow
FRAME
RATE
REC FORMAT
1080/25p 1080/50p
800 3.125% slow 6.25% slow
400 6.25% slow 12.5% slow
200 12.5% slow 25% slow
100 25% slow 50% slow
FRAME
RATE
REC TIMING
START
TRIGGER
END
TRIGGER
END
TRIGGER
HALF
960 19 sec 19 sec 9 sec
480 10 sec 10 sec 5 sec
240 8 sec 8 sec 4 sec
120 16 sec 16 sec 8 sec
FRAME
RATE
REC TIMING
START
TRIGGER
END
TRIGGER
END
TRIGGER
HALF
800 23 sec 23 sec 11 sec
400 12 sec 12 sec 6 sec
200 9 sec 9 sec 5 sec
100 19 sec 19 sec 10 sec
Produktspecifikationer
| Varumärke: | Sony |
| Kategori: | Kamera |
| Modell: | PXW-FS5M2 |
Behöver du hjälp?
Om du behöver hjälp med Sony PXW-FS5M2 ställ en fråga nedan och andra användare kommer att svara dig
Kamera Sony Manualer

25 Februari 2025
27 Januari 2025
19 September 2024
18 September 2024
15 September 2024
15 September 2024
15 September 2024
11 September 2024
11 September 2024
10 September 2024
Kamera Manualer
- Kamera Samsung
- Kamera Casio
- Kamera HP
- Kamera Philips
- Kamera Panasonic
- Kamera Epson
- Kamera Medion
- Kamera Nikon
- Kamera Olympus
- Kamera VTech
- Kamera Canon
- Kamera Acer
- Kamera Agfaphoto
- Kamera Agfa
- Kamera Alpine
- Kamera Anker
- Kamera Argus
- Kamera Hikvision
- Kamera GE
- Kamera BenQ
- Kamera Lexibook
- Kamera Leica
- Kamera Silvercrest
- Kamera Hitachi
- Kamera Nedis
- Kamera Gembird
- Kamera Lenco
- Kamera GoPro
- Kamera Pyle
- Kamera SereneLife
- Kamera Kodak
- Kamera Bushnell
- Kamera Blaupunkt
- Kamera TP Link
- Kamera Logitech
- Kamera Lenovo
- Kamera Ezviz
- Kamera Polaroid
- Kamera Trust
- Kamera Avaya
- Kamera Easypix
- Kamera Denver
- Kamera Optoma
- Kamera Sanyo
- Kamera Imou
- Kamera Fujifilm
- Kamera Maginon
- Kamera Konica Minolta
- Kamera Emerson
- Kamera Vemer
- Kamera AVerMedia
- Kamera Celestron
- Kamera Eufy
- Kamera Lumens
- Kamera Yashica
- Kamera Flir
- Kamera Dahua Technology
- Kamera Daitsu
- Kamera Rollei
- Kamera Arlo
- Kamera Netgear
- Kamera Nest
- Kamera Sigma
- Kamera Ricoh
- Kamera Cobra
- Kamera Bresser
- Kamera Reolink
- Kamera Ansco
- Kamera Sygonix
- Kamera UniView
- Kamera Powerfix
- Kamera Intel
- Kamera Mamiya
- Kamera Pentax
- Kamera Konig
- Kamera Trevi
- Kamera Foscam
- Kamera Zenit
- Kamera Viewsonic
- Kamera Fuji
- Kamera Technaxx
- Kamera D-Link
- Kamera Swann
- Kamera Fluke
- Kamera Azden
- Kamera Kyocera
- Kamera Minox
- Kamera Minolta
- Kamera Lorex
- Kamera Marshall Electronics
- Kamera Creative
- Kamera Ring
- Kamera Vivitar
- Kamera SJCAM
- Kamera Zorki
- Kamera Laserliner
- Kamera EverFocus
- Kamera RunCam
- Kamera Scosche
- Kamera SeaLife
- Kamera Burris
- Kamera FIMI
- Kamera SPC
- Kamera Meade
- Kamera Contax
- Kamera ARRI
- Kamera Traveler
- Kamera Levenhuk
- Kamera Exakta
- Kamera Digital Watchdog
- Kamera Elmo
- Kamera Oregon Scientific
- Kamera ZeissIkon
- Kamera Silvergear
- Kamera Dorr
- Kamera Spypoint
- Kamera HOLGA
- Kamera Praktica
- Kamera Hasselblad
- Kamera Moto Mods (Motorola)
- Kamera Fantasea Line
- Kamera Vimar
- Kamera Kogan
- Kamera Getac
- Kamera Speco Technologies
- Kamera Brinno
- Kamera Z CAM
- Kamera General
- Kamera Ergoguys
- Kamera Strex
- Kamera General Electric
- Kamera Berger & Schröter
- Kamera Prixton
- Kamera AViPAS
- Kamera Leitz Focomat IIc
- Kamera Syrp
- Kamera Cosina
- Kamera Hanwha
- Kamera Videology
- Kamera InfiRay
- Kamera Pelco
- Kamera Joy-it
- Kamera Videotec
- Kamera Cambo
- Kamera Kobian
- Kamera Kyocera Yashica
- Kamera Red Digital Cinema
- Kamera Alfatron
- Kamera Bauhn
- Kamera Konica
- Kamera Akaso
- Kamera BZBGear
- Kamera Seek Thermal
- Kamera Aida
- Kamera Ikegami
- Kamera MuxLab
- Kamera Ikelite
- Kamera Adeunis
- Kamera Hoppstar
- Kamera IOptron
- Kamera Moultrie
- Kamera PatrolEyes
- Kamera Camouflage
- Kamera HuddleCamHD
- Kamera AquaTech
- Kamera PTZ Optics
- Kamera Aplic
- Kamera Linhof
- Kamera GoXtreme
- Kamera KanDao
- Kamera Aquapix
- Kamera Kraken Sports
- Kamera Voigtlander
Nyaste Kamera Manualer

9 April 2025
9 April 2025

3 April 2025
3 April 2025
1 April 2025
29 Mars 2025
29 Mars 2025
27 Mars 2025
27 Mars 2025
27 Mars 2025