Sunstech uSUN250 Bruksanvisning
Sunstech
Smartphone
uSUN250
Läs nedan 📖 manual på svenska för Sunstech uSUN250 (226 sidor) i kategorin Smartphone. Denna guide var användbar för 13 personer och betygsatt med 4.5 stjärnor i genomsnitt av 2 användare
Sida 1/226

User Manual
uSUN250


1
Contents
1 . A KPPEARANCE AND EYPAD OPERATIONS ................................................. 2
2. SING ISKU MEMORY CARD AS U D ........................................................... 2
3.WIFI ................................................................................................... 4
4. BLUETOOTH ......................................................................................... 5
5.MAIL ................................................................................................... 7
6.D IALLING ............................................................................................. 8
7. MESSAGING .......................................................................................12
8. CONTACTS .........................................................................................15
9. INTERNET EXPLORER ............................................................................18
10. RECORDER .......................................................................................19
11. CLOCK ..............................................................................................19
12.CACULATOR ......................................................................................20
13.CAMERA ...........................................................................................21
14. IMAGES ............................................................................................23
15. MUSIC .............................................................................................26
16. CALENDAR .......................................................................................27
17.FM RADIO ........................................................................................29
18.SETTINGS ..........................................................................................29
19. NOTICES FOR THE USE OF PHONE .........................................................34

2
1 . Appearance and Keypad Operations
Keys Functions
home
z Press this button to return home from any
application or interface.
z Press it to open recently opened applications
window.
menu
z Press it to start the menu,which allows you to
perform actions in the current interface or options’
menu.
back
z Press it to return to the previous interface,or to
close dialog box 、options’ menu、notification panel
or the keypad.
power
z Press it to open the phone’s menu,then you
could choose to lock the screen、turn off the phone,
or put it to the silent mode.
up
z Press it to increase the volume
z Press it to put the phone in vibration mode from
silent mode.
down z Press it to decrease the volume.
P-Serson z Cover it, and then the phone’s backlight will turn
off
front
camera
z Entering the camera interface, switched to the
front camera can take a photo of yourself.
2. Using Memory Card as U Disk
If you want to send music, pictures or other files to the phone’s
memory card from the computer,you should set memory card as u
disk first.
Set memory card as u disk
1) Connect the phone to the computer with USB cable. The
notification icon will appear in the status box.
2) Use USB mobile transmission line will connected to the
computer
3) In the notification panel, touch USB is connected ,then touch
“ ”Open the USB Storage Device

8
press the menu button to delete it.
Notices:many functions depend on Gmail Account,for example:
Electronic Market、Google Talk、Sync Contact and Calendar.
5.2 Email
• Load Email.
a. Open network connection,
b. In setting the account interface, input the correct email address
and password and click next mobile phone automatically complete
the sending and receiving server Settings. Pop-up mail find
frequency, and user Settings interface, complete Settings, click next.
c. For account creation name, enter the email user name, and click
next. Complete set, synchronize mailbox.
• Create and send Email
When creating mails, select mails > create mails. Enter the
address(recipient)、theme and contents. Press MENU you could
‘append’、‘Add Cc/Bcc’, select send or discarded or save as draft.
• Check the Email files
Click on the bottom folder options, list all folder options
6.Dialling
When the icon of internet server appears in the screen, you could
dial or receive callings. The signal bar on the top right corner show
the strength of network signal (the maximum with 4 signal bars) .

9
• Start dialing
Open application’s main menu>dial. You could choose SIM1 or SIM2
to do the dialing.
Dialling
At the dialing Keboard ,enter the phone number,and then click
the dialing key , after that,you should choose one SIM card or
internet call. If needed to call the extension,you could click the “dial
pad” in the bottom of the screen to open the interface or press
menu key to select “delay 2 seconds”,and then enter the number of
the extension.
The dialup keyboard input number, click Menu can IP dial-up or
speed dial
• Video call: video call usually refers to the Internet and mobile
Internet based on (3 G Internet) end, through the phone between
the speech of the real-time transmission and image (user of bust,
photographs, items, etc.) of a way to communicate. Only 3 G to
support this function. Input a number click video dial-up, each other
answers the phone after both can through camera for video calls.
• Telephone calls in the call log
Every telephone number called and received in“ 、SIM1 SIM2”will be
reserved in phone’s menu of call log. On the top left of every call
record will show“SIM1 or SIM2”
All numbers in the call log can be dialed by clicking the button ”dial”
on the right side of the screen.
When number list appearing, ;click it to catch details press it for

10
long you could dial via “SIM1 or SIM 2”,meanwhile you can edit,
delete, save the number or do other operations.
• Receive callings
When calling comes(top left will show from which SIM card)press
“ ”Answer and slide towards right until the middle button, then you
can receive callings.
• Proximity sensor
According to the distance between phone and human body,it will
adjust automatically the switch of the backlight.
During the call, close the phone to the ear, the backlight will turn off
automatically,which could save batteries and prevent inadvertently
touching.
• Refuse to answer the phone
a. When standby, calling comes, “ ”press refuse button and slide
towards left side until the middle button, then you could refuse the
calling.
b. When using,calling comes,click on the “refuse”button to refuse
the calling.
• Two-way call/multiparty call(conference call)
• Notices:this function needs that SIM card open multiparty call
features.
1) Already exist a call in the phone
2) Click“Add calls”,dial another call( ,or receive another call phone
default open ”call waiting”(settings–dialing settings–other dialing
settings), ,after both connected could view the status of calling.

11
3)select“ ”combine call – you can combine two calls into one way.
4)after multiparty call connected ,you could separate the calls or
hang up one of them via“the small arrow of conference call”.
• Telephone recording
During the call,more>start record,you could record the dialog of
the call.
1)settings>set other functions of the call in the dialing settings,for
example:Call Transfer– after all the settings finished and turned on,
you could transfer the call to a certain number.
2)In settings>dialing settings >other dialing settings,open “call
waiting”.After turned on,you can receive another call when your
already on the line,The answering and rejecting functions are just
like ordinary phones
• Call settings
Voice Call
1)Voice Mail:The voice mailbox in setting in the input voicemail
number.
2) IP prefix number:Setting the different of SIM cards IP prefix
numbers
3)Call forwarding:Can set respectively 2 a SIM card, the line is busy,
and no one has to receive, not be connect four connecting way
3) Call barring: Can set respectively two to the SIM card call
restrictions
4) Additional Settings:a.My phone number b.Call waitting。

12
Video Call
1)Local video replacement:Set a picture to display when camera off
use.
2) Display peer video:Display picture for replacing peer video when
it is unavailable.
3)Peer video replacement:Set a picture to display when peer video
unavailable.
4)Enable back camera:Available to switch cameras if turn on.
5) Bigger Peer video:Turn on to make peer video bigger than local
video.
6)Auto drop back:Drop back to voice call connecting automatically
7)Outgoing video call:Display local video when make a video call.
8) Incoming video call:Display local video when accept an incoming
video call.
9) Other settings: a. Call forwarding b.Call barring c.Additional
settings
Internet call
1) Account
2) Use Internet calling
Other Settings
1) Fixed Dialing Numbers
2) Minute Reminder:Turn on minute reminder at 50s of every
minute.
3) Quick Response:Can edit the text messages rejected by the
information when content.
7. Messaging
• To Send SMS.
1) Press home>messaging,touch“new messages”.
2) In the interface of “edit”:
a. Click “ ”recipient box to start input method,you can also click
“ ” ,enter box to start input method in that way you can enter
characters.
b. Click “send from SiM1 or SIM2”to send.
• To Send MMS.
When creating message,it was defaulted as SMS,it will be turned to
MMS when following operations were done. You can send MMS via
clicking “send” af ter editing.
1) In the interface of “edit”,Click the button of “Menu”:
2) Click “append”,you can send the following attachments,then
it will be turned to MMS automatically.

13
• Send messages to multiple numbers
Enter multiple numbers in the box of entering,each number is
separate with a comma.
Click on the right side of the head with the receiver plus icon, can
choose contact group in the address book
Notices:
a, If you want send MMS with
many pages, you should
select “append PPT” in the
“append” interface.
b, You can append 10
pictures, with the form of GIF,
JPEG.
c, Click “adding themes”, the
box of “theme” will appear
under the box of “recipient”,
meanwhile it is turned to
MMS automatically.

14
• Notices:For now this phone can send messages , you can only
enter 312 characters in the box “ ”recipient .
When a message is sent or sent again,a small yellow letter will
appear. The number 1 or 2 on the letter refers to SIM1 or SIM2.
When message sending fails,a red triangle with an exclamation
point will appear.
When editing information other functions of Menu button
15
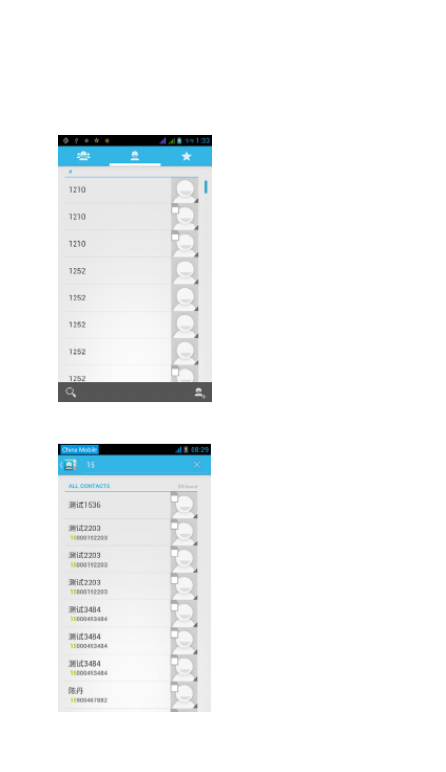
8. Contacts
• Open the menu of applications>contacts
Default display phone contacts and SIM card contacts, sort contacts
by the first letter of the alphabet.
2)Click Search Icons,You can enter the contact search interface.
a.To enter the Numbers or letters and the list of names of the
phonebook, which will be shown in the search results.
16
b.If the search didn’t fine the contact, the interface will say contact
not found.
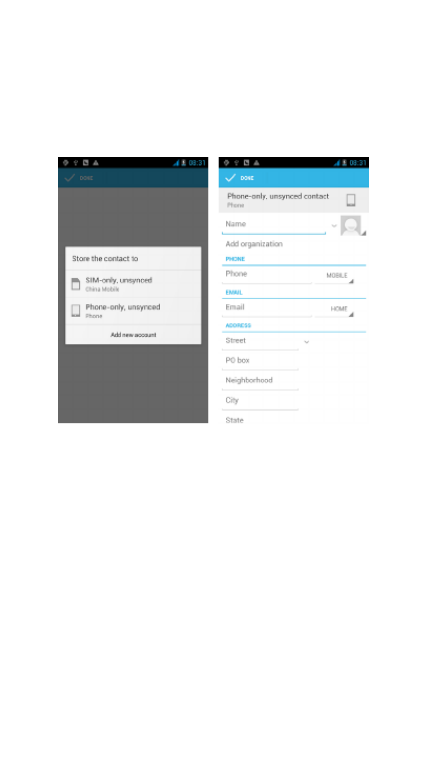
3)Click“Add Contact” Icons,Can create New Contacts
Select save contacts to phone or a SIM card, enter in the contact
editing interface.
You can edit contact head, name, telephone number, group, save to
and more, and then click "finish".
4)In contact interface, click on the Menu button
a. Menu >Delete contacts
Can “All” Icons checked, click the delete button, delete all the
contacts, including cell phone and SIM card of contact.
Can separate check one or more contacts, click delete to select the
contact you want to delete .
b. Menu> To display a contact
You can choose all contacts, SIM card of contacts or mobile phone
contacts
c. Choose the option also on the SIM card and cell phone whether
or not to show all contacts.
d. Menu >Import/export
In the mobile phone you can choose, SIM card or SD card three
parties to find contact information and import or export contacts.
First choose the "copy source" and then select the next step,
selecting copy contact to, can complete the contact's copy.
e. Menu >Accounts
Account and synchronization set routine synchronization Settings.
f. Menu >Share visible contacts
All contacts can be imported into the SD card, or through bluetooth,

17
email, text message or MMS.
• Open the application interface >Contact ,change to the
group.
1)Click“Add group” to create a new group .
2)In "the group name" column input group name, in "type in the
contact's name" column input contact key word, the phone will
search all contacts and you can add a contact to the group. Finally

18
click "finish".
3) In a group, click on the Menu button, Menu functions
a. Menu>Update
You can modify the group name, delete or add group of contacts
b. Menu >Delete
You can delete the group but, you will not delete the contact from
the phone.
c. Menu >Sending a group message .
Select the group and it will be added to the recipient bar.
d. Menu >Send Email by group
If contact of a group have the same email address, the automatic
new mail, and E-mail address will be in the address bar add to the
receiver
9. Internet Explorer
Internet explorer
1)In the interface of internet explorer,touch address filed and enter
the URL.
2)Use keypad to enter URL. The appropriate web sites will appear on
the screen. You can touch it directly go to the page or continue to
enter URL.
• Homepage
Select “homepage”,you can load in the set homepage. If you do
not set it, you will use the vendor’s preset homepage.
• Functions of menu
1) Menu>Backward
After browsing through multiple pages, the browser will return to
the previous page before the current page.
2) Menu>Forward
After browsing through multiple pages, will move to a web page
after the current page.
3) Menu>Windows
You can view all open windows to the current.
4) Menu>Bookmarks
a. Click the “Bookmarks”to make the current URL as a bookmark
saved.
b. Click the bookmark under the bookmarks list,will open the URL.
5) Menu>More
a. Add bookmarks,save the current URL as bookmark.
b. Find on page,search what you need in current page.
c. Select text,in the text, click and drag to select a piece of text.
d. Page info,display page address and other information of the
current browsing.
e. Share page,select the Bluetooth or SMS to share the current
page.
f. Downloads,show all the content downloaded.

19
g. History, Show your browsing history, and view the most visited
pages of information.
h. Setting, contains a variety of browser settings.
10. Recorder
Recorder can record voice, and send it quickly via Bluetooth or MMS
as well as make it as ring tone.
• Notices:recorder can only save the audio files as AMR format.
1) Click the recorder application.
2) Keep the phone’s microphone near the voice source.
3) Click recorder to record voices ,and click to stop or Recordinglist.
All recordings save in my recording folder in the default music
program.
11.Clock
1) Open the menu of application, click
2) Click screen except the alarm at any position, screens, black, time
with white shows, this time the standby time to screen will not turn
off the screen. Click the screen again to restore normal clock
interface.
3) Click screen set alarm button and enter the alarm clock mode

20
• Alarm
After setting the alarm when the time you have entered arrives you
will be alerted by ringing or vibrating to activate this function. Press
Menu to add alarm,you can also add it from the adding interface.
You could set the alarm according to your needs. In the interface of
alarm will show three alarms which are not set.
Edit
You can edit the current alarm,edit time、ringing tones、vibration、
repeat form and tabs.
12.Caculator
calculator
This function can convert your phone into a calculator, it can do
simple calculations.
·In the calculator interface , press MENU or hold down the screen to
the left, then the advanced panel appears.
21
13.Camera
13.1 camera
• Prior preparation
Install memory card before using the camera or video camera. All
your photos or videos taken by the phone are stored in memory
card.
• Open camera
Press home, touch menu, select camera. To take a photo.
1) Find the object you would like to take a photo of by looking at
the screen.
2)Touch the “shutter” button on the screen.
3)After taking the photo will be saved to the camera’s galley folder.
4)You can view the photos by touching the preview box button.
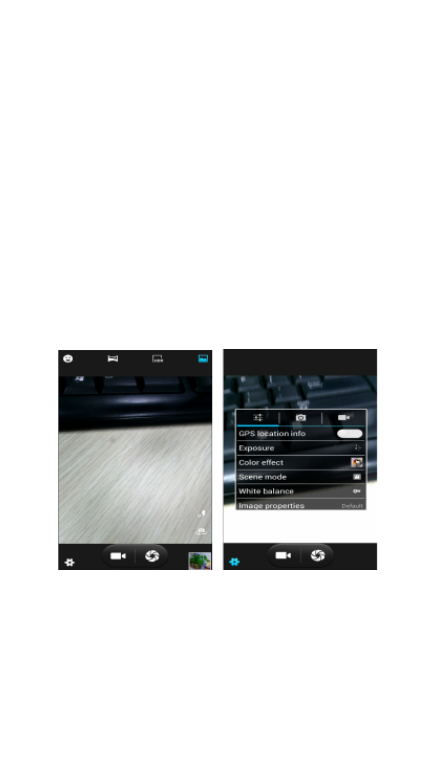
5)Camera settings
Touch “setting Menu” in the interface of the camera to adjust the
settings
Under camera viewfinder mode, press Menu,you can switch to
video or photo gallery.
On the top right of the cameras viewfinder mode you can see a
preview of the previous picture. Touch preview box, the photo
display on full screen and you can enlarge it to view details.
• Shared Settings of Camera and Video camera
1 off. )Flash mode:Auto、On、
2)White balance:Auto、Incandescent、Daylight、Fluorescent、
Cloudy、Twilight、Shade、Warm fluorescent.
3)Color effect:None、Mono、Sepia、Negative、Aqua、Blackboard、
22
Whiteboard.
4)Scene mode,Auto、Night、Sunset、Party 、Portrait、Landscape、
Night portrait、Theatre、Beach、Snow、Steady Photo、Fireworks、
Sport、Candle light.
5)Other settings:store location ,exposure,image properties,
anti-flicker
• Camera Settings
1) Capture mode:normal、HDR、Face beauty、Panorama
2) Self timer: ,off 2 seconds ,10 seconds
3) Continuous shot:40 shots ,90 shots
4) Picture size:QVGA,VGA,1M pixels,1.3M pixels,2M pixels,
3M pixels,5M pixels
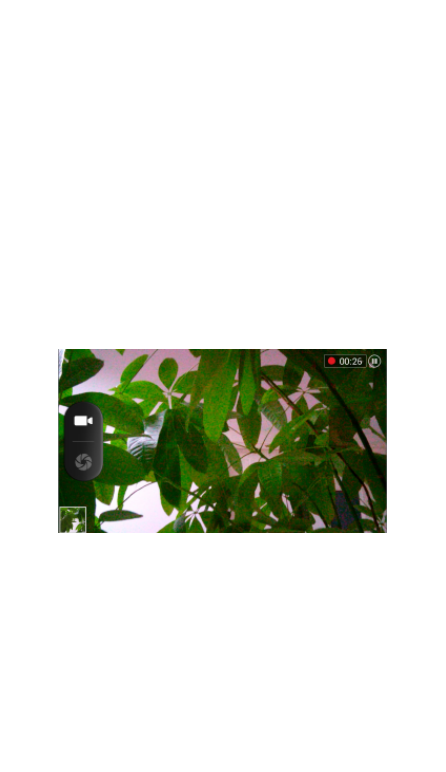
13.2 Video camera
• Prior preparation
Install memory card before using the camera or video camera. All
your photos or videos taken by the phone are stored in the memory
card.
• Take video
1 Aim the screen at what you would like to capture. )
2)Touch the “shutter” button on the screen.
3)After recording ,videos will saved to the camera’s galley folder .
4)You can view the videos by touching the preview box button.
5) Video camera settings
Touch “set” in the camera interface to edit video camera settings
Under camera viewfinder mode, press Menu,you can switch to
video or photos’ gallery.
On the top right of camera viewfinder mode, display the preview of
the previous video. Touch preview box, the video will display in full
screen and you can touch the play button to view it.

23
• Shared Settings of Camera and Video camera
1 off. )Flash mode:Auto、On、
2)White balance:Auto、Incandescent、Daylight、Fluorescent、
Cloudy、Twilight、Shade、Warm fluorescent.
3)Color effect:None、Mono、Sepia、Negative、Aqua、Blackboard、
Whiteboard.
4)Scene mode,Auto、Night、Sunset、Party 、Portrait、Landscape、
Night portrait、Theatre、Beach、Snow、Steady Photo、Fireworks、
Sport、Candle light.
• Videos settings
1 off)Microphone: ,on
2)audio mode:meeting,normal
3)time lapse interval : , , , , , , ,off 1s 1.5s 2s 2.5s 3s 5s 10s
4)video quality:low,medium,high,fine
14. Images
• Open images
Press home,touch label of applications,then touch photo gallery.
In the camera interface ,Press menu to open the menu.
1) Files Interface
a. In the library the interface, upper right a slide show the play
button, click on the way to the slide circulation play all image files.
b. Click on the images, enter the picture to see interface.
c. Choose a long press image files, pop-up corresponding
operation.

24
2) Use images
After taking pictures, you can view them and share them with your
friends.
a. Use E-mail to send pictures :choose Gmail or E-mail,
pictures will be automatically added to an E-mail. Write your
information, click send.
b. Use Messaging to send pictures:Select the information, pictures
will be additional to the MMS. Write your information, click
send.
C. Use Bluetooth:Bluetooth list, select already pairing of bluetooth
equipment, you can through Bluetooth send a picture.
4)Check pictures
In the photo view interface, you can drag or can forward to view the
photos
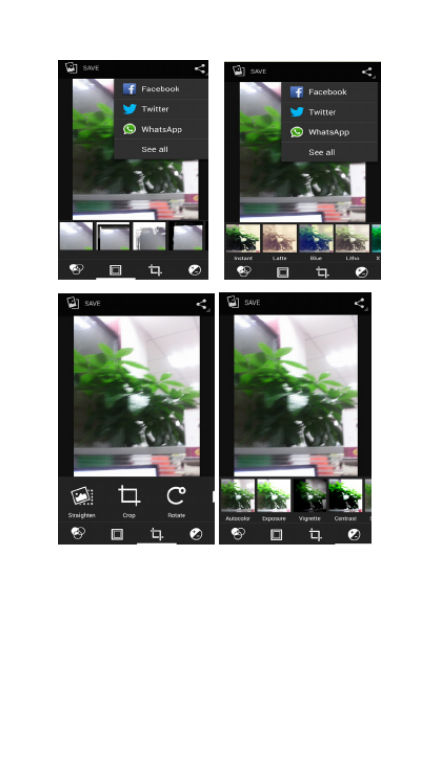
5) Edit picture.
a. Edit light:Fill Light Highlights Shadows Auto-Fix.
b. Edit image effects :Cross-process, Posterize Lomo
Documentary and so on.
c. Color Effects:Warmth Saturation B &W Sepia Negative Tint
Duo-tone Doodle.
d. Crop: Crop Red Eye Straighten Rotate Flip Sharpen.
25
6)Crop pictures:
a. If you want to adjust the size of the clip, please hold the edge of
the cutting tools. The arrow appears clip, can adjust its size.
b. If you want to adjust in the clip that keep proportion, please hold
down any of the four corners of the one.
c. If you want move to the clip of the picture area , please hold
cutting and then move to drag in to the position.
• View images
1) In the picture interface, touch the photo album to view the
images.
2) Touch the thumbnail to view pictures on full screen.

26
You can choose to display small or large thumbnails. Hold down the
screen towards the left side to view the next photo or towards right
to view the previous one.
In the photo album , press and hold down the picture towards left
to view the next picture, or towards right to view the previous one.
15. Music
The phone can play the digital audio files in memory card.: AMR 、
M4A
、MIDI
、MP3、WAV
、OGG.
• Open Music
Press home icon and search the app music . Then the interface of
Music Media appears.
• Music Media
Your music files are classified according to the following four
categories :Artists, albums, songs and play lists. Touch one of these
categories; you can view the list inside.
Continue the operations, until your wanted music appears. Such as,
if you choose Artists a list of artists sorted by the numbers will
appear. Choose any on to open the list,then all the albums and
songs will appear. Select one album, then the songs in it will be
played.

27
• Tips: You can play all of the songs in the interface of music
media, in random sequence . Press Menu, and then touch the
Party Shuffle. Then will start playing the first song randomly
selected . To close the Party Shuffle, press Menu, then touch to turn
off the Party Shuffle.
16. Calendar
Enter in the app calendar.
Load Googles accounts, enter the application, In the interface of
month or week , your will use gray to highlight the day. Display
default the date on the current month.
In the interface,press menu,4 display modes will appear:

28
1) Schedule Interface shows a certain schedule(click on the initial
time and view forward,click the final time to view backwards )
2) Day Interface displays a day's schedule (last clicked date),
slide around to turn page according day.
3) Week Interface displays a week's schedule (last clicked
date), slide around to turn page according week.
4) Today Interface displays a day's schedule , In the interface of
month or week use gray to highlight the day.
5) Month interface displays a month's schedule (last clicked date)
Slide around to turn page according month.
• New activities
1) Press menu, more < touch new activities.
2) Enter the name of activity in the activities’ box.
Notices:Such as special occasions such as birthday or a day with
events, set the all-day option to Yes. If the activity is at a certain time
period, select the start time and end time.
3)Enter the event location, description, guests, repeat, remind time.
4) Click finish to return to calendar.

29
17.FM Radio
FM Radio
Through this app, you may listen to FM radio on the device, to use
the FM radio is necessary connect a wired headset this also serves as
an antenna to have a better reception, before opening this
program ,you can install the original equipment-headphones,
when listening, you can switch it manually to speakers or the
mode with wired headphones.
• Open FM radio
Touch this app to open the application of FM
radio.
1) Click on the "search", automatic scanning search FM channel,
and channel in list interface, list all channels
2) Click "FM recording", when you listening to the radio can be
recorded. The recording name is to default and can be arbitrary.
3) Click "exit" to turn off the FM radio .
4) Must be insert a headphones to a better reception, select a
speaker and you can listening the radio through of the speaker.
5) Click in the five-pointed star icon to add the channel as favorite.
• Listen to FM radio background
Click to return to key, the radio program moved to the background,
right now you can still continue to listen to the show, and can also
carry out any other program.
18.Settings

30
Your service provider may can default some device settings, so you
is not possible be able to change these settings.
• SIM management
1) Touch it to choose or to disable the SIM card, the card is grey
when disabled.
2) The default SIM card ,you can choose Voice call,Video
call,Messaging,Data connection.
• Wireless and internet
Flight mode Touch to open or close.
When you turn On the flight mode the Wi-Fi function will close
automatically;turn off the flight mode then connect Wi-Fi,it can be
used normally.
1) Wi-Fi and Wi-Fi settings Touch Wi-Fi to
activate . Open Wi-Fi ,it can search for available
networks automatically,networks without password can be used
directly, others need to enter the password first.
• Bluetooth
Bluetooth switch turn ON will automatically and search nearby the
other device with bluetooth.
• Data usage
1. Data usage set up mobile data traffic limit, flow more than limit
will be close mobile data services.
2. More
Wireless & networks
a. Airplane mode
b. VPN
c. Tethering&portable hotspot
d. Mobile networks
e. GPRS transfer mode
• Audion profiles
This option gives the phone tones’ settings under the status of
receiving calls or notification. Including :Vibration, volume, ring
tones, ring tones notification and feedback (Button operation tone,
select Sound, screen lock tone, touch )
.To adapt every environment.
1) Select “ ,Standard / Mute / Conference / Outdoor Touch the spot
on the right, when turns green ,it opens.
2)Volume:Including the ring volume and alarm clock settings, you
can manually slide to select.
31
• Displays
a. Brightness Adjust the brightness b. Auto rotating screen
Rotate phone to change direction
c. Animation Choose to display animations d. Screen Timeout
Adjust the delay before the screen automatically locks
• Storage
a. Can view the SD card and cell phone memory usage.
b. Can Unmount SD card or Erase SD card.
c. Can choose the default memory.
• Battery
Boot time, the use in each module to use power in general
• Applications
1) Unknown sources allow to install non-electronic market
applications
2) Manage applications manage and delete the installed
applications.
3) Running services touch any of the services listed in> pop up 'to
stop the service? 'two-button operation box, touch the 'Stop 'the
service is stopped, and disappear from the "running services" list.
4)Storage use you can view the all program downloaded on Sd card
or running or how many memory space they occupy
5)Battery use you can see the power situation.
6) Development . USB debug :USB debug only apply in the develop
process. This function allows copy data in computer and mobile
devices.
• Location access
1) Use wireless Use wireless to find locations in the application
( )Google map .
Touch it to open or close
2) When using the GPS satellite positioning, set accuracy to street
level(cancel it to save battery).
Touch it to open or close
3) GPS EPO assistance,use GPS assistance data(EPO)to speed uo
GPS poditioning
4) A-GPS Use auxiliary data can accelerate the process of GPS
positioning.
Open it and remind you“it produce GPRS flows when using A—
GPS”.
• Security
1) Set up screen locks Use images、PIN or password to lock the

32
screen.
a. Touch “images ”, the first time there will be a simple unlock
instructions and examples, click “next step ” to continue the step
“make the unlocking image ”。
b. Touch PIN Enter PIN numbers to unlock the screen.
c. Touch password Set password to unlock the screen.
d. Touch “no” Stop this application.
2) Set up SIM card lock Enter( )4-8numbers PIN to set the lock
of SIM.
SIM card PIN (Personal Identification Number) is to prevent
unauthorized use of SIM cards.PIN code provided with SIM. The
service provider gives the initial value.
Change a blocked PIN code, you need to open the "SIM Lock ", then
go to Change Password screen, the phone will automatically
prompt enter the old PIN code and asked to enter a new PIN code
twice,finally the phone will prompt that change the code
successfully. If you enter the PIN with error for three times, SIM card
PIN codes will be automatically locked, PUK codes is usually
supplied with SIM card. If no, you should go to the service provider
for the codes.
If you enter 10 times wrong PUK code, the SIM card will be
permanently locked.
3) Password visible Password visible when enter it
4) Select device administration Add or delete device manager.
5) Use security credentials Allow application visit security
credentials or other credentials.
6) Install from SD card Install the encrypted certificate from SD
card.
7) set password Set or change Certificate store password
8) clear storage Clear all the contents of the certificate store
and reset their passwords.
• Languages and keyboard
1) Selecting Language Country Include many languages on the
phone .
2) Custom Dictionary Add words to custom dictionary or
delete.
3) Keyboard Settings Vibrating when buttons are pressed,
Playing sound when
buttons are pressed, Capitalizing automatically, Speech Input(by
microphone on the
keyboard), Inputting words(speech can be altered by sliding finger
on space key), Displaying
tips(activate predictive function when you input words);
Auto-Text(Automatically input certain
words when press space key or specified keys)
4) Input method you can select Android keyboard or google
input method.

33
• Backup & reset
1) Backup I data will application data, WLAN password and other
Settings backup to Google's servers
2) Resetting to Factory Settings, Clear all data stored on the phone.
• Add account
a. Corporate
b. Email
c. Google
• Date and Time
1) Automation Use date and time provided by Network.
2) Setting Date Touch “+” and ”-” to set date.
3) Selecting Time Zone Select Time Zone according to where
you are.
4) Setting Time Touch “+” and ”-” to set time.
5) Use 24 Hour Time Format ON/OFF
6) Select Date Format There are 3 kinds of formats you can
choose from: Month-Day-Year, Day-Month-Year and Year-Month-Day,
among which Year-Month-Day is the default setting.
• Schedule power on/off
You can set time of boot or shutdown by touching it. You may also
select to repeat it or a certain day during a week.
• Accessibility
1) Large text
2) Power button ends call: According to the "power" button to end
the call to open, call, press the "power" will end the call and not shut
down the screen
3) Auto-rotate screen
4) Speak passwords
5) Touch & hold delay
6) Install web scripts
7) Quick boot
• Developer options
a. USB Debugging: USB debugging only for development and USB
disk.
b. Stay awake :Screen will never sleep while charging.
c. Allow mock locations
d. Desktop backup password
e. Strict mode enabled
f. Pointer location
g. Show touches
h. Show screen updates

34
i. Show CPU usage
j. Force GPU rendering
k. Window animation scale:
l. Transition animation scale
m. Don’t keep activities
n. Background process limit
o. Show all APRs
• About phone
You can check the information on status bar and remaining power.
19. Notices for the use of phone
Your phone is a product of superior design and craftsmanship and
should be treated with care. The following suggestions can help you
comply with the terms of repair kits, to extend the life of mobile
phone.
1) Place the mobile phone and their parts and components out of
reach of small children.
1) Keep the phone dry, rain, humidity and all types of liquids which
contain minerals will corrode electronic circuits.
2) Don’t touch the phone with wet hands when charging, it will
cause electric shock or damage the phone.
3) Avoid place the device in high temperature environment.
Temperatures will shorten the life of electronic devices, damage
batteries, and warp or melt certain plastics.
4) Avoid place the device in too low temperature environment.
When the temperature rises, the phone will produce water vapor
that may damage electronic circuit.
5) Avoid place the phone in dusty, dirty places, otherwise parts may
be damaged.
6) To avoid the phone in a lit cigarette, near open flame or any heat
source.
7) Do not open the device, non-professional approach will do
damage to the phone.
8) Do not throw it from height, knock or shake the phone, rough
handling can damage internal circuit boards.
9) Do not paint the phone, because the paint will block
headphones, microphones or other removable parts, and lead it not
work.
10) Use clean, soft, dry cloth to clean the camera, light sensor
lenses. Prohibit the use of harmful chemicals and cleaning agents,
cleaning fluids to clean the phone
11) If mobile phone, battery, charger, or mobile phone
accessories are defective, send to the nearest qualified service
center for inspection.
12) I f is necessary, Service Centre staff will assist you and will
arrange for phone repairs.

35
-Recovery mode uSUN250
How to enter in Recovery Mode.
Please, follow these steps.
1-To enter in the recovery mode first you should power off the
device,
Then first press the “ON-OFF” key for one second and then press
“VOL +” Key at the same time, until the appears the Android doll.
After appears another Android doll.
1-Push the “Power” and appears the Internal menu.

36
2-Push “VOL –“ key and select “wipe data / factory reset” then
press “VOL +” .
3- Select “ Yes delete all user data ” with the “VOL–“ Key and then
press
“VOL +” to select.
Android-appeared.
4- When it finishes select “reboot system now” press the “VOL
+ "button and the unit will re-start itself. (this process may last for a
few minutes)

37
How to download the software using the unit.
IMPORTANT: When you download the software, all data will be
deleted as photos, videos and Apps that you have been
installed.
Do not interrupt this process please make sure the battery is fully
charged.
Please, follow these steps.
1- Open browser and search and open this link:
www.sunstech.es/download/
2- Select the model of the tablet that you have and download the
software.(This software is installed In the INTERNAL SD).
3- When it finished the download, select the App " Wireless update
" in your unit.
4-Select the software and wait until the process is finished.
Made in China

38
EUROPEAN WARRANTY
1. General
This warranty is granted without prejudice and in addition to the
recognized rights for the consumer vis-à-vis the seller provided in
the Royal Legislative Decree of 16 November, approving the
restated text of the General Law for the Protection of Consumers
and Users and other complementary legislation. Therefore, the
recognized legal rights for the consumer are not limited or excluded
according to the relevant Regional, National or European legislation.
This warranty shall be valid in all the European Union Member
States with the limitations that legally correspond in the country in
which they are intended to be implemented in accordance with
their implementing legislation.
Notwithstanding the foregoing, SUNSTECH shall respect the rights
and limitations related to the product warranty that legally
correspond in each of the States listed in the Attachment in
accordance with their implementing legislation for any product
provided that it is intended for the EU market and has been
purchased or used by the consumer or user within the EEA.
2. Legal Warranty
This SUSTECH product has a two (2) year warranty counting from
the date of delivery and/or purchase. During the above timeframe,
SUNSTECH shall be held responsible for any lack of conformity of
the product in relation to the contract in accordance with the
provisions of the Law for the Protection of Consumers and Users,
that shall entitle the consumer to request the repair or replacement
of the product, unless one of these options is objectively impossible
or disproportionate.
Accordingly, the remedy (i.e. the repair or replacement) shall be
deemed to be disproportionate if it imposes unreasonable costs on
the seller. In order to determine this, the following shall be
considered: (i) the value of the product if there were no lack of
conformity; (ii) the relevance of the lack of conformity; and (iii) if the
other form of remedy could be carried out without major
inconvenience to the consumer and user.
To determine whether the costs are unreasonable, the costs
incurred by one form of remedy must be significantly higher than
the costs corresponding to the other form of remedy.
In addition, the consumer may choose between requesting a
reduction in the price or terminating the contract, if he is not
entitled to demand the repair or replacement of the product and
whenever these actions would not be completed within a
reasonable timeframe and would cause more inconvenience to the
consumer and user. However, the termination shall not take place
where the lack of conformity is minor.

39
Both the repair and the replacement of the product as result of the
product’s lack of conformity shall be free of charge for the consumer
and user, including labour and materials.
In any case, repairs under warranty shall be carried out by
SUNSTECH’s Official Technical Assistance Service or its authorized
distributors.
3. Conditions for the warranty to be exercised
To exercise the legal and commercial warranty, it is necessary to
submit documentary evidence showing the delivery and/or
purchase date of the product, whether the invoice, receipt, delivery
slip or sealed and dated warranty card. Documents which have been
tampered with or falsified will not be accepted.
The consumer shall contact SUNSTECH’s Customer Service Team
using the website (under the support section) and will be informed
about what action to take. At that time, the consumer shall have to
provide a clear description of the malfunction or the lack of
conformity of the product with the contract.
In any case, repairs under the warranty shall be carried out by
SUNSTECH’s Official Technical Assistance Services or its authorized
distributors so that SUNSTECH can be held responsible under the
legal and/or commercial warranty.
4. Exceptions
The warranty does not foresee or include periodic maintenance or
product installation revisions.
In addition, the product will not be considered as lacking
conformity in relation to the contract and therefore, it will not be
covered by the legal or commercial warranty when:
• The lack of conformity corresponds to a discrepancy with the
safety standards or the local or national techniques of a different
country to the one it was originally designed and produced in;
• This product or any of its identification features (number of series,
etc.) have been partially or completely opened, assembled,
unassembled, handled and/or repaired by a person not part of
SUNSTECH’s Official Technical Assistance Services team or its
authorized distributors
• The lack of conformity is a result of an incorrect installation
(except if the installation has been carried out by one of SUNSTECH’s
authorized sellers or under its responsibility, or by the consumer
following SUNSTECH’s installation instructions) or an abusive or
inadequate use of the product, including but not limited to, a usage
that is not in accordance to the normal purpose of the product or
the directions for use and maintenance, as defined by SUNSTECH;

40
• The lack of conformity has been caused by a computer virus, an
action or a manipulation of passwords, software installation,
manipulation or reinstallation, etc.;
• The lack of conformity is due to the use of accessories, chargers
or consumables that are not SUNSTECH originals and therefore are
not designed for that product;
• The lack of conformity is due to the use of any third party
software or application that modifies, changes or adapts the
software that was approved and/or included by SUNSTECH in the
product;
• The lack of conformity is a result of downloading or using third
party multimedia services and/or contents available or accessible
through the product;
• Damages in or through the battery, which are due to it being
overcharged, are produced;
• Any of the box seals or battery cells have been damaged, or
there is clear evidence that shows these were handled; and/or
• The product damages are caused by any unforeseeable or force
majeur circumstances, especially, lightning, water, fire, applying
incorrect voltage or any other cause that is not due to the product
manufacturing or design.
Under no circumstances will SUNSTECH be held responsible for the
loss of any data stored in the product. The consumer will be held
responsible for any back-up copies and the protection of any data
from loss, damage or destruction.
None of the warranties included here cover the replacement of
parts, due to ware or rupture of mechanisms, rubber, boxes and/or
plastic, as well as any aesthetic damage resulting from the normal
use of the product, for example, if the screen loses its shine with the
use of the product. In the same way, the warranties do not cover any
type of damage produced during the transportation of the product
(including but not limited to aesthetic damage, blows, lines,
scratches, stains, dents, etc.) in which case the applicable provisions
under SUNSTECH’s general contract conditions will apply.
For further information go to www.sunstech.es
You can also contact:
AFEX SUNS, S.A.
Pallars, 189-191
08005 BARCELONA

98
No está permitido reproducir, distribuir, traducir o transmitir
ninguna parte de esta guía de ningún modo o por ningún medio, p100-ya
sea electrónico o mecánico, incluyendo fotocopias, grabaciones o
almacenamiento en cualquier sistema de almacenamiento y
recuperación de información, sin el permiso previo por escrito de
Afex Suns, S. A.
Información sobre seguridad
Esta sección contiene información sobre seguridad para
dispositivos móviles. Algunos de los contenidos podrían no
aplicarse a su dispositivo. A fin de evitar lesiones a usted mismo
y a otras personas o daños al dispositivo, lea la información
sobre seguridad del dispositivo antes de utilizarlo.
Advertencia
En caso de no cumplir con estas normas y advertencias de
seguridad, el usuario podría sufrir lesiones graves o muerte.
No utilice cables de alimentación o conectores dañados ni
enchufes sueltos
Las conexiones inseguras pueden provocar una descarga eléctrica o
incendio
No toque el cable de alimentación con las manos mojadas ni tire
del cable para desconectar el cargador
Si lo hace, podría resultar electrocutado.
No doble ni dañe el cable de alimentación
Si lo hace, podría provocar una descarga eléctrica
No cause un cortocircuito en el cargador ni en el dispositivo
Si lo hace, podría provocar una descarga eléctrica, o el dispositivo
podría no funcionar correctamente.
Use baterías, cargadores, accesorios y suministros aprobados
por el fabricante
• El uso de baterías o cargadores genéricos puede acortar la vida
útil del dispositivo o provocar el funcionamiento incorrecto.
También puede provocar un incendio o la explosión de la batería.
• Use sólo baterías y cargadores aprobados por SUNSTECH,
específicamente diseñados para el dispositivo. Las baterías y
cargadores no compatibles pueden causarle lesiones físicas graves o
dañar el dispositivo.
• SUNSTECH no se hace responsable de la seguridad del usuario
en casos en que se utilicen accesorios o suministros que no estén
aprobados por la marca.
No golpee ni deje caer el cargador o el dispositivo
Manipule y deseche el dispositivo y el cargador con precaución
• Nunca arroje la batería o el dispositivo al fuego. No coloque
nunca la batería o el dispositivo sobre aparatos de calor, como
hornos, microondas, estufas o radiadores. Si se sobrecalienta, el

99
dispositivo podría explotar. Siga todas las normas locales para
desechar la batería o el dispositivo usados.
• Nunca aplaste ni perfore el dispositivo
• Evite exponer el dispositivo a presiones externas altas, p101-ya que
puede producirse un cortocircuito interno y sobrecalentamiento.
Proteja el dispositivo, la batería y el cargador para evitar que se
dañen
• Evite exponer el dispositivo y la batería a temperaturas muy altas
o muy bajas.
• Las temperaturas extremas pueden dañar el dispositivo y reducir
la capacidad de carga y la duración del dispositivo y la batería.
• Evite que la batería entre en contacto con objetos metálicos, p101-ya
que esto puede crear una conexión entre los terminales positivo y
negativo de la batería y dañarla de forma permanente o temporal.
• Nunca utilice cargadores ni baterías dañados.
No guarde el dispositivo en calefactores, microondas,
equipamientos de cocina caliente ni contenedores de alta
presión, ni cerca de ellos.
• La batería puede presentar fugas
• El dispositivo puede sobrecalentarse y producir un incendio.
No utilice ni guarde el dispositivo en zonas con altas
concentraciones de polvo o materiales transportados por el aire
El polvo o los materiales extraños pueden provocar el mal
funcionamiento del dispositivo y pueden resultar en un incendio o
una descarga eléctrica.
Información sobre seguridad
No muerda ni chupe el dispositivo ni la batería
• Esto puede dañar el dispositivo o causar una explosión o un
incendio
• Los niños o animales pueden ahogarse con las piezas pequeñas
• Cuando sean niños los que utilicen el dispositivo, asegúrese de
que lo hagan correctamente.
No introduzca el dispositivo o los accesorios suministrados en
sus ojos, oídos o boca
Si lo hace podría ahogarse o sufrir lesiones serias.
No manipule baterías de iones de litio dañadas o que presenten
fugas
Para desechar la batería de iones de litio de la manera más segura,
comuníquese con el centro de servicio autorizado más próximo.
Precaución
En caso de no cumplir con estas normas y advertencias de
precaución, el usuario podría sufrir lesiones o provocar daños
materiales
No utilice el dispositivo cerca de otros dispositivos electrónicos

100
• La mayoría de los dispositivos electrónicos utilizan señales de
radiofrecuencia. El dispositivo puede interferir con otros dispositivos
electrónicos.
• Si utiliza una conexión de datos LTE, podría provocar la
interferencia con otros dispositivos, tales como equipos de audio y
teléfonos.
No utilice el dispositivo en un hospital, en un avión o en
automóvil que pudiese sufrir interferencias causadas por
radiofrecuencia.
• Si es posible, evite usar el dispositivo a una distancia inferior a 15
cm de un marcapasos, p102-ya que el dispositivo puede interferir con él.
• Para minimizar la posible interferencia con un marcapasos, utilice
el dispositivo sólo del lado opuesto del cuerpo respecto de la
posición del marcapasos.
• Si utiliza equipos médicos, comuníquese con el fabricante de los
equipos antes de utilizar el dispositivo, a fin de determinar si el
equipo se verá afectado por la radiofrecuencia emitida por el
dispositivo.
• Si se utilizan dispositivos electrónicos en un avión, estos pueden
interferir con los instrumentos electrónicos de navegación.
Asegúrese de que el dispositivo se encuentre apagado durante los
procedimientos de despegue y aterrizaje. Después del despegue,
podrá utilizar el dispositivo en modo avión, siempre y cuando se lo
permita el personal del avión.
• Los dispositivos electrónicos de su automóvil pueden funcionar
de forma incorrecta a causa de la interferencia de radio del
dispositivo. Comuníquese con el fabricante para obtener más
información.
No exponga el dispositivo al humo o a emanaciones pesadas
Si lo hace, podría dañar la parte externa del dispositivo o provocar
su mal funcionamiento.
Si utiliza audífonos, comuníquese con el fabricante para
obtener información a cerca de la interferencia de radio
La radiofrecuencia que el dispositivo emite puede interferir con
algunos audífonos. Antes de utilizar el dispositivo, comuníquese con
el fabricante a fin de determinar si el audífono se verá afectado por
la radiofrecuencia emitida por el dispositivo.
No utilice el dispositivo cerca de otros dispositivos o aparatos
que emitan frecuencia de radio, como sistemas de sonido o
torres de radiotransmisión
Las frecuencias de radio pueden provocar el mal funcionamiento
del dispositivo.
Apague el dispositivo en entornos potencialmente explosivos
• En entornos potencialmente explosivos, apague el dispositivo,
en lugar de quitarle la batería.
• Respete siempre las normas, las instrucciones y las señales de

101
aviso en entornos potencialmente explosivos.
• No use el dispositivo en puntos de carga de combustible
(gasolineras) ni cerca de combustibles o químicos o en áreas de
demolición.
• No almacene ni lleve líquidos inflamables, gases o materiales
explosivos en el mismo compartimiento en el que está el dispositivo,
sus piezas o sus accesorios.
Si percibe que el dispositivo o la batería emiten olores o sonidos
raros o si ve humo o líquidos salir del dispositivo o la batería,
interrumpa el uso del dispositivo inmediatamente y llévelo a un
Centro de servicios autorizado.
Si no lo hace, podría provocar un incendio o una explosión.
Cumpla con todas las advertencias y normas de seguridad
relacionadas con el uso de dispositivos móviles, mientras
conduce un vehículo.
Mientras conduce, su responsabilidad principal es controlar el
vehículo de forma segura. Si la ley lo prohíbe, no utilice el
dispositivo móvil mientras conduce. Por su seguridad y la de los
demás, utilice su sentido común y recuerde los siguientes consejos:
• Conozca el dispositivo y sus funciones de practicidad, como la
marcación rápida y la rellamada. Estas funciones le permiten reducir
el tiempo necesario para realizar o recibir llamadas con el
dispositivo móvil.
• Coloque el dispositivo en un lugar de fácil alcance. Asegúrese de
poder tener acceso al dispositivo inalámbrico sin quitar los ojos del
camino. Si recibe una llamada en un momento inapropiado, deje
que el buzón de voz conteste por usted.
• Interrumpa las llamadas en situaciones de tráfico denso o en
condiciones meteorológicas adversas. La lluvia, el aguanieve, la
nieve, el hielo o el tráfico denso pueden ser peligrosos.
• No anote ni busque números de teléfono. Anotar alguna tarea o
mirar la agenda lo distrae de su responsabilidad principal que es
conducir de forma segura.
• Marque prudentemente y evalúe el tráfico. Realice llamadas
cuando no se esté desplazando o antes de incorporarse al tráfico.
Intente programar las llamadas cuando el automóvil se encuentre
estacionado.
• No mantenga conversaciones estresantes ni emotivas que
puedan distraerle. Hágale saber a su interlocutor que está
conduciendo y termine las conversaciones que puedan desviar su
atención del camino.
Uso y mantenimiento correctos del dispositivo móvil
Mantenga el dispositivo seco
• La humedad y los líquidos pueden dañar las partes o los
Produktspecifikationer
| Varumärke: | Sunstech |
| Kategori: | Smartphone |
| Modell: | uSUN250 |
Behöver du hjälp?
Om du behöver hjälp med Sunstech uSUN250 ställ en fråga nedan och andra användare kommer att svara dig
Smartphone Sunstech Manualer

18 September 2024
18 September 2024
18 September 2024
18 September 2024
18 September 2024
18 September 2024
18 September 2024
Smartphone Manualer
- Smartphone Sony
- Smartphone Samsung
- Smartphone Xiaomi
- Smartphone LG
- Smartphone AEG
- Smartphone Huawei
- Smartphone Brondi
- Smartphone HP
- Smartphone Philips
- Smartphone Panasonic
- Smartphone Garmin
- Smartphone Gigaset
- Smartphone Motorola
- Smartphone Medion
- Smartphone Nokia
- Smartphone Toshiba
- Smartphone Wiko
- Smartphone Yarvik
- Smartphone Acer
- Smartphone Aiwa
- Smartphone Alcatel
- Smartphone Alecto
- Smartphone Aligator
- Smartphone Allview
- Smartphone Apple
- Smartphone Amazon
- Smartphone Amplicomms
- Smartphone Amplicom
- Smartphone Archos
- Smartphone Prestigio
- Smartphone Google
- Smartphone Lexibook
- Smartphone Sharp
- Smartphone Telefunken
- Smartphone Silvercrest
- Smartphone Nedis
- Smartphone Thomson
- Smartphone Manta
- Smartphone Asus
- Smartphone OK
- Smartphone Hisense
- Smartphone Hyundai
- Smartphone Sony Ericsson
- Smartphone Micromax
- Smartphone Kodak
- Smartphone Bush
- Smartphone RCA
- Smartphone Sonim
- Smartphone Sencor
- Smartphone Overmax
- Smartphone Blaupunkt
- Smartphone TP Link
- Smartphone Lenovo
- Smartphone Energy Sistem
- Smartphone Polaroid
- Smartphone Doro
- Smartphone Sagem
- Smartphone Lava
- Smartphone Blu
- Smartphone Easypix
- Smartphone Denver
- Smartphone Intex
- Smartphone ZTE
- Smartphone Sanyo
- Smartphone Konrow
- Smartphone Brigmton
- Smartphone TCL
- Smartphone Gigabyte
- Smartphone Mitsubishi
- Smartphone Aspera
- Smartphone Microsoft
- Smartphone Nec
- Smartphone Swissvoice
- Smartphone Sunny
- Smartphone Nordmende
- Smartphone Haier
- Smartphone Krüger And Matz
- Smartphone Binatone
- Smartphone Blackberry
- Smartphone HTC
- Smartphone Vivo
- Smartphone Olympia
- Smartphone Razer
- Smartphone Mio
- Smartphone Wolder
- Smartphone Audioline
- Smartphone NGM
- Smartphone Goclever
- Smartphone Profoon
- Smartphone Vodafone
- Smartphone NGS
- Smartphone Dell
- Smartphone Hammer
- Smartphone Switel
- Smartphone InFocus
- Smartphone GreatCall
- Smartphone XD
- Smartphone Pantech
- Smartphone Honor
- Smartphone RugGear
- Smartphone Umidigi
- Smartphone CAT
- Smartphone Intermec
- Smartphone AT&T
- Smartphone Mpman
- Smartphone Trevi
- Smartphone Tesla
- Smartphone Bury
- Smartphone Logicom
- Smartphone Karbonn
- Smartphone Vivax
- Smartphone Emporia
- Smartphone Hannspree
- Smartphone Phicomm
- Smartphone Nevir
- Smartphone Kyocera
- Smartphone Crosscall
- Smartphone Plum
- Smartphone Infinix
- Smartphone OnePlus
- Smartphone Keneksi
- Smartphone Klipad
- Smartphone Iget
- Smartphone T-Mobile
- Smartphone JCB
- Smartphone CRUX
- Smartphone Geemarc
- Smartphone Unnecto
- Smartphone Wileyfox
- Smartphone ITT
- Smartphone MyPhone
- Smartphone Avus
- Smartphone Wolfgang
- Smartphone Oppo
- Smartphone BQ
- Smartphone ORA
- Smartphone Echo
- Smartphone Primux
- Smartphone Tiptel
- Smartphone UTStarcom
- Smartphone Zipy
- Smartphone Mediacom
- Smartphone Beafon
- Smartphone SPC
- Smartphone Billow
- Smartphone Telstra
- Smartphone Ulefone
- Smartphone ToughGear
- Smartphone Benefon
- Smartphone Doogee
- Smartphone Energizer
- Smartphone Realme
- Smartphone Kurio
- Smartphone Coolpad
- Smartphone TAG Heuer
- Smartphone Mobistel
- Smartphone Itel
- Smartphone Garmin-Asus
- Smartphone Handheld
- Smartphone Fero
- Smartphone AT Telecom
- Smartphone Xtreamer
- Smartphone O2
- Smartphone General Mobile
- Smartphone Mustang
- Smartphone Syco
- Smartphone Kogan
- Smartphone Maxcom
- Smartphone I.safe Mobile
- Smartphone Pharos
- Smartphone Storex
- Smartphone Fairphone
- Smartphone Freeman
- Smartphone HomTom
- Smartphone EVOLVEO
- Smartphone Auro
- Smartphone Maxx
- Smartphone ITTM
- Smartphone Verykool
- Smartphone Cyrus
- Smartphone Posh Mobile
- Smartphone THL
- Smartphone NGM-Mobile
- Smartphone Media-tech
- Smartphone Nothing
- Smartphone Oukitel
- Smartphone Lark
- Smartphone NUU Mobile
- Smartphone Senifone
- Smartphone Tecno
- Smartphone Telme
- Smartphone UMi
- Smartphone Olitech
- Smartphone Mobiola
- Smartphone Meizu
- Smartphone Neffos
- Smartphone Gionee
- Smartphone TIM
- Smartphone Cubot
- Smartphone Leotec
- Smartphone Leagoo
- Smartphone NTech
- Smartphone Majestic
- Smartphone Nubia
- Smartphone LeEco
- Smartphone Best Buy
- Smartphone GSmart
- Smartphone Bea-fon
- Smartphone Opticon
- Smartphone EStar
- Smartphone Saiet
- Smartphone Facom
- Smartphone Bluebird
- Smartphone Jitterbug
- Smartphone Custom
- Smartphone CSL
- Smartphone POCO
- Smartphone Tecdesk
- Smartphone Aplic
- Smartphone HMD
- Smartphone Opis
- Smartphone Volla
- Smartphone Nothing Tech
- Smartphone Maxwest
- Smartphone Krüger&Matz
- Smartphone Kalley
Nyaste Smartphone Manualer
2 April 2025

30 Mars 2025
10 Mars 2025
7 Mars 2025
6 Mars 2025
5 Mars 2025
3 Mars 2025
2 Mars 2025
26 Februari 2025

26 Februari 2025