Oplink CLAL1 AlarmShield Bruksanvisning
Läs nedan 📖 manual på svenska för Oplink CLAL1 AlarmShield (19 sidor) i kategorin Säkerhet. Denna guide var användbar för 10 personer och betygsatt med 4.5 stjärnor i genomsnitt av 2 användare
Sida 1/19

AlarmShield™
Installation Guide
FAQ
Note:
Some devices may not be included in
certain packages. Also, power adapter
images in this guide are for reference
only, please refer to the actual power
adapter plug in the package.
Installation Guide
Guide d'Installation
Installationsanleitung
Guida all'installazione
Guía de instalación
Guia de Instalação
Installatiehandleiding

Installation Guide
(A) OPU (B) OPU Power Adapter
(C) Ethernet Cable
(D) 16GB USB Flash Drive
USB flash drive provides storage
for any add-on Wi-Fi IP Caemras to
record any event-triggered video.
(E) Door/Window Sensor
Spacer & Magnet
Battery
Double-sided Tapes
Spacer
Magnet
Sensor
(F) Motion Sensor
Battery
Double-sided Tapes
(G) Siren with Power Adapter
Mounting Screws
Screw Anchors
Remote Control
Remote control is used
to arm and disarm the
system or to trigger
the emergency alarm
by pressing the Arm
button for 3 seconds.
Internet
Router
(Not included)
(A)
(D)
(C)
(B)
Assemble the OPU station and connect to
a DHCP-enabled router
Assemble the system according to the provided picture.
It is recommended that the OPU be placed on a 3-5ft
(0.91-1.52m) high platform.
Note: Once the OPU is up and running, to establish proper connection
to it, power up the remaining devices within 5 feet of the OPU. When
connection is established and working, the devices can be moved to
their desired locations.
PARTS FOR STEP 3PARTS FOR STEP 5PARTS FOR STEP 6
PARTS FOR STEP 7
Package Contents
Download the Oplink App
Android: Open Google Play Store. Search for "Oplink
Connected" and install the application.
iPhone: Open App Store. Search for "Oplink Connected"
and install the application.
Windows: Open Marketplace. Search for "Oplink
Connected" and install the application.
Set up an account with your smartphone
Launch the "Oplink Connected" application. Follow the
instructions on the application page to activate your
account using your phone number.
Installationsanleitung Step Guide
STEP 1STEP 2STEP 3
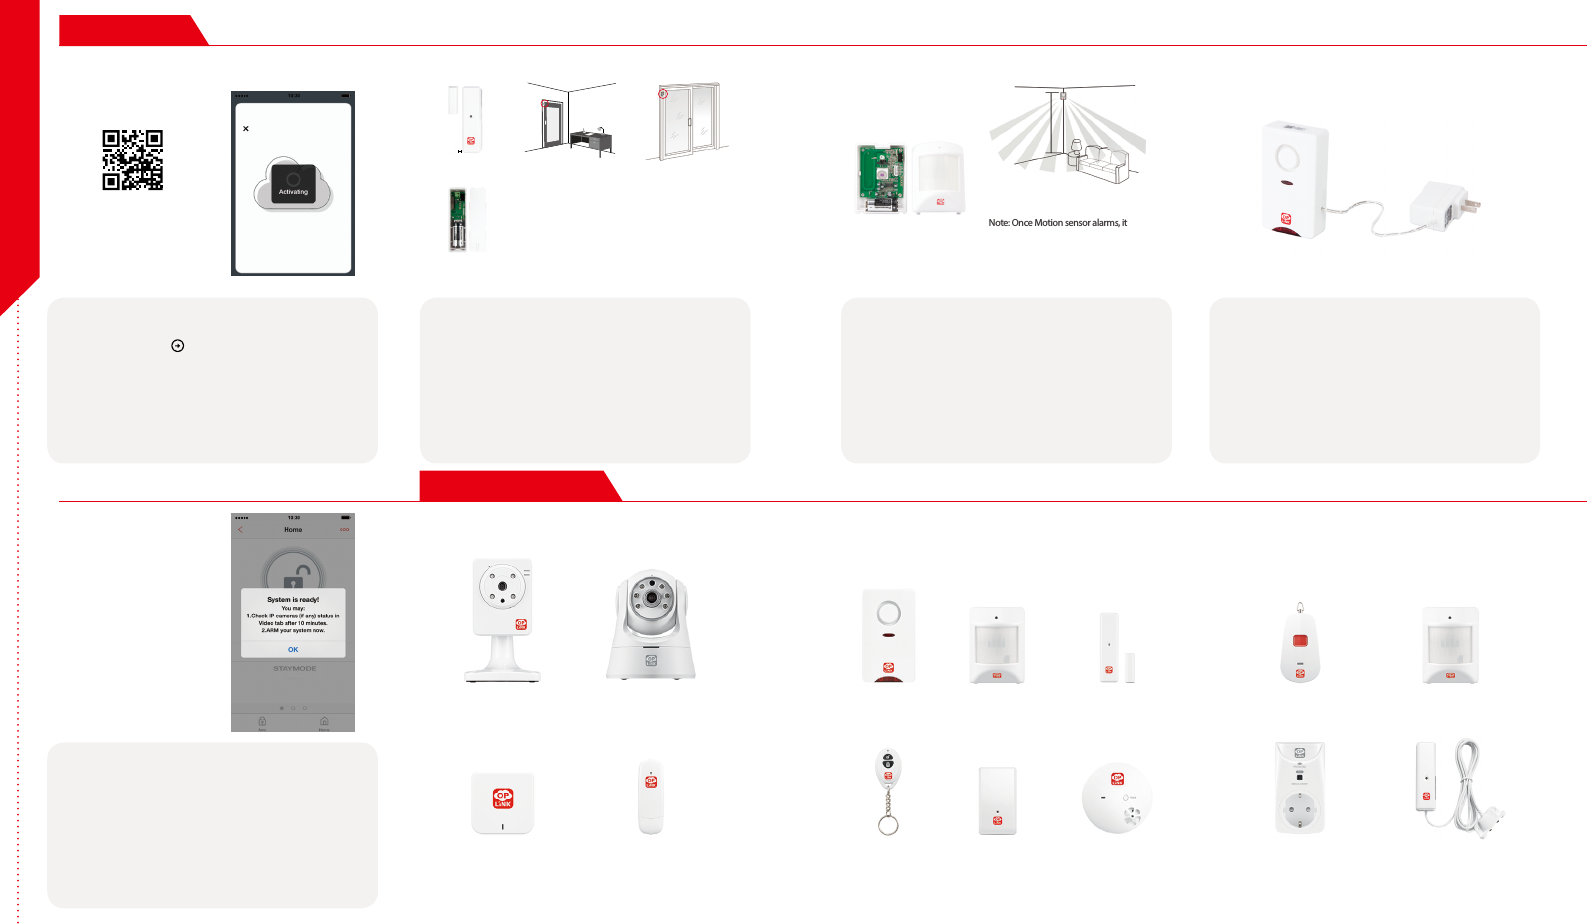
Installation Guide
Note: When the activation process
cannot be completed normally, the
App will ask you to scan the OPU's
QR code, located on the back of the
OPU, to continue.
1/4 de pouce
(0,64 cm)Max
Montez le capteurde porte Montez le capteur de Fenêtre
(G) Installaon des baeries des
capteurs de porte/fenêtre
1/4 de pouce
(0,64 cm)Max
Montez le capteurde porte Montez le capteur de Fenêtre
(G) Installaon des baeries des
capteurs de porte/fenêtre
1/4 de pouce
(0,64 cm)Max
Montez le capteurde porte Montez le capteur de Fenêtre
(G) Installaon des baeries des
capteurs de porte/fenêtre
Note: For the Door/Window Sensor, it does not matter
which piece you place on the frame and which piece
you place on the moving part. To create proper contact,
ensure the tops of the two pieces line up. The Spacer is
used in situations where the smaller piece needs to be
elevated to the larger piece to ensure proper contact.
Note: Once Motion sensor alarms, it will start
to count 3 minutes, and count over again if
any movement detected in this period .The
next alarm will be triggered only when no
movement is detected within 3 minutes.
(H) Installaon des baeries
du capteur de mouvement
Montez le Capteur
de Mouvement
(H) Installaon des baeries
du capteur de mouvement
Montez le Capteur
de Mouvement
Congratulations! You have
successfully installed the
security system!
Wireless RF Repeater Water Leak
Sensor
Sonic & Heat
Sensor
Wi-Fi Repeater Smart PlugGarage Door
Sensor
Wi-Fi Pan & Tilt IP Camera Inactivity
Sensor
Motion Sensor Door/Window
Sensor
Remote Control
Wi-Fi IP Camera Panic ButtonSiren
(G )
Add-on Devices
STEP 4
STEP 8Cameras & Repeaters Security & Safety Devices Care & Automation Devices
STEP 5STEP 6STEP 7
(Sample of QR Code)
1/4 inch Max Mount Door Sensor Mount Window Sensor
(E) Door/Window Sensor
Battery Installation
(F) Motion Sensor Batter y
Installation
Mount Motion Sensor
Less than 7 Feet
Start devices activation on the app
Tap the Next Button to go to the "Activating" screen.
(Activation process takes approximately 2 minutes)
Place the Door/Window Sensor
Each Door/Window Sensor set consists of two pieces. Take
the larger piece and with slight force, push the small tab on
the back plate outward and slide the back plate upward.
Remove the back plate and insert a battery into each Door/
Window Sensor set. Apply the double-sided tape to each
piece. It is recommended that the Door/Window Sensor be
mounted in a vertical/upright position.
Place the Motion Sensor
Lift the top tab to remove the cover and install the battery
into the Motion Sensor. For maximum coverage, the
sensor should be placed in the corner of the room to be
monitored and no more than 7 feet above the ground.
The Motion Sensor is most effective in areas such as
hallways and entry points where possible intruders will
have to pass through.
Power up the Siren
Plug the Siren into an outlet within 5 feet of the OPU to
establish connection. Once connection is established and
working, the Siren can be moved to its desired location.
Your Siren comes with a backup battery pre-installed.
To make use of the backup battery, pull and remove the
clear plastic strip to initiate battery contact.
Activation completed
When you see the "System is ready!" message, your system
is ready for use.
Note: Your IP Camera status will be updated after 10 minutes.
You may expand your system's functions and features with a variety
of Oplink add-on devices.
Step Guide
Produktspecifikationer
| Varumärke: | Oplink |
| Kategori: | Säkerhet |
| Modell: | CLAL1 AlarmShield |
Behöver du hjälp?
Om du behöver hjälp med Oplink CLAL1 AlarmShield ställ en fråga nedan och andra användare kommer att svara dig
Säkerhet Oplink Manualer

10 September 2024
22 Augusti 2024
20 Augusti 2024
18 Augusti 2024
Säkerhet Manualer
- Säkerhet Bosch
- Säkerhet Panasonic
- Säkerhet Honeywell
- Säkerhet Siemens
- Säkerhet Abus
- Säkerhet Alecto
- Säkerhet Alphatronics
- Säkerhet Aritech
- Säkerhet Prestigio
- Säkerhet Airbolt
- Säkerhet Brennenstuhl
- Säkerhet Hikvision
- Säkerhet Nedis
- Säkerhet Yale
- Säkerhet Tevion
- Säkerhet Eminent
- Säkerhet Blaupunkt
- Säkerhet Ezviz
- Säkerhet Trust
- Säkerhet Elro
- Säkerhet Doro
- Säkerhet Axa
- Säkerhet Optex
- Säkerhet Axis
- Säkerhet Theben
- Säkerhet Maginon
- Säkerhet Velleman
- Säkerhet Smartwares
- Säkerhet Easymaxx
- Säkerhet Profile
- Säkerhet Marquant
- Säkerhet Jacob Jensen
- Säkerhet Trebs
- Säkerhet Ednet
- Säkerhet Fenton
- Säkerhet Eufy
- Säkerhet Perel
- Säkerhet Steinel
- Säkerhet Somfy
- Säkerhet Goliath
- Säkerhet Devolo
- Säkerhet Lamax
- Säkerhet Audiovox
- Säkerhet Netgear
- Säkerhet Nest
- Säkerhet Grothe
- Säkerhet LevelOne
- Säkerhet Unitron
- Säkerhet Netatmo
- Säkerhet Goobay
- Säkerhet Switel
- Säkerhet Bticino
- Säkerhet Topcraft
- Säkerhet First Alert
- Säkerhet Sygonix
- Säkerhet Nemef
- Säkerhet Dahua
- Säkerhet Powerfix
- Säkerhet Foscam
- Säkerhet BRK
- Säkerhet Bavaria
- Säkerhet Juwel
- Säkerhet Hagenuk
- Säkerhet Technaxx
- Säkerhet Waeco
- Säkerhet Logicom
- Säkerhet Jupiter Pro
- Säkerhet Xavax
- Säkerhet Marmitek
- Säkerhet Elkron
- Säkerhet Orbis
- Säkerhet Niko
- Säkerhet Gira
- Säkerhet Jung
- Säkerhet Basetech
- Säkerhet Interlogix
- Säkerhet Dnt
- Säkerhet Trendnet
- Säkerhet Fito
- Säkerhet Urmet
- Säkerhet Iget
- Säkerhet Ranex
- Säkerhet Wanscam
- Säkerhet Easy Home
- Säkerhet Geemarc
- Säkerhet Satel
- Säkerhet Dymond
- Säkerhet Notifier
- Säkerhet Friedland
- Säkerhet Plustek
- Säkerhet Golmar
- Säkerhet Grandstream
- Säkerhet Batavia
- Säkerhet Storage Options
- Säkerhet Provision ISR
- Säkerhet NetworX
- Säkerhet Bitron Video
- Säkerhet Eden
- Säkerhet Monacor
- Säkerhet Zmodo
- Säkerhet Elro-Flamingo
- Säkerhet Electronics Line
- Säkerhet One2track
- Säkerhet HUMANTECHNIK
- Säkerhet PIR Alarm
- Säkerhet Heidemann
- Säkerhet Directed Electronics
- Säkerhet BML
- Säkerhet Unitec
- Säkerhet Jablotron
- Säkerhet Muller
- Säkerhet Home8
- Säkerhet AVTech - Velleman
- Säkerhet Galaxy
- Säkerhet Sonic Alert
- Säkerhet I-onik
- Säkerhet Smartalarm
- Säkerhet GE Security
- Säkerhet Microtech
- Säkerhet Nor-tec
- Säkerhet Entrya
- Säkerhet Kopp
- Säkerhet Tegui
- Säkerhet Stobo
- Säkerhet Kompernass
- Säkerhet Iiquu
- Säkerhet Storex
- Säkerhet Powermax
- Säkerhet Woonveilig
- Säkerhet Mikros
- Säkerhet V-Tac
- Säkerhet Bolyguard
- Säkerhet Indexa
- Säkerhet Skytronic
- Säkerhet Paradox
- Säkerhet Flamingo FA15RF
- Säkerhet SecuFirst
- Säkerhet BRK DICON
- Säkerhet FBII
- Säkerhet FlinQ
- Säkerhet Dericam
- Säkerhet Myfox
- Säkerhet Kocom
- Säkerhet RISCO Group
- Säkerhet SmartHome
- Säkerhet Bellman
- Säkerhet Protector
- Säkerhet I-Tel
- Säkerhet Home Protector
- Säkerhet Ksenia
- Säkerhet Mr Safe
- Säkerhet Epine
- Säkerhet Inner Range
- Säkerhet Dedicated Micros
- Säkerhet Visonic
- Säkerhet PROmax
- Säkerhet Y-cam
- Säkerhet Selvag
- Säkerhet Voxx
- Säkerhet Fracarro
- Säkerhet Guardall
- Säkerhet Xena
- Säkerhet Smanos
- Säkerhet One Concept
- Säkerhet QuattSecure
- Säkerhet NetBotz
- Säkerhet Securitas
Nyaste Säkerhet Manualer
19 Februari 2025
12 Januari 2025
7 Januari 2025
7 Januari 2025
24 Oktober 2024
22 Oktober 2024
21 Oktober 2024
20 Oktober 2024
20 Oktober 2024
Axis Camera Station S9001 Mk II Desktop Terminal Bruksanvisning
19 Oktober 2024